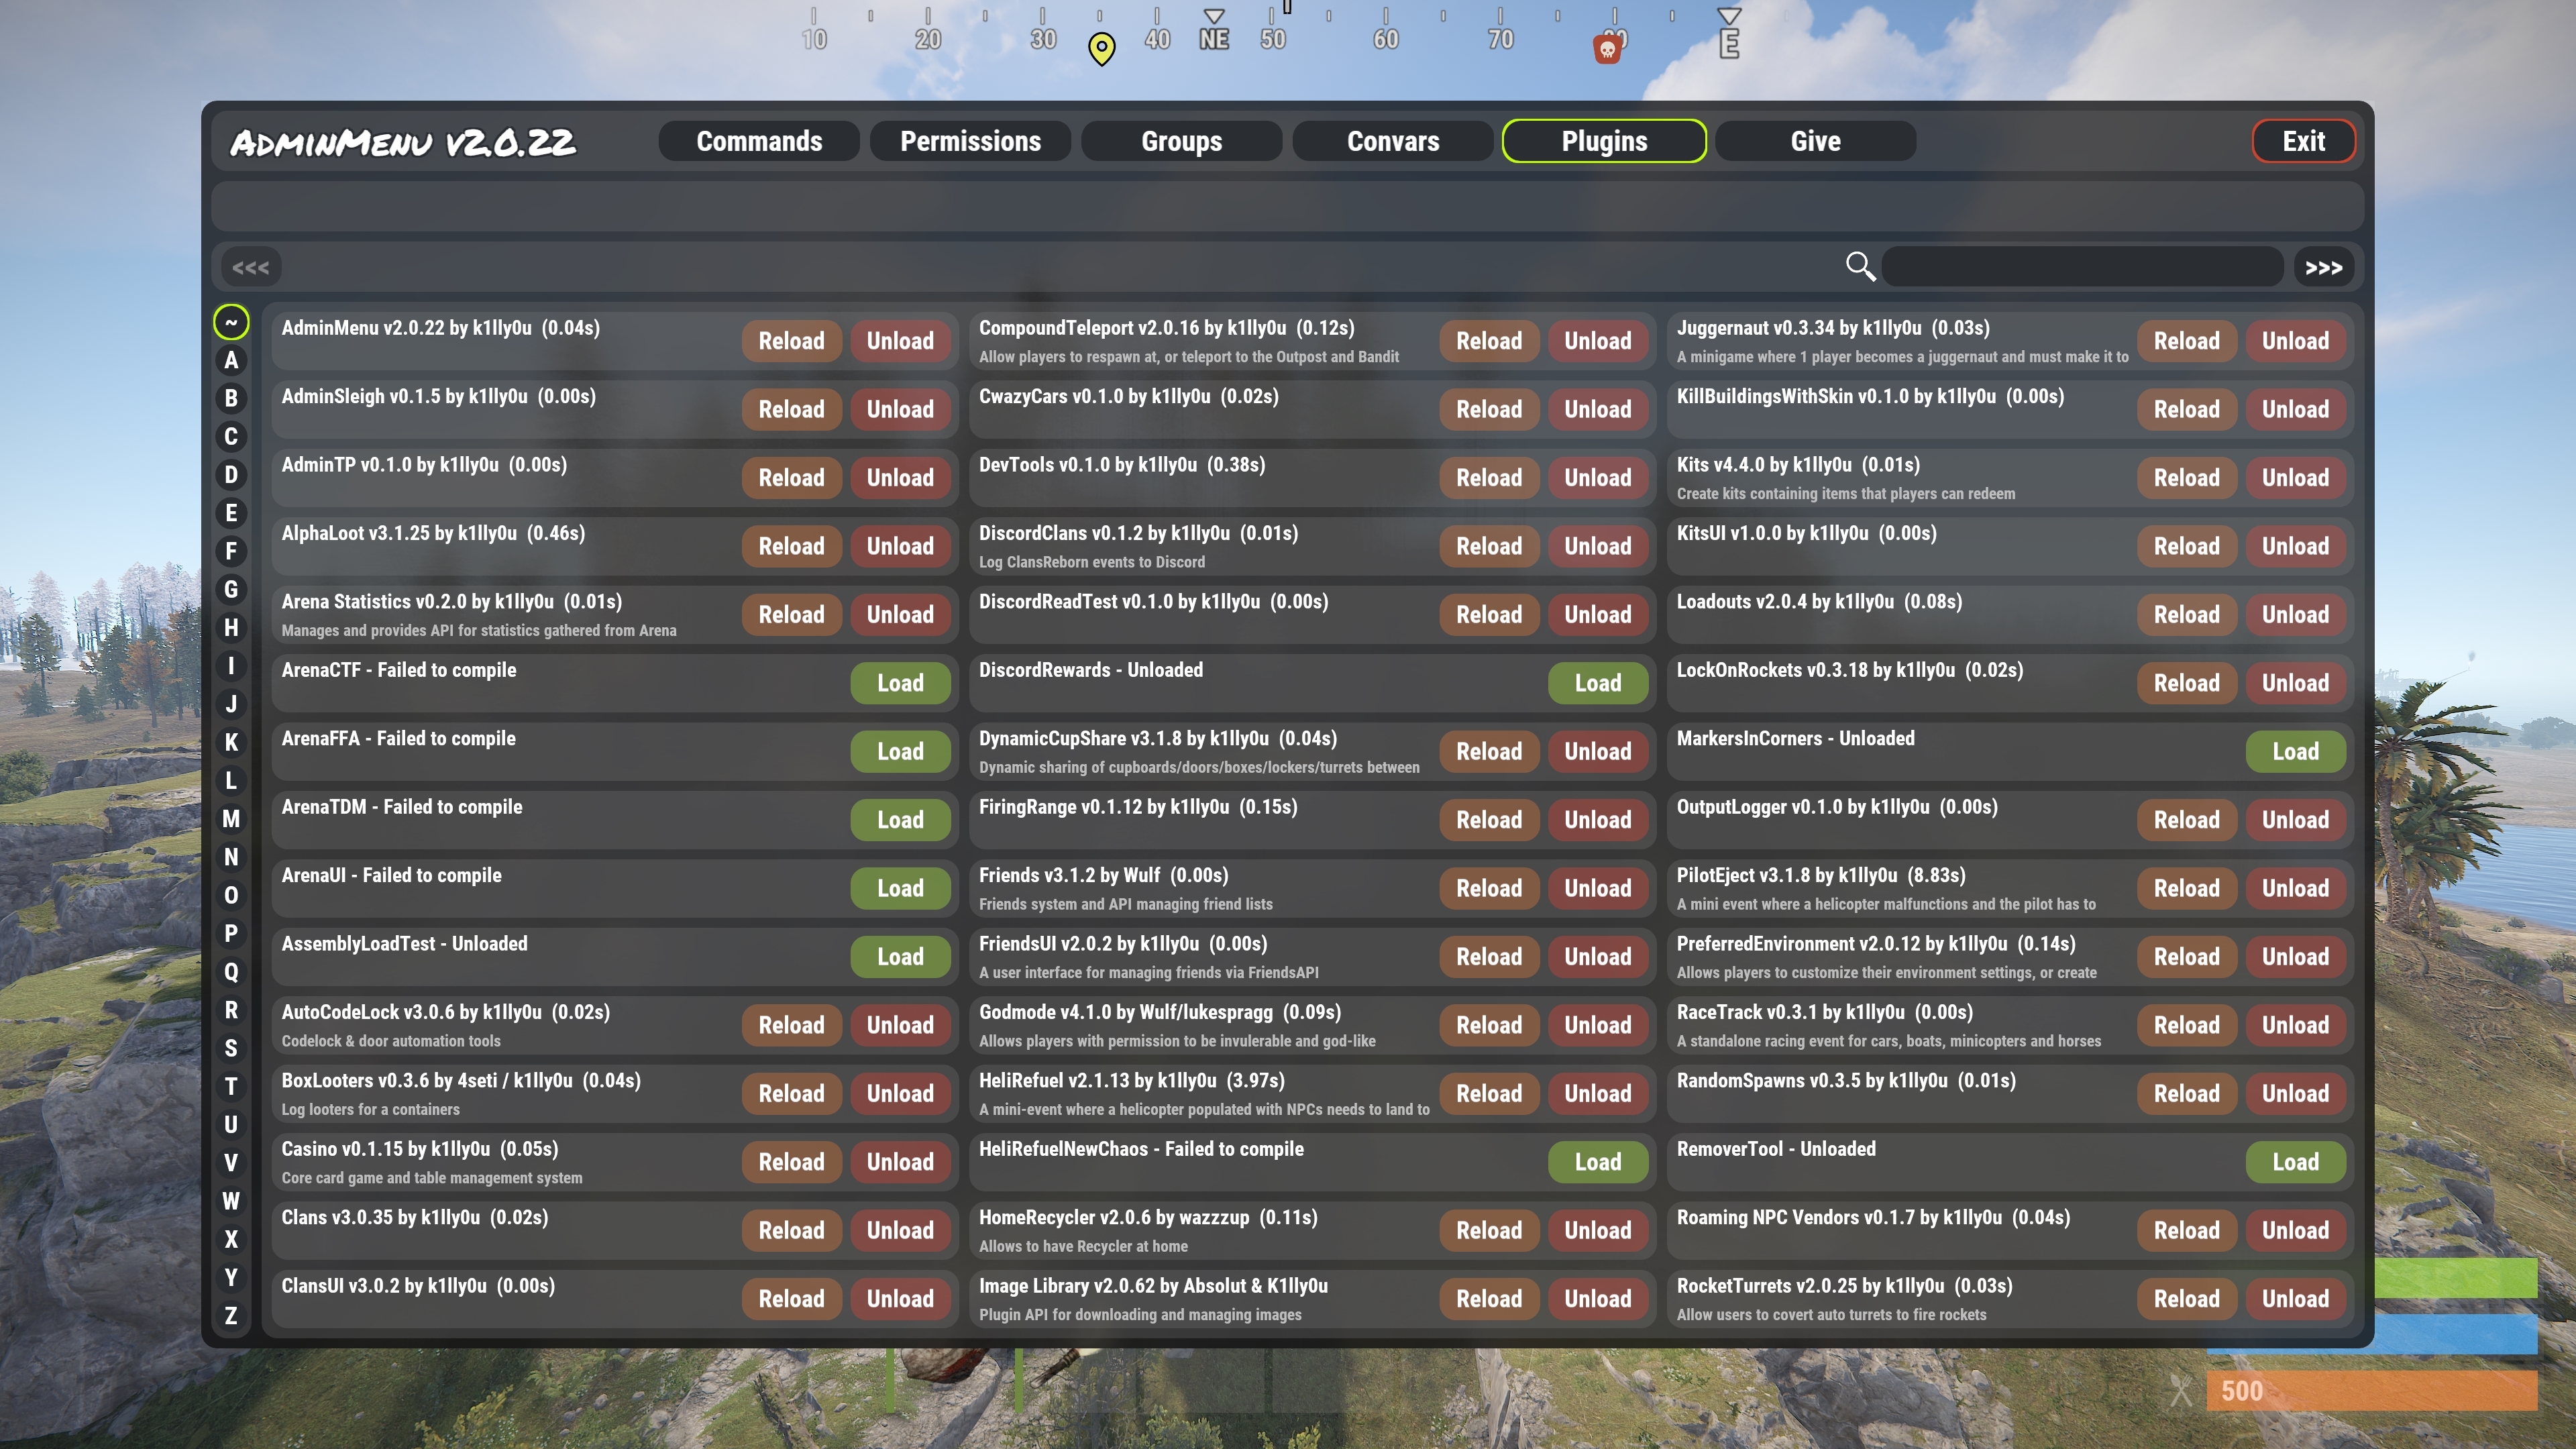
Normal UI
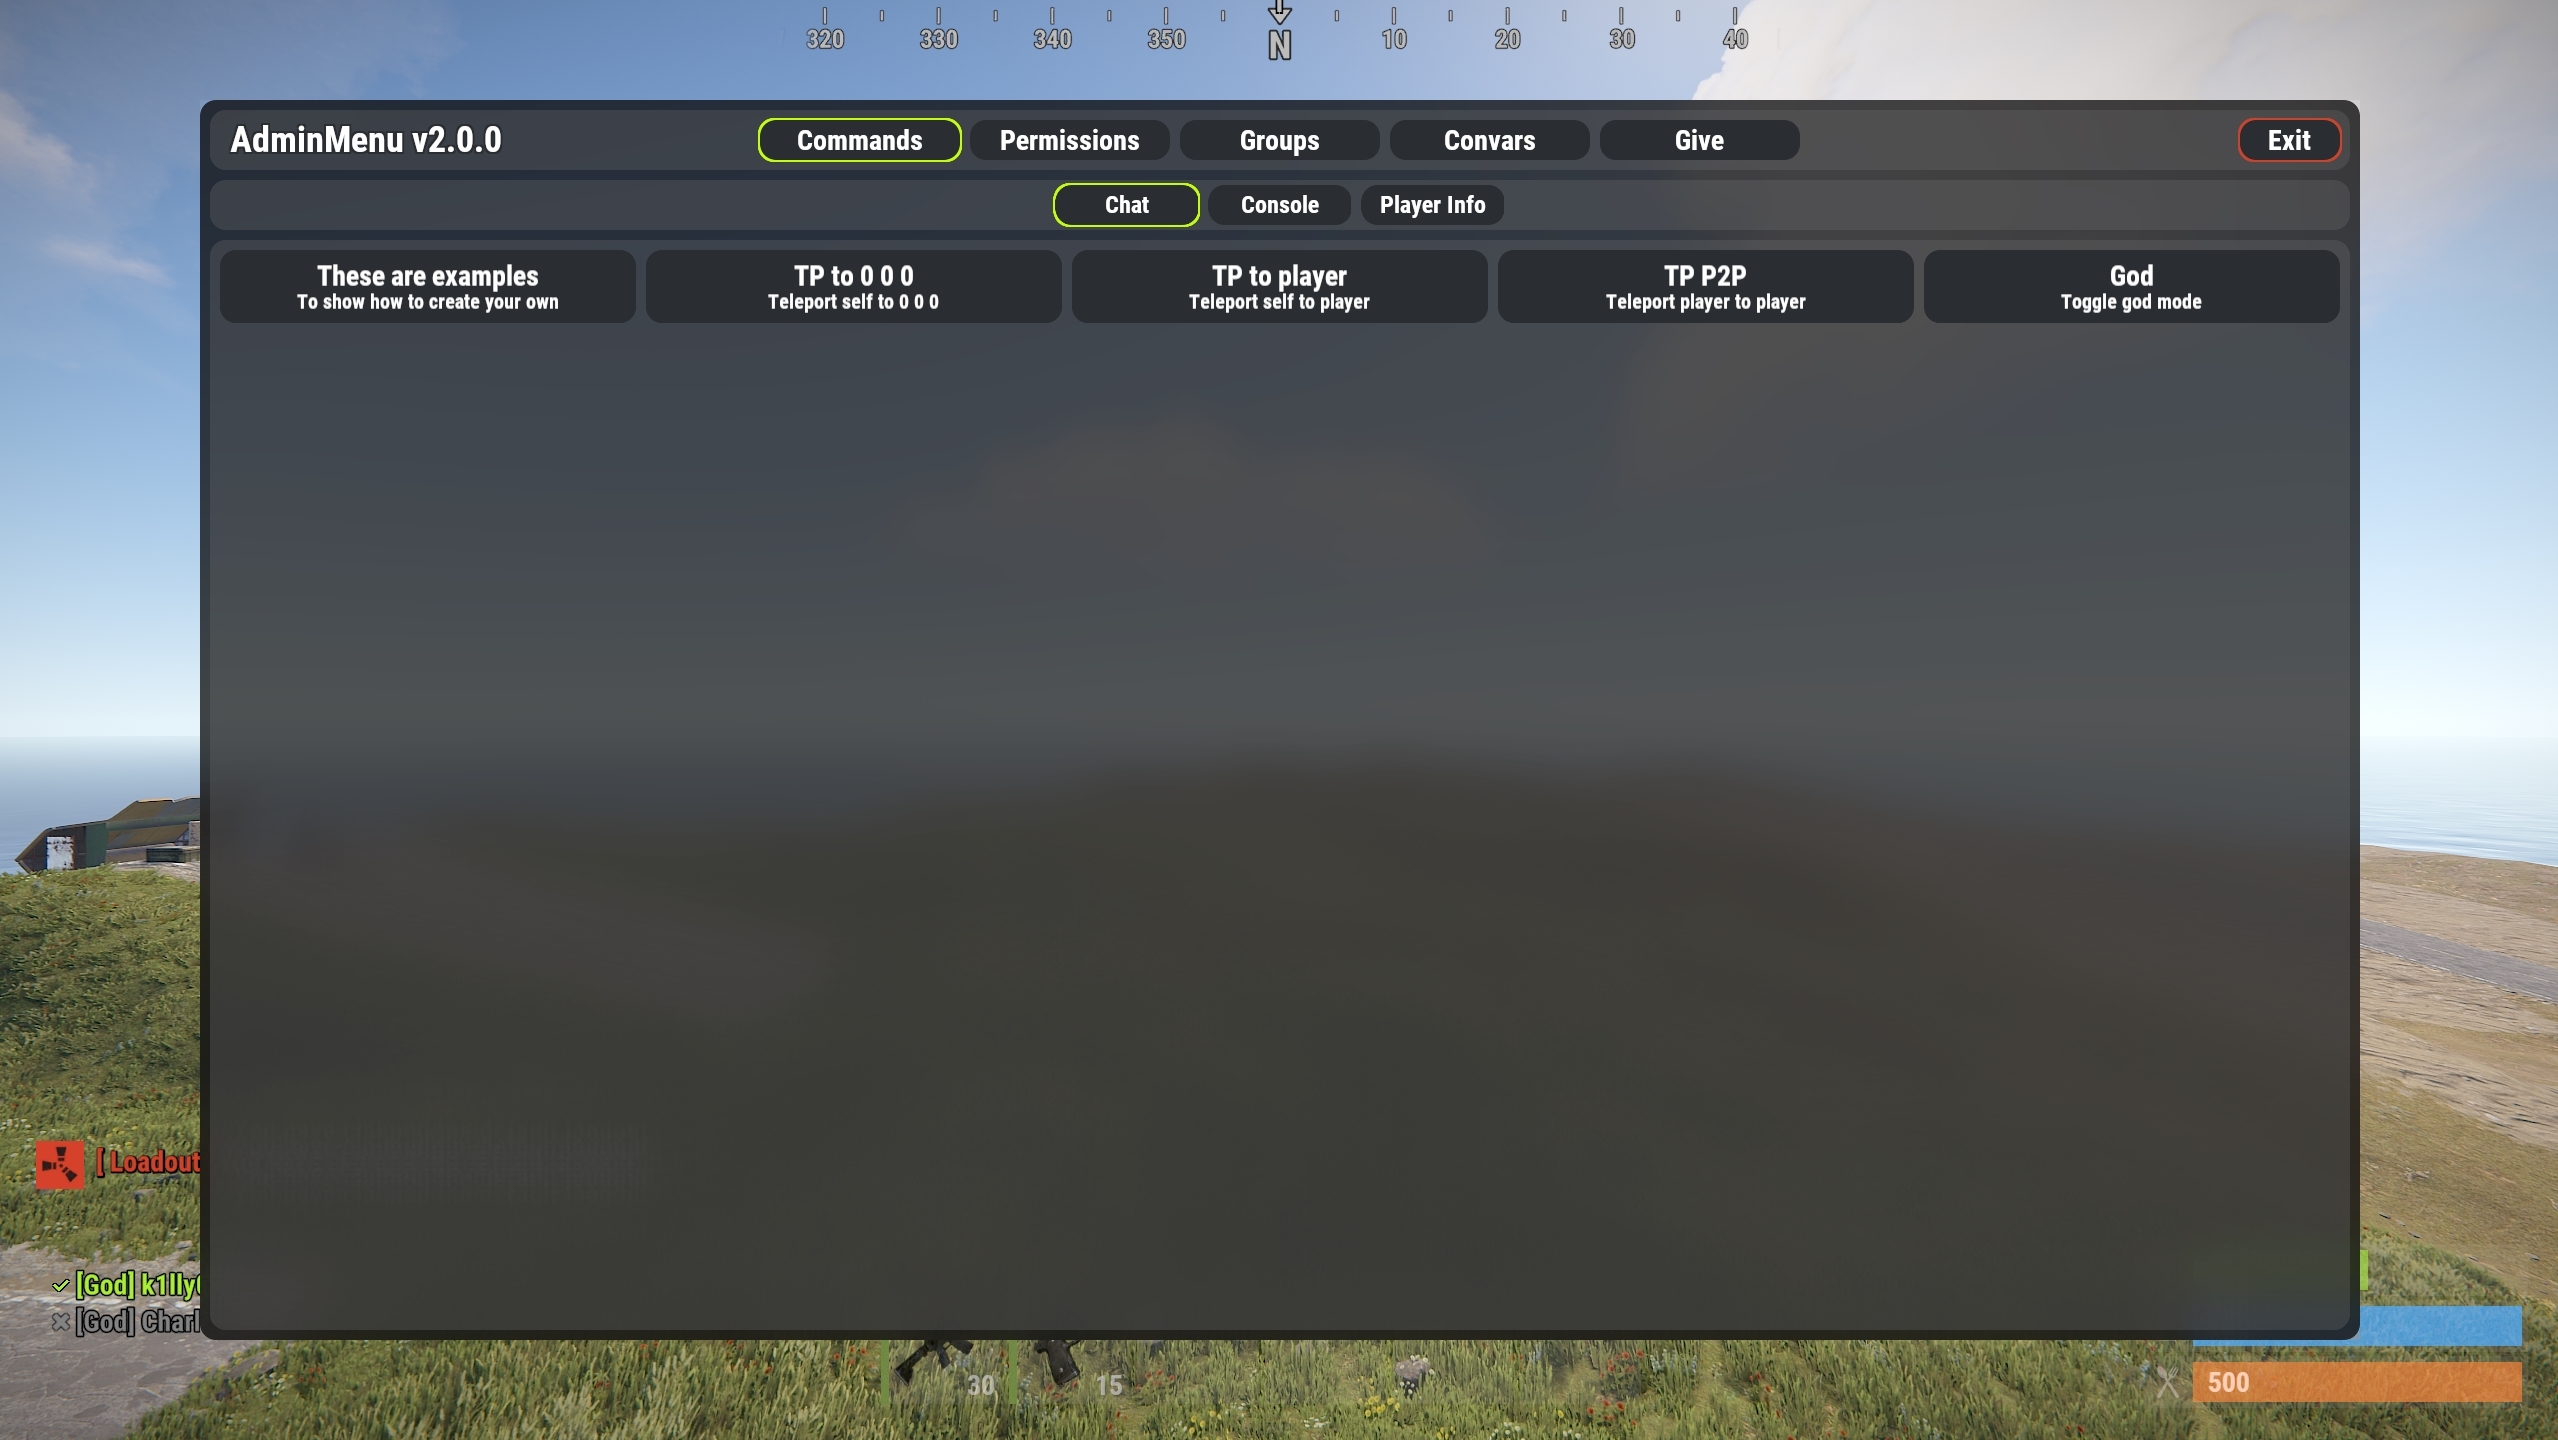
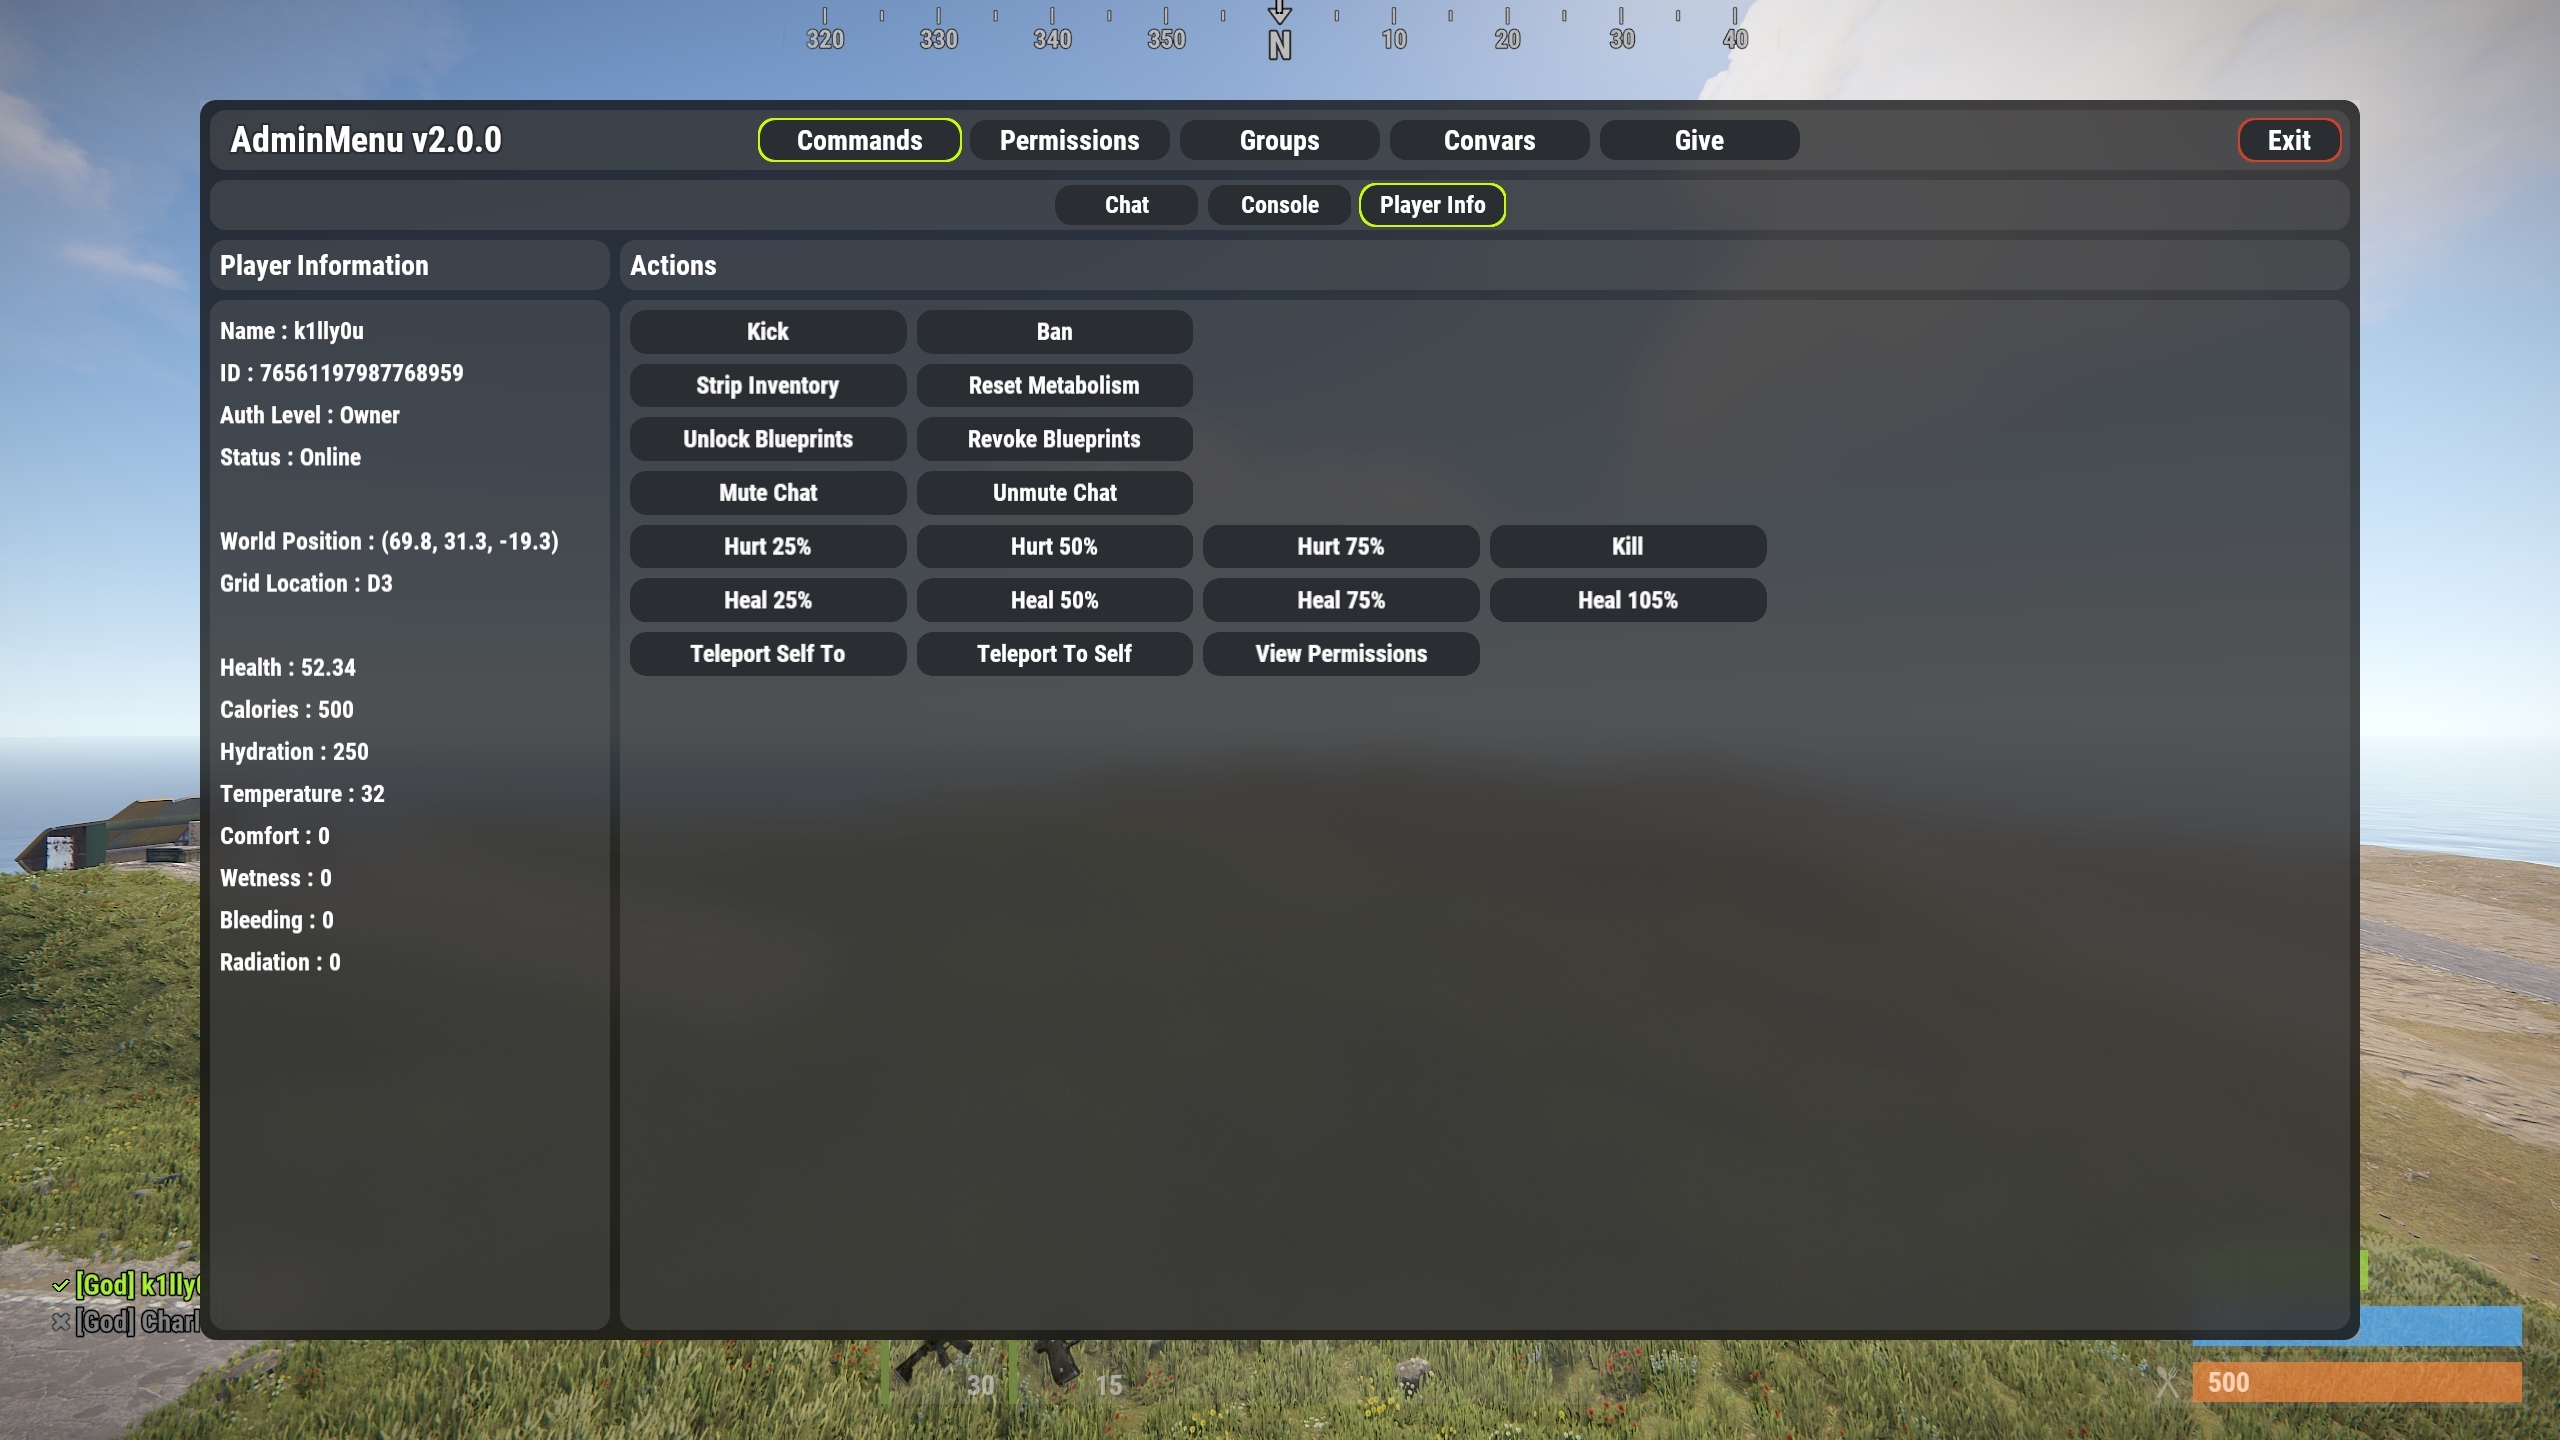
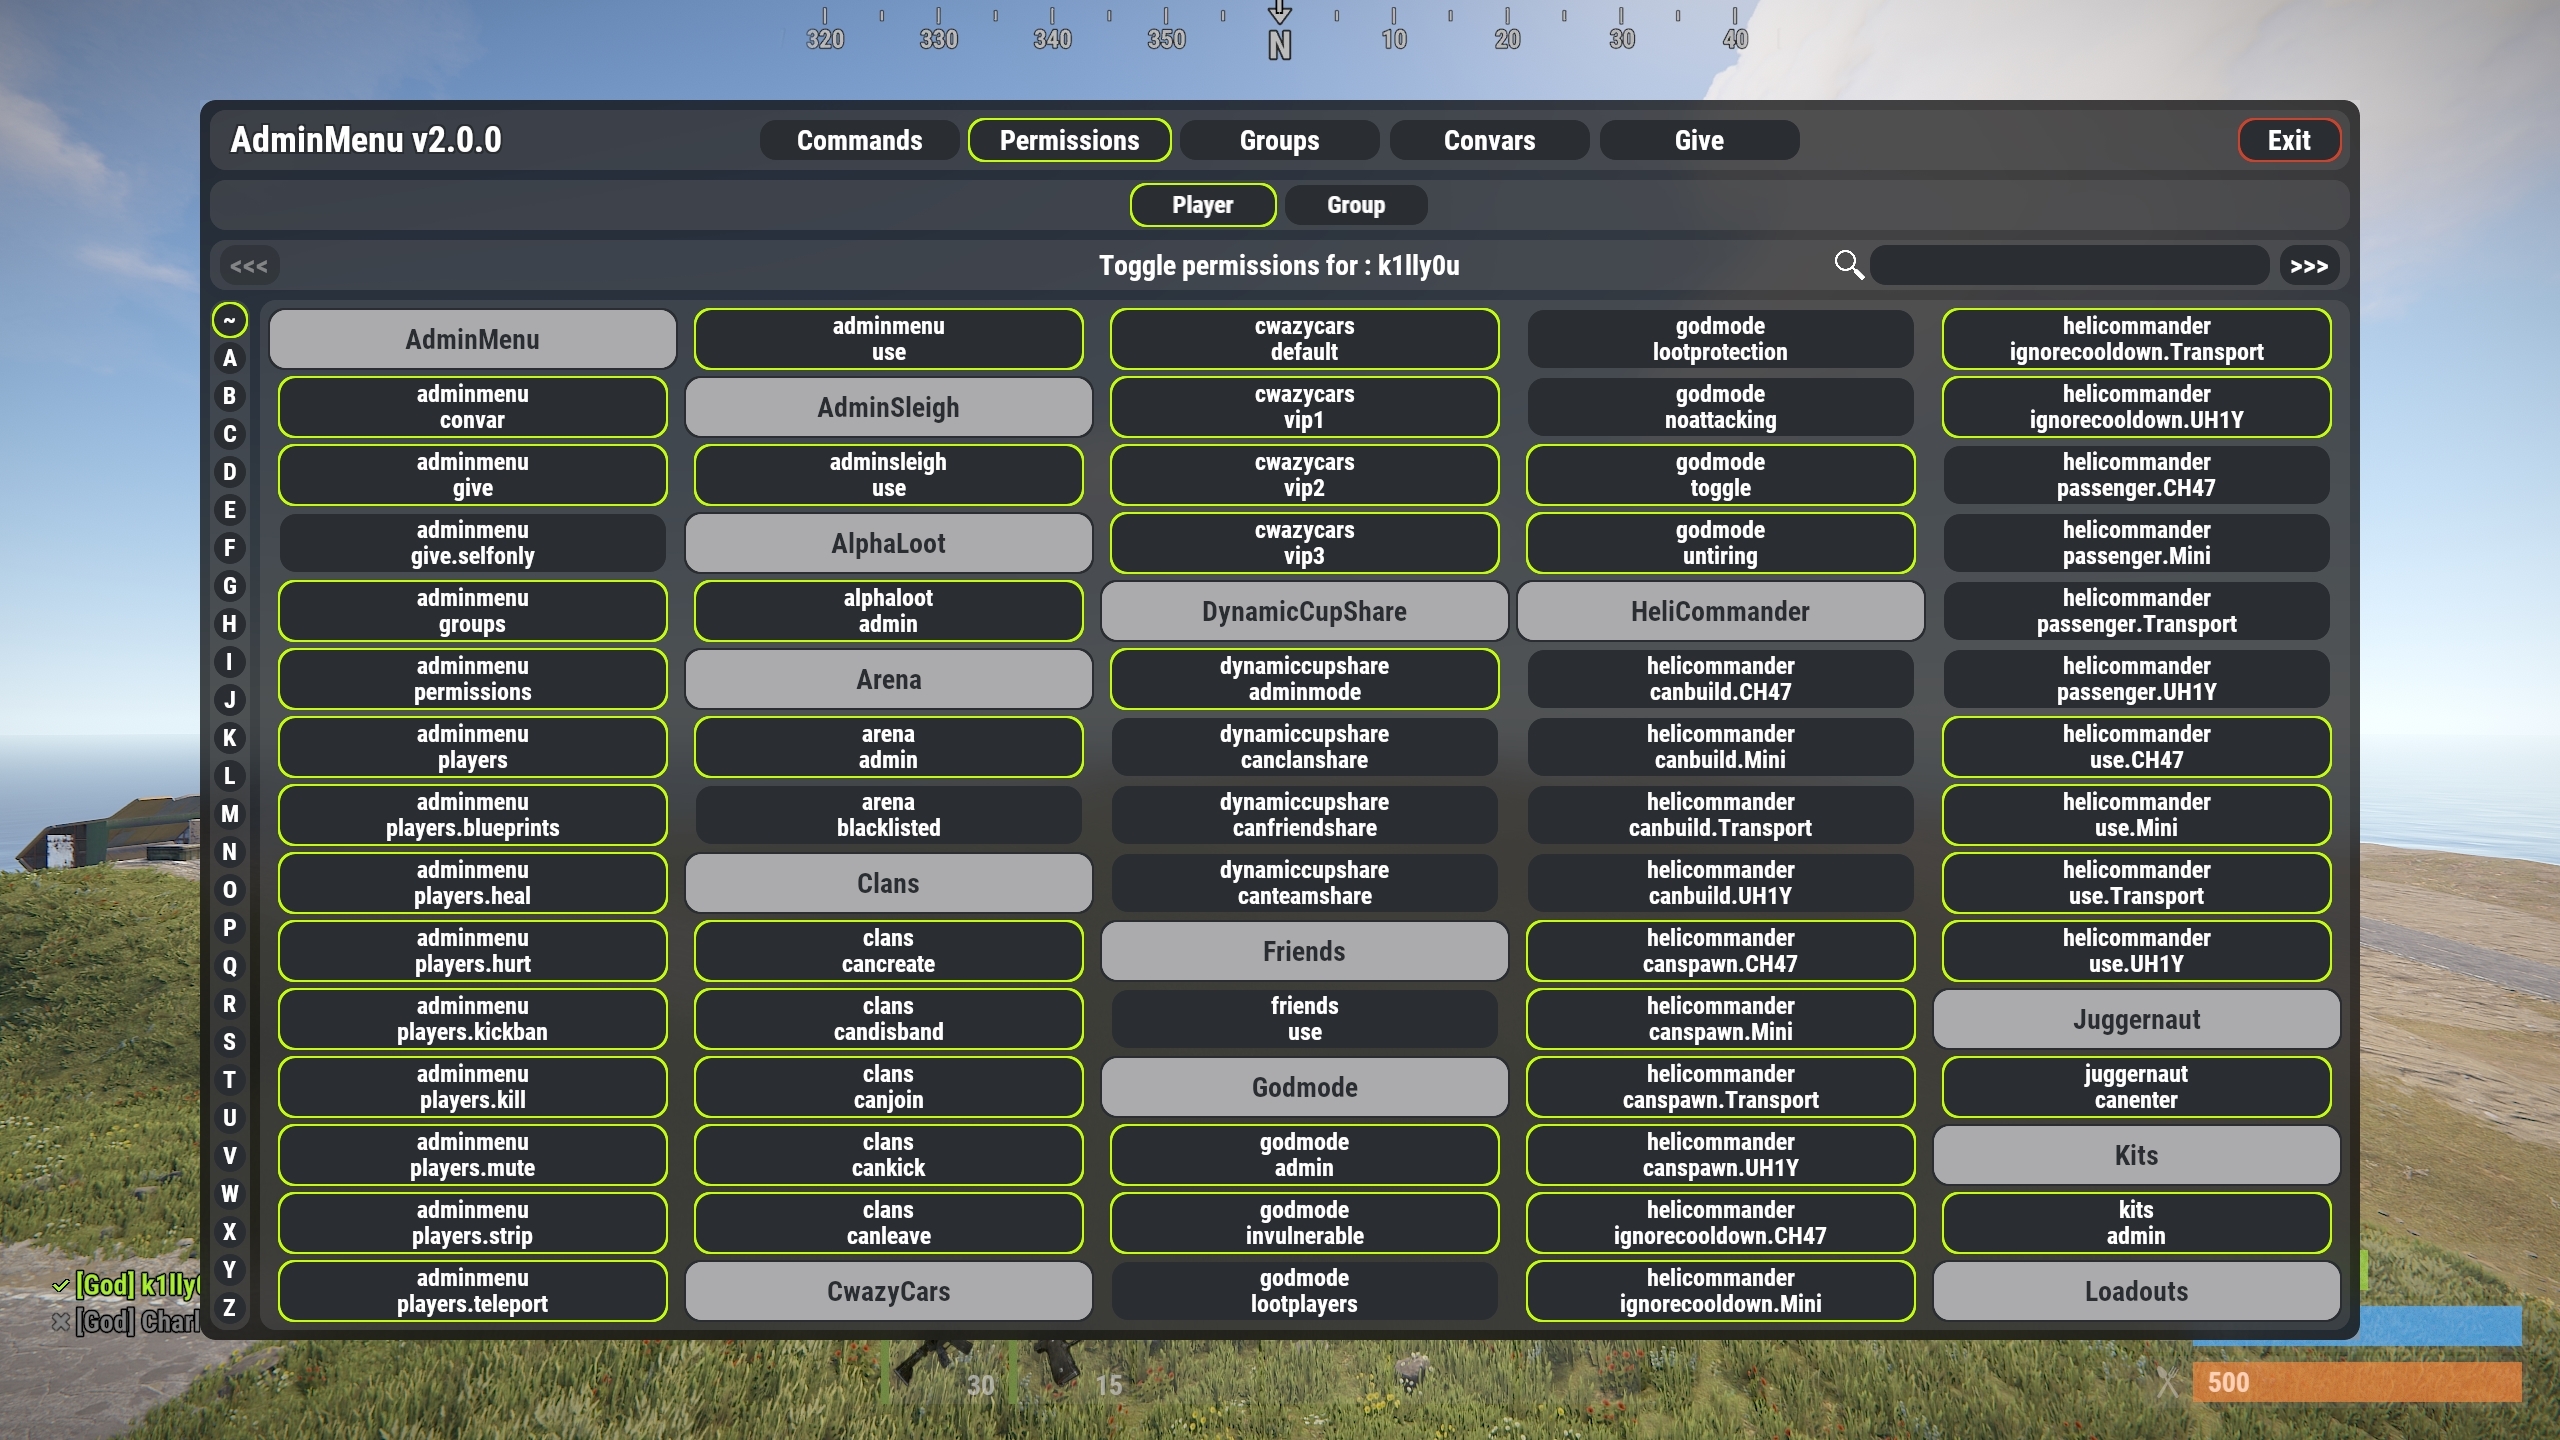
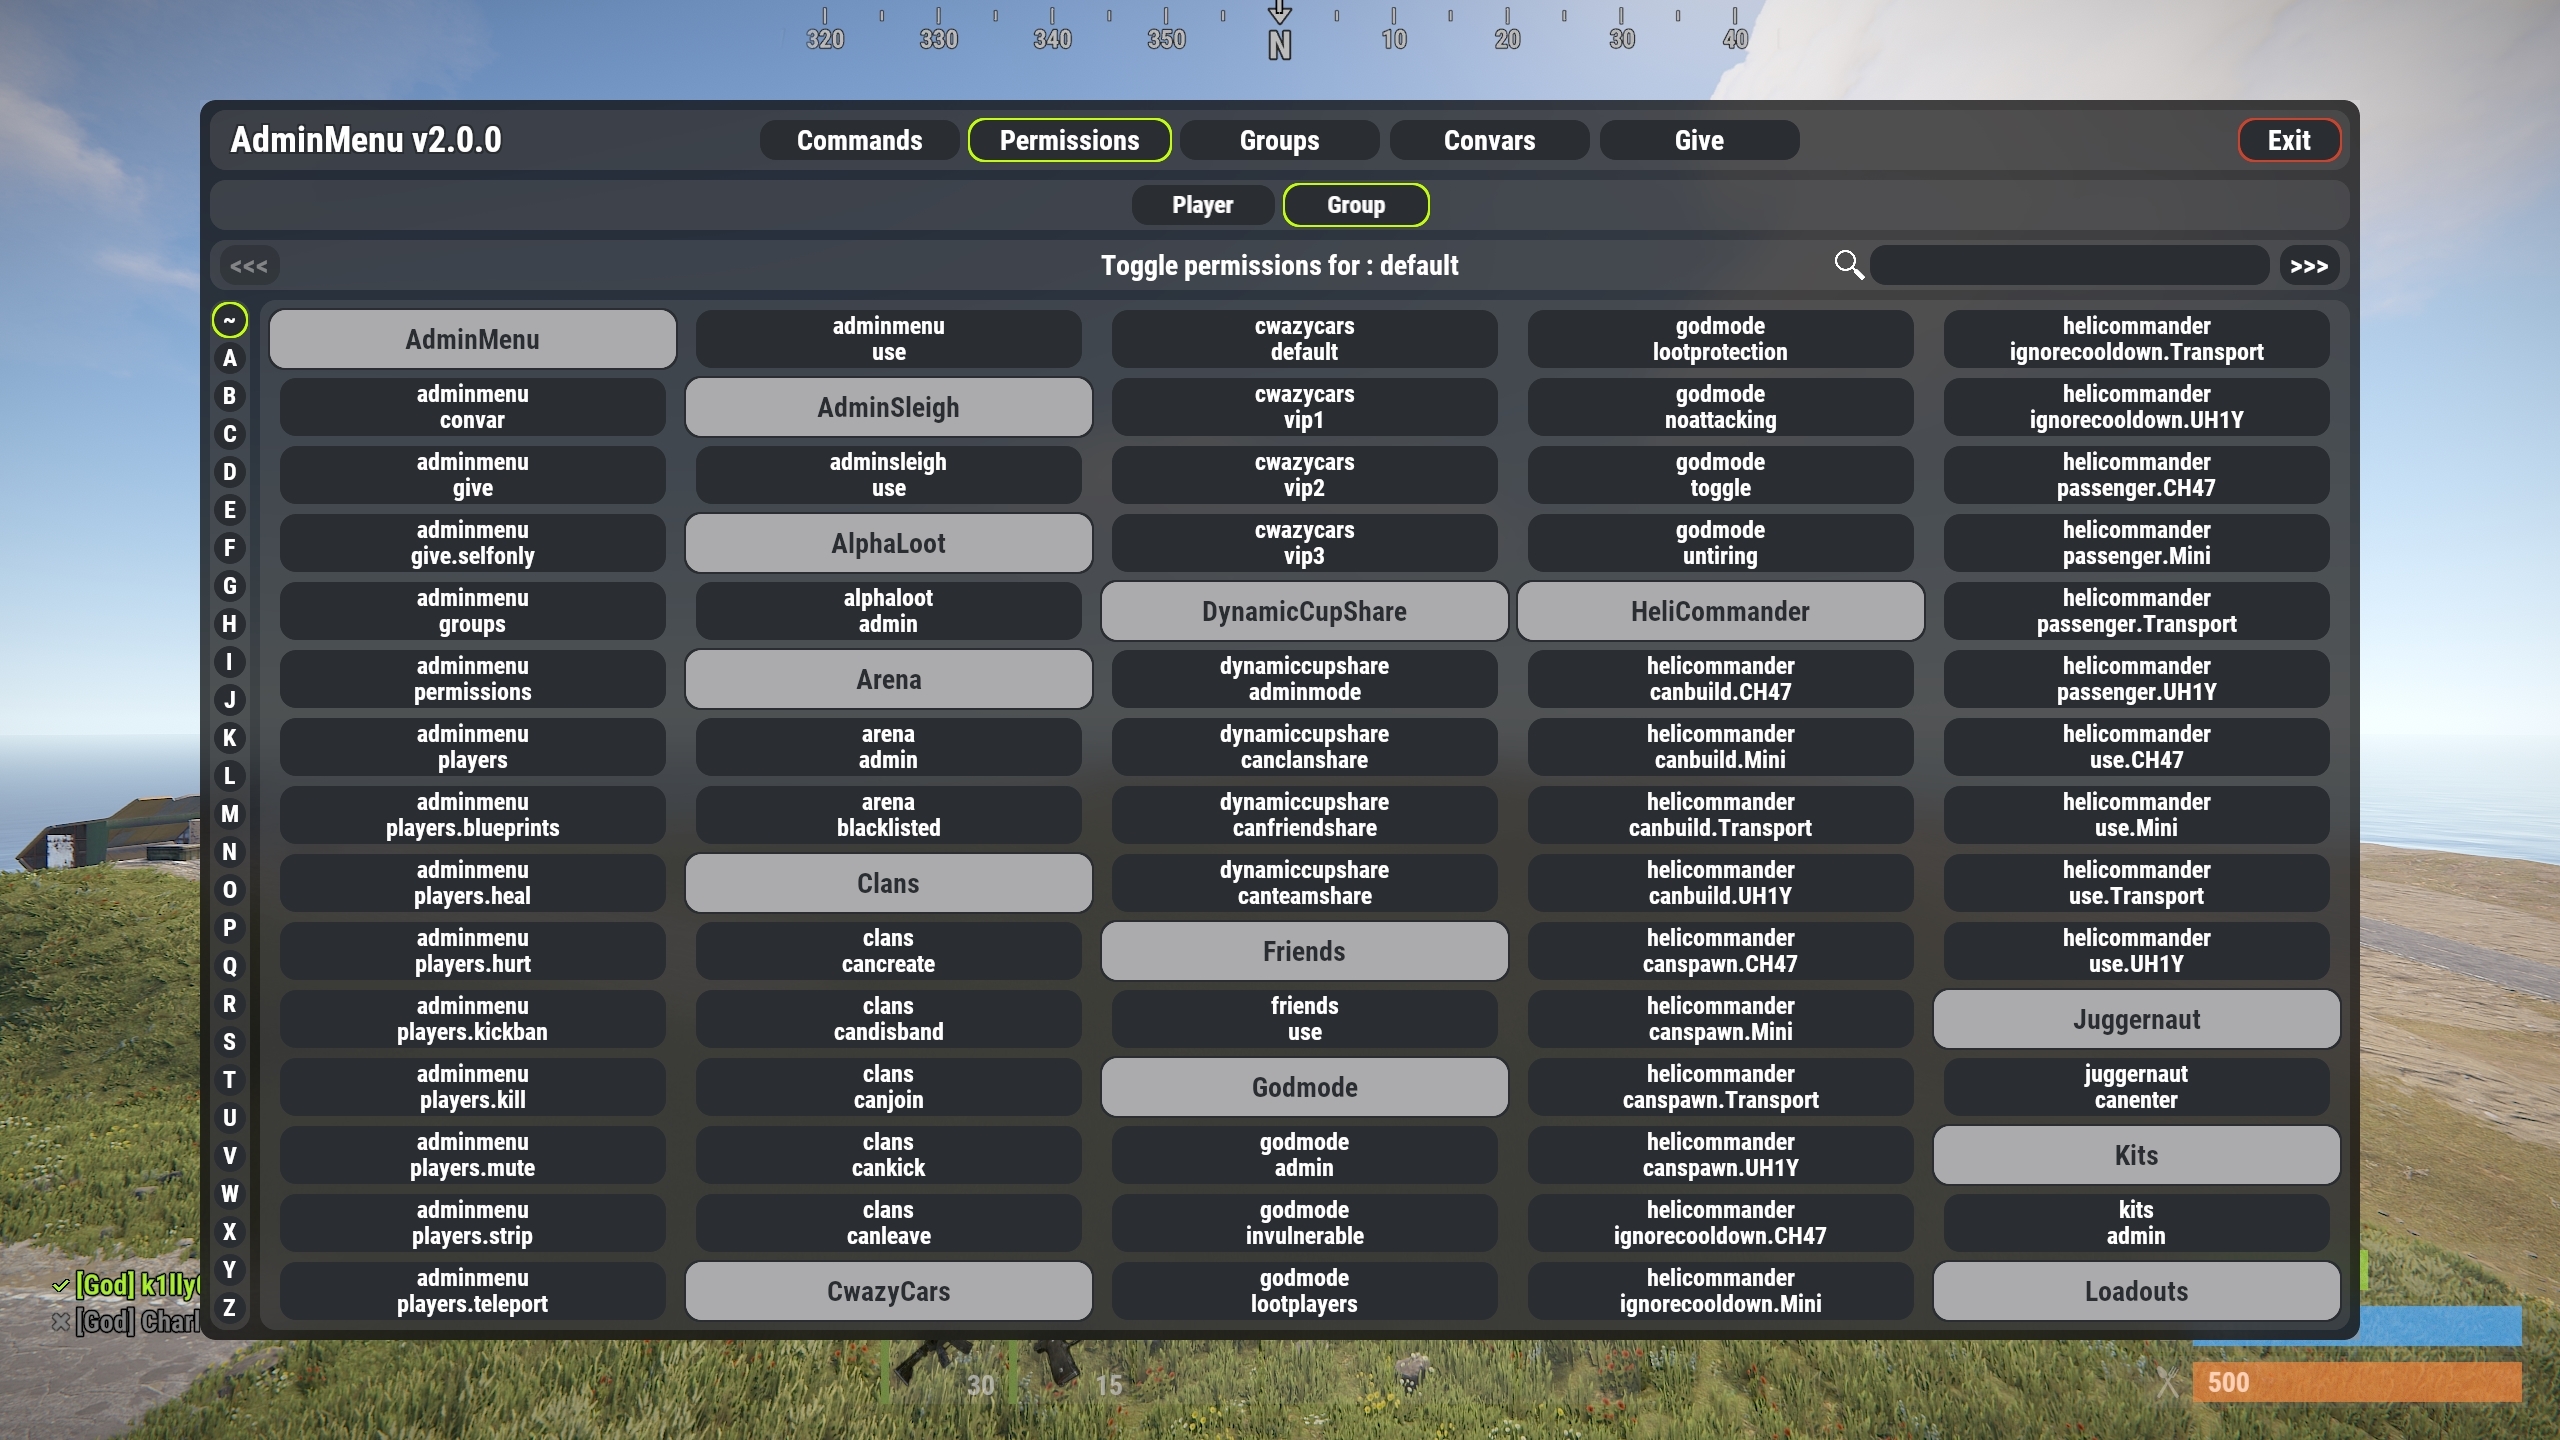
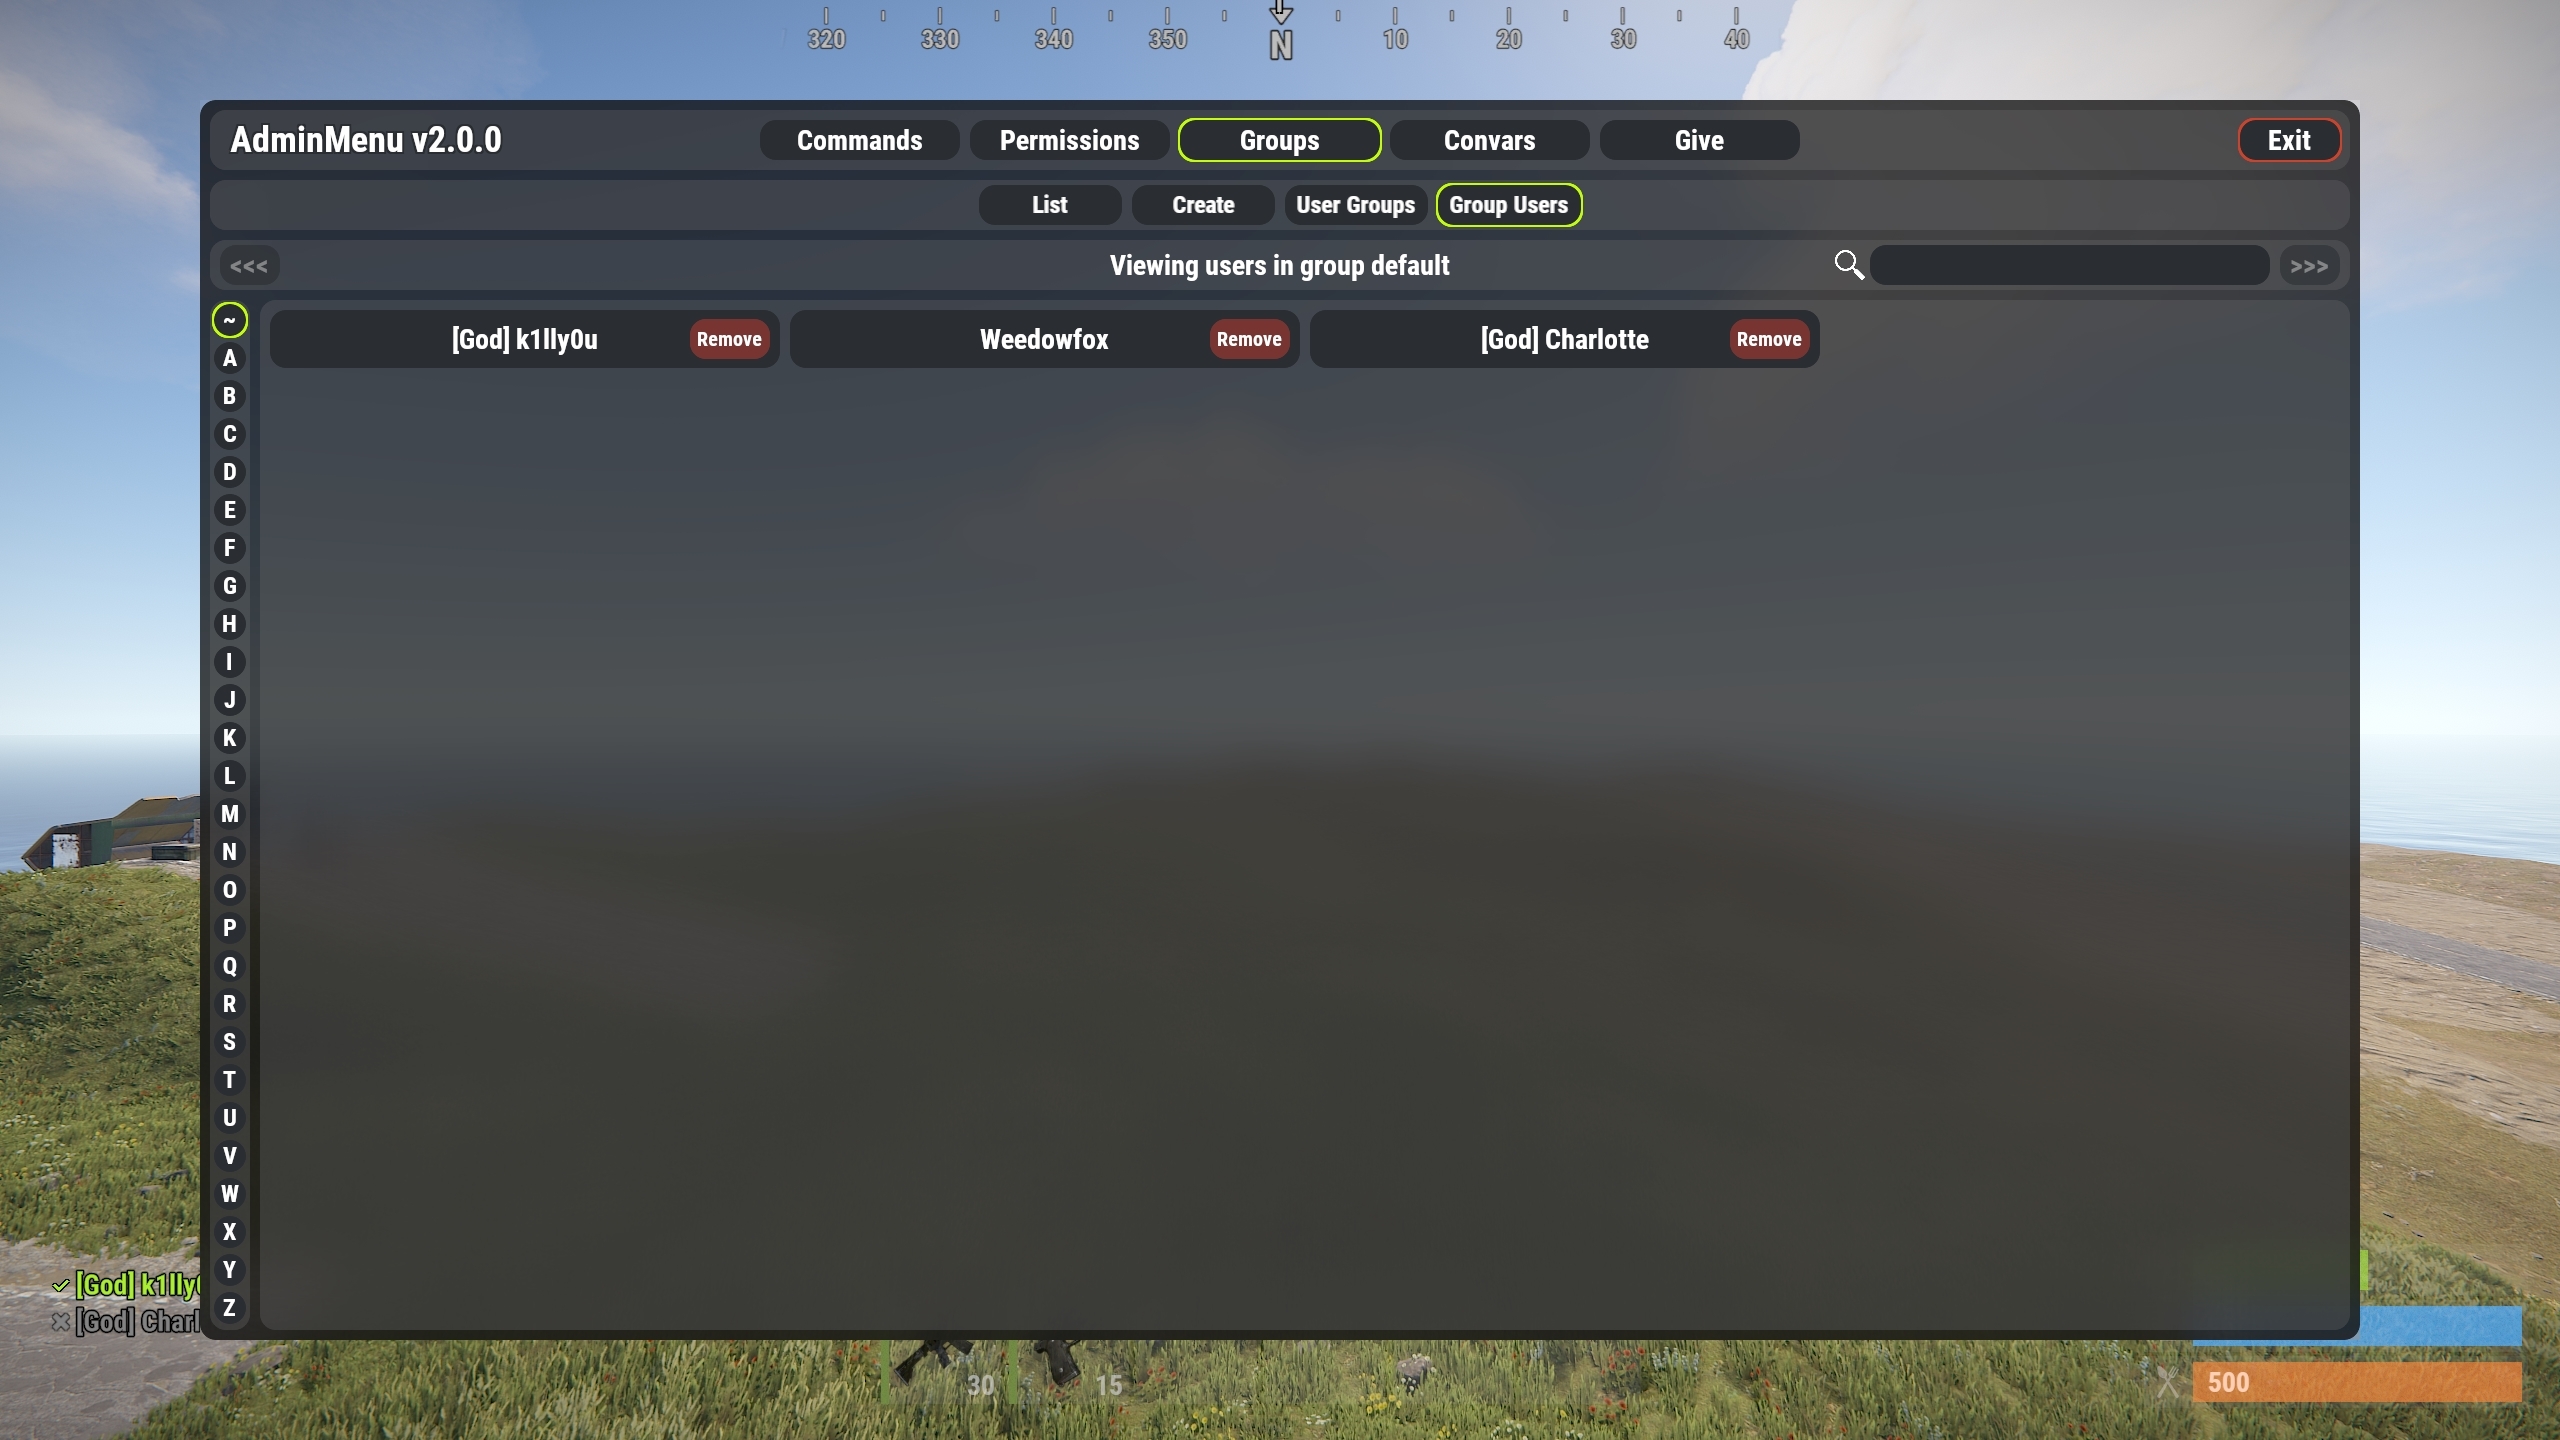
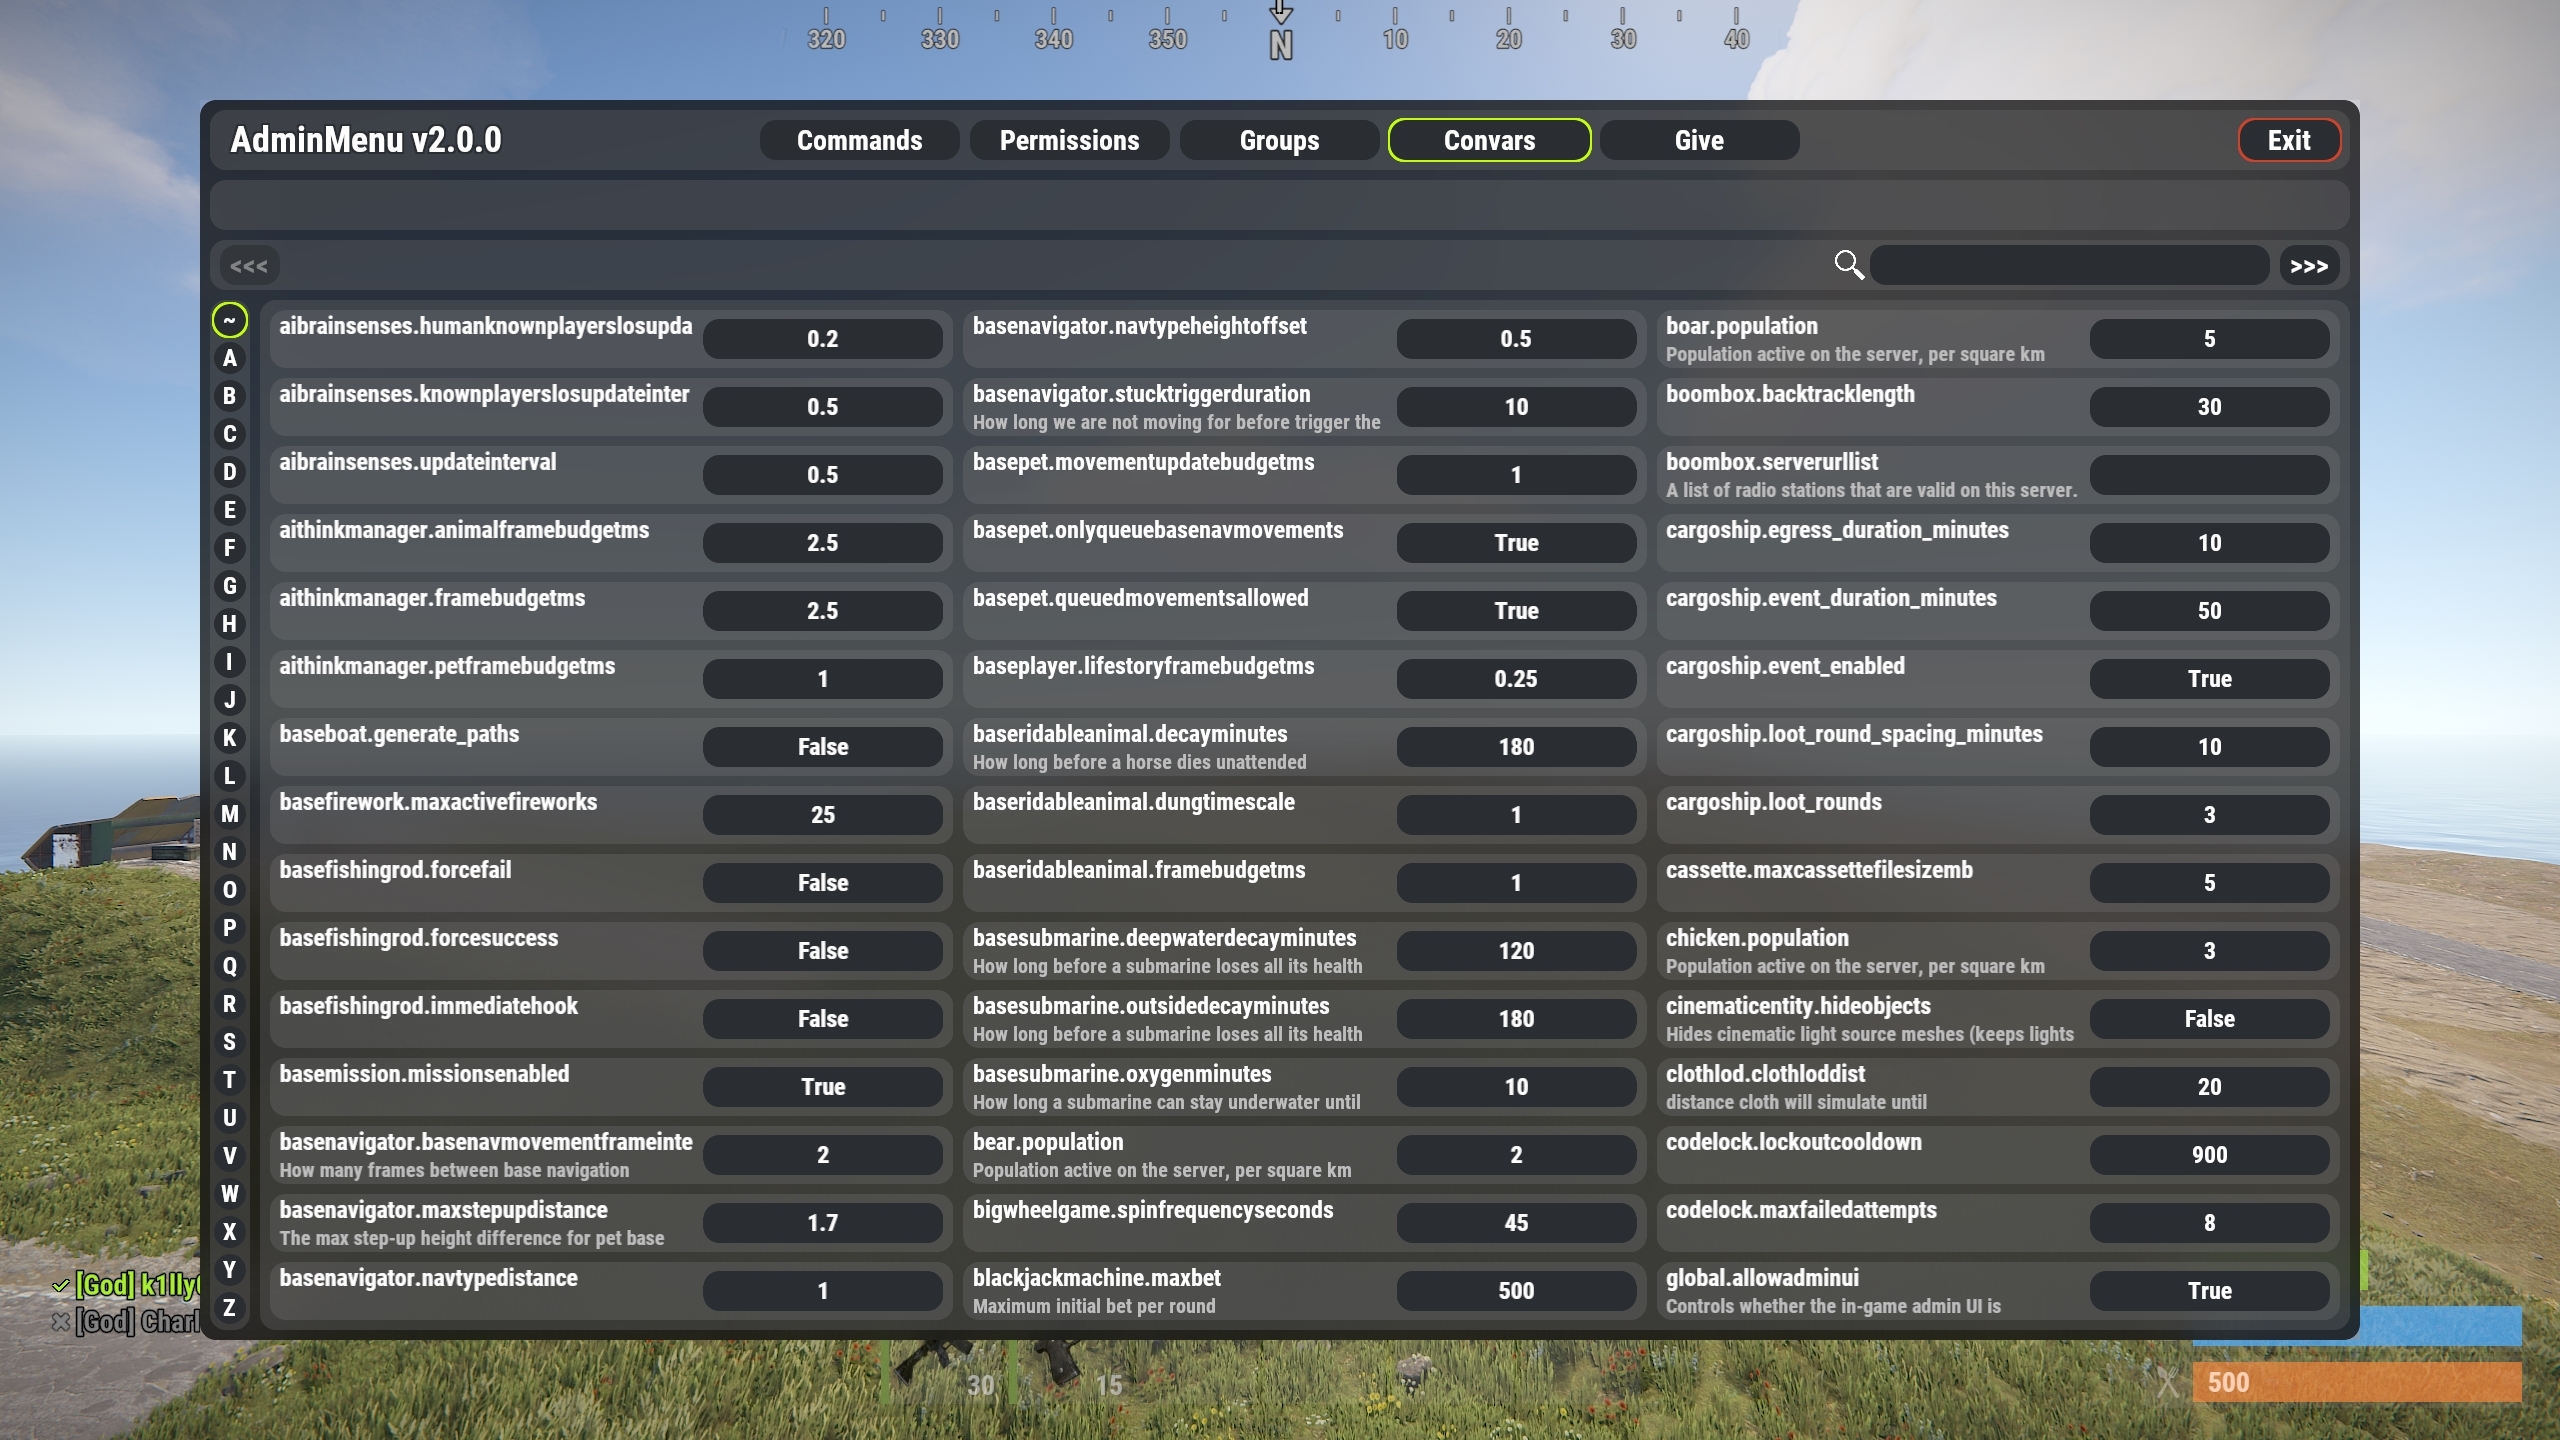
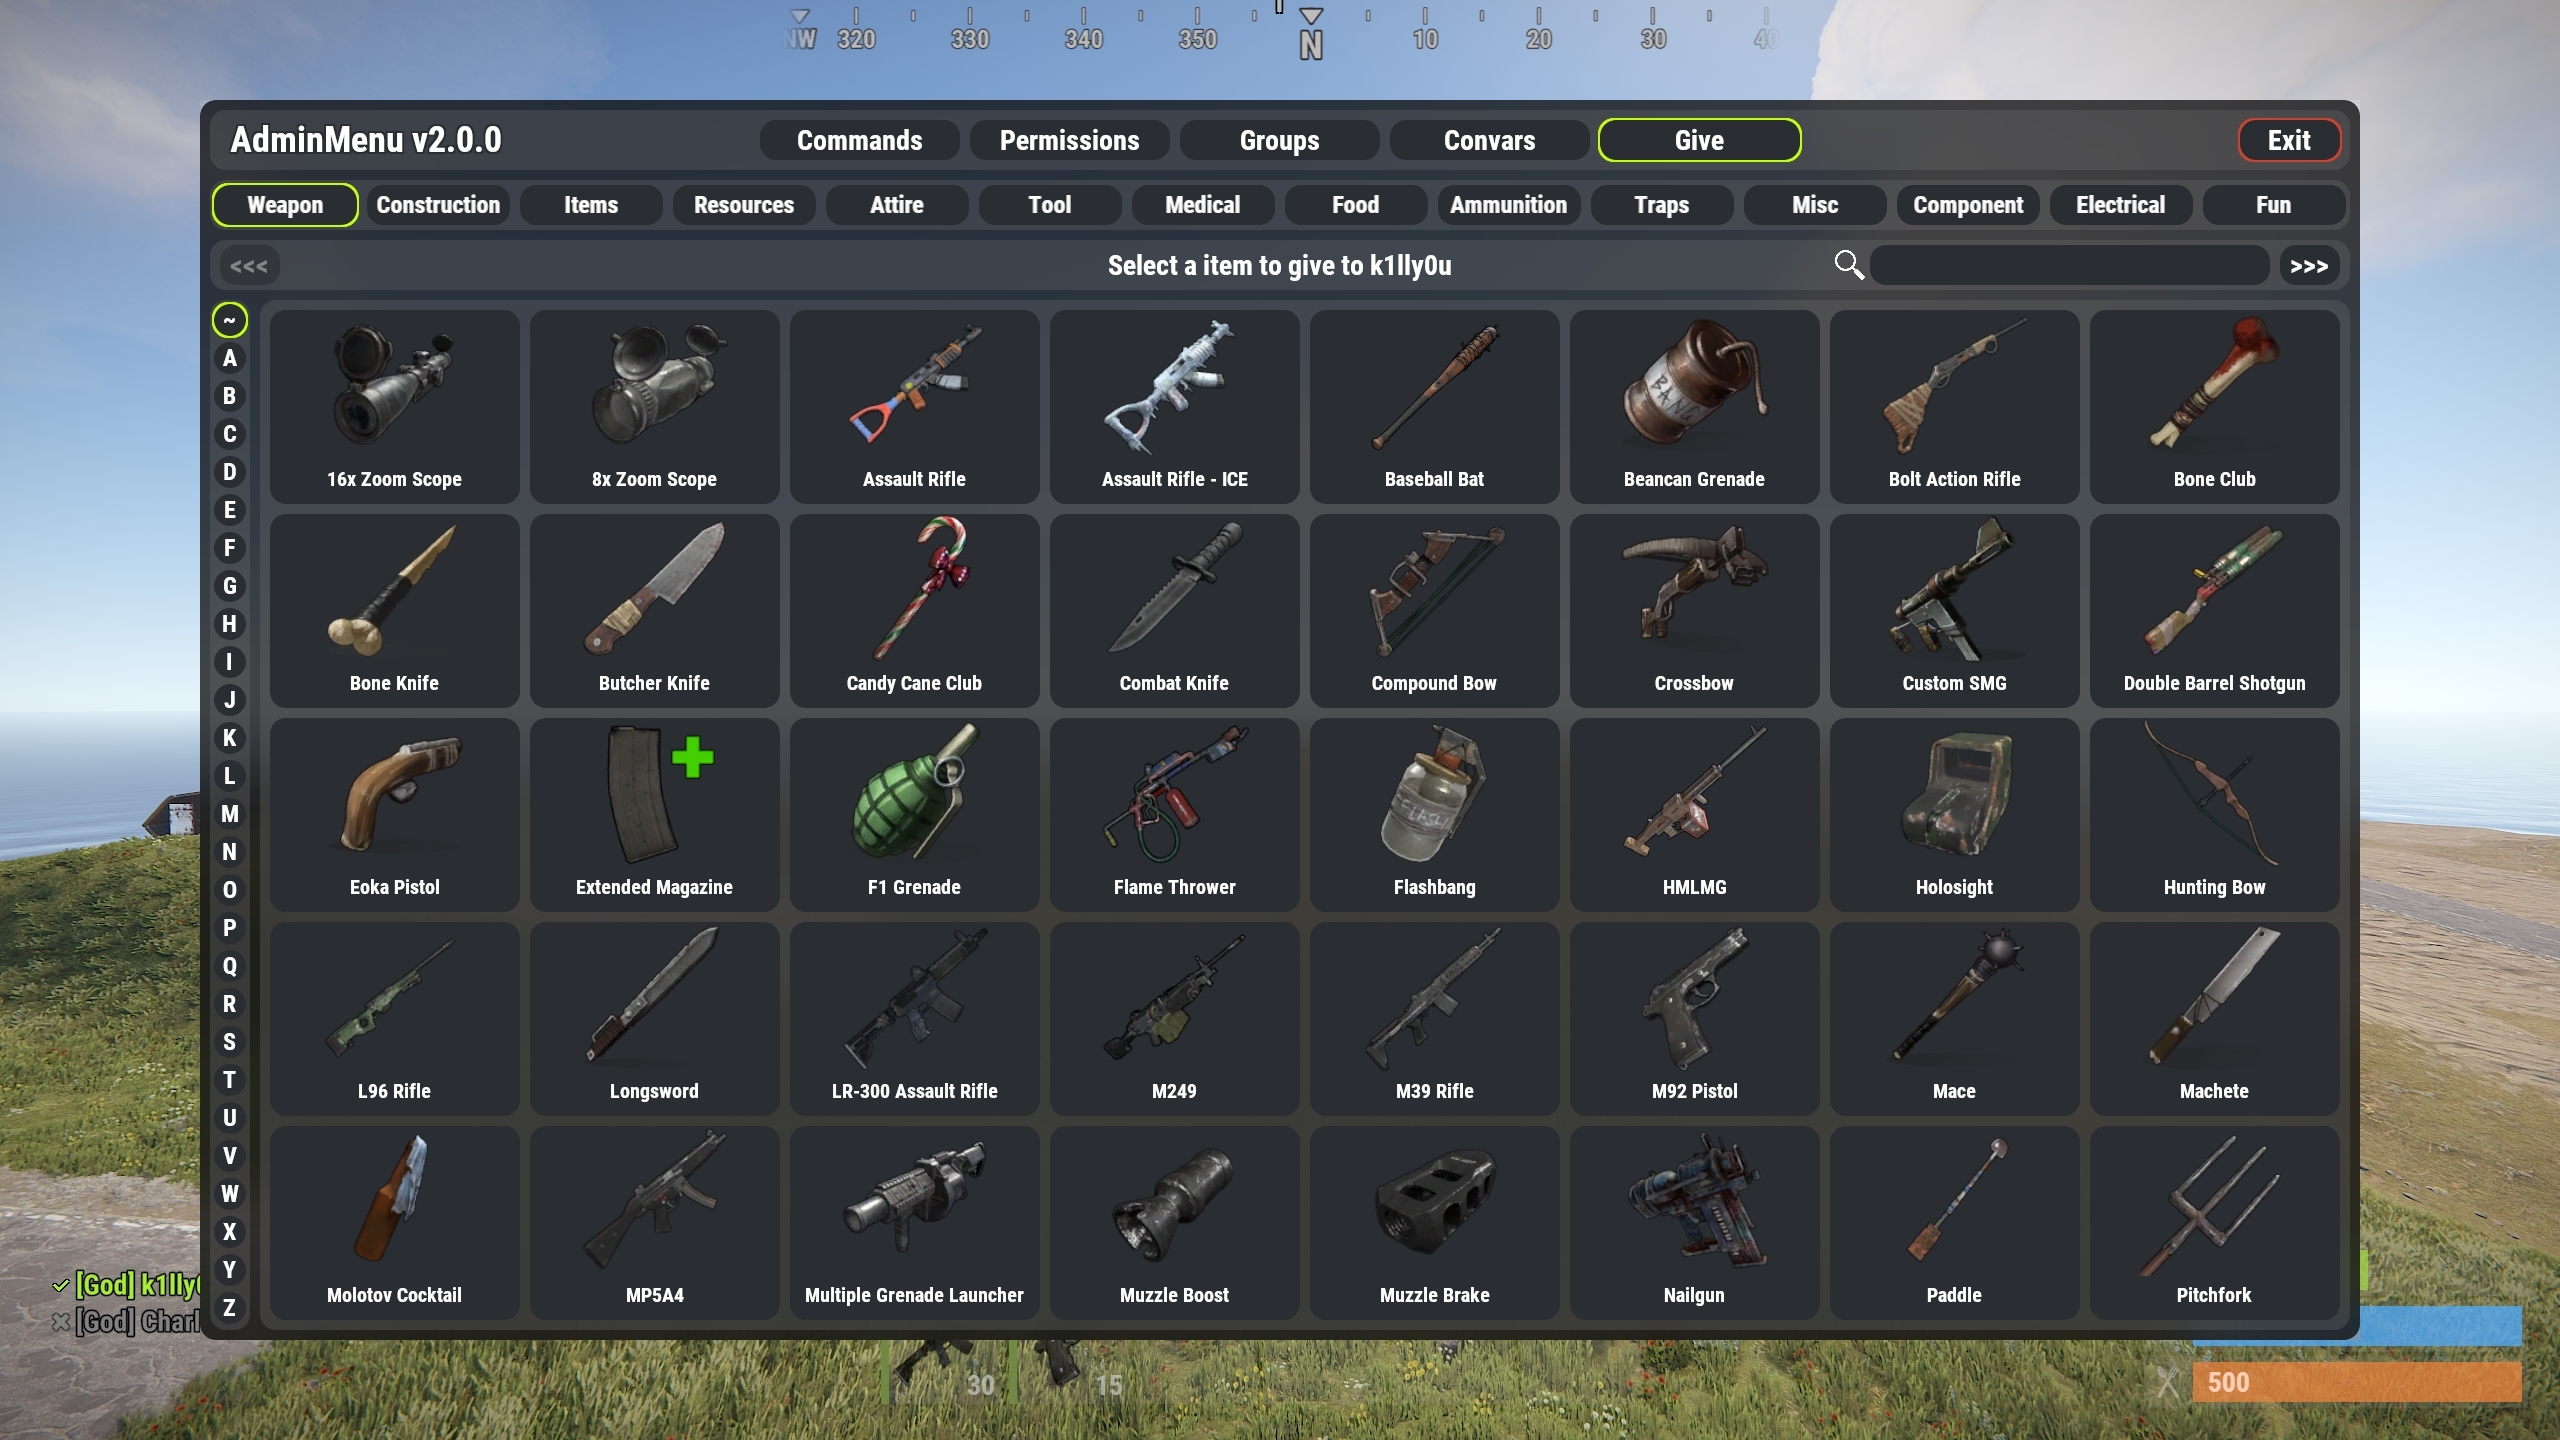
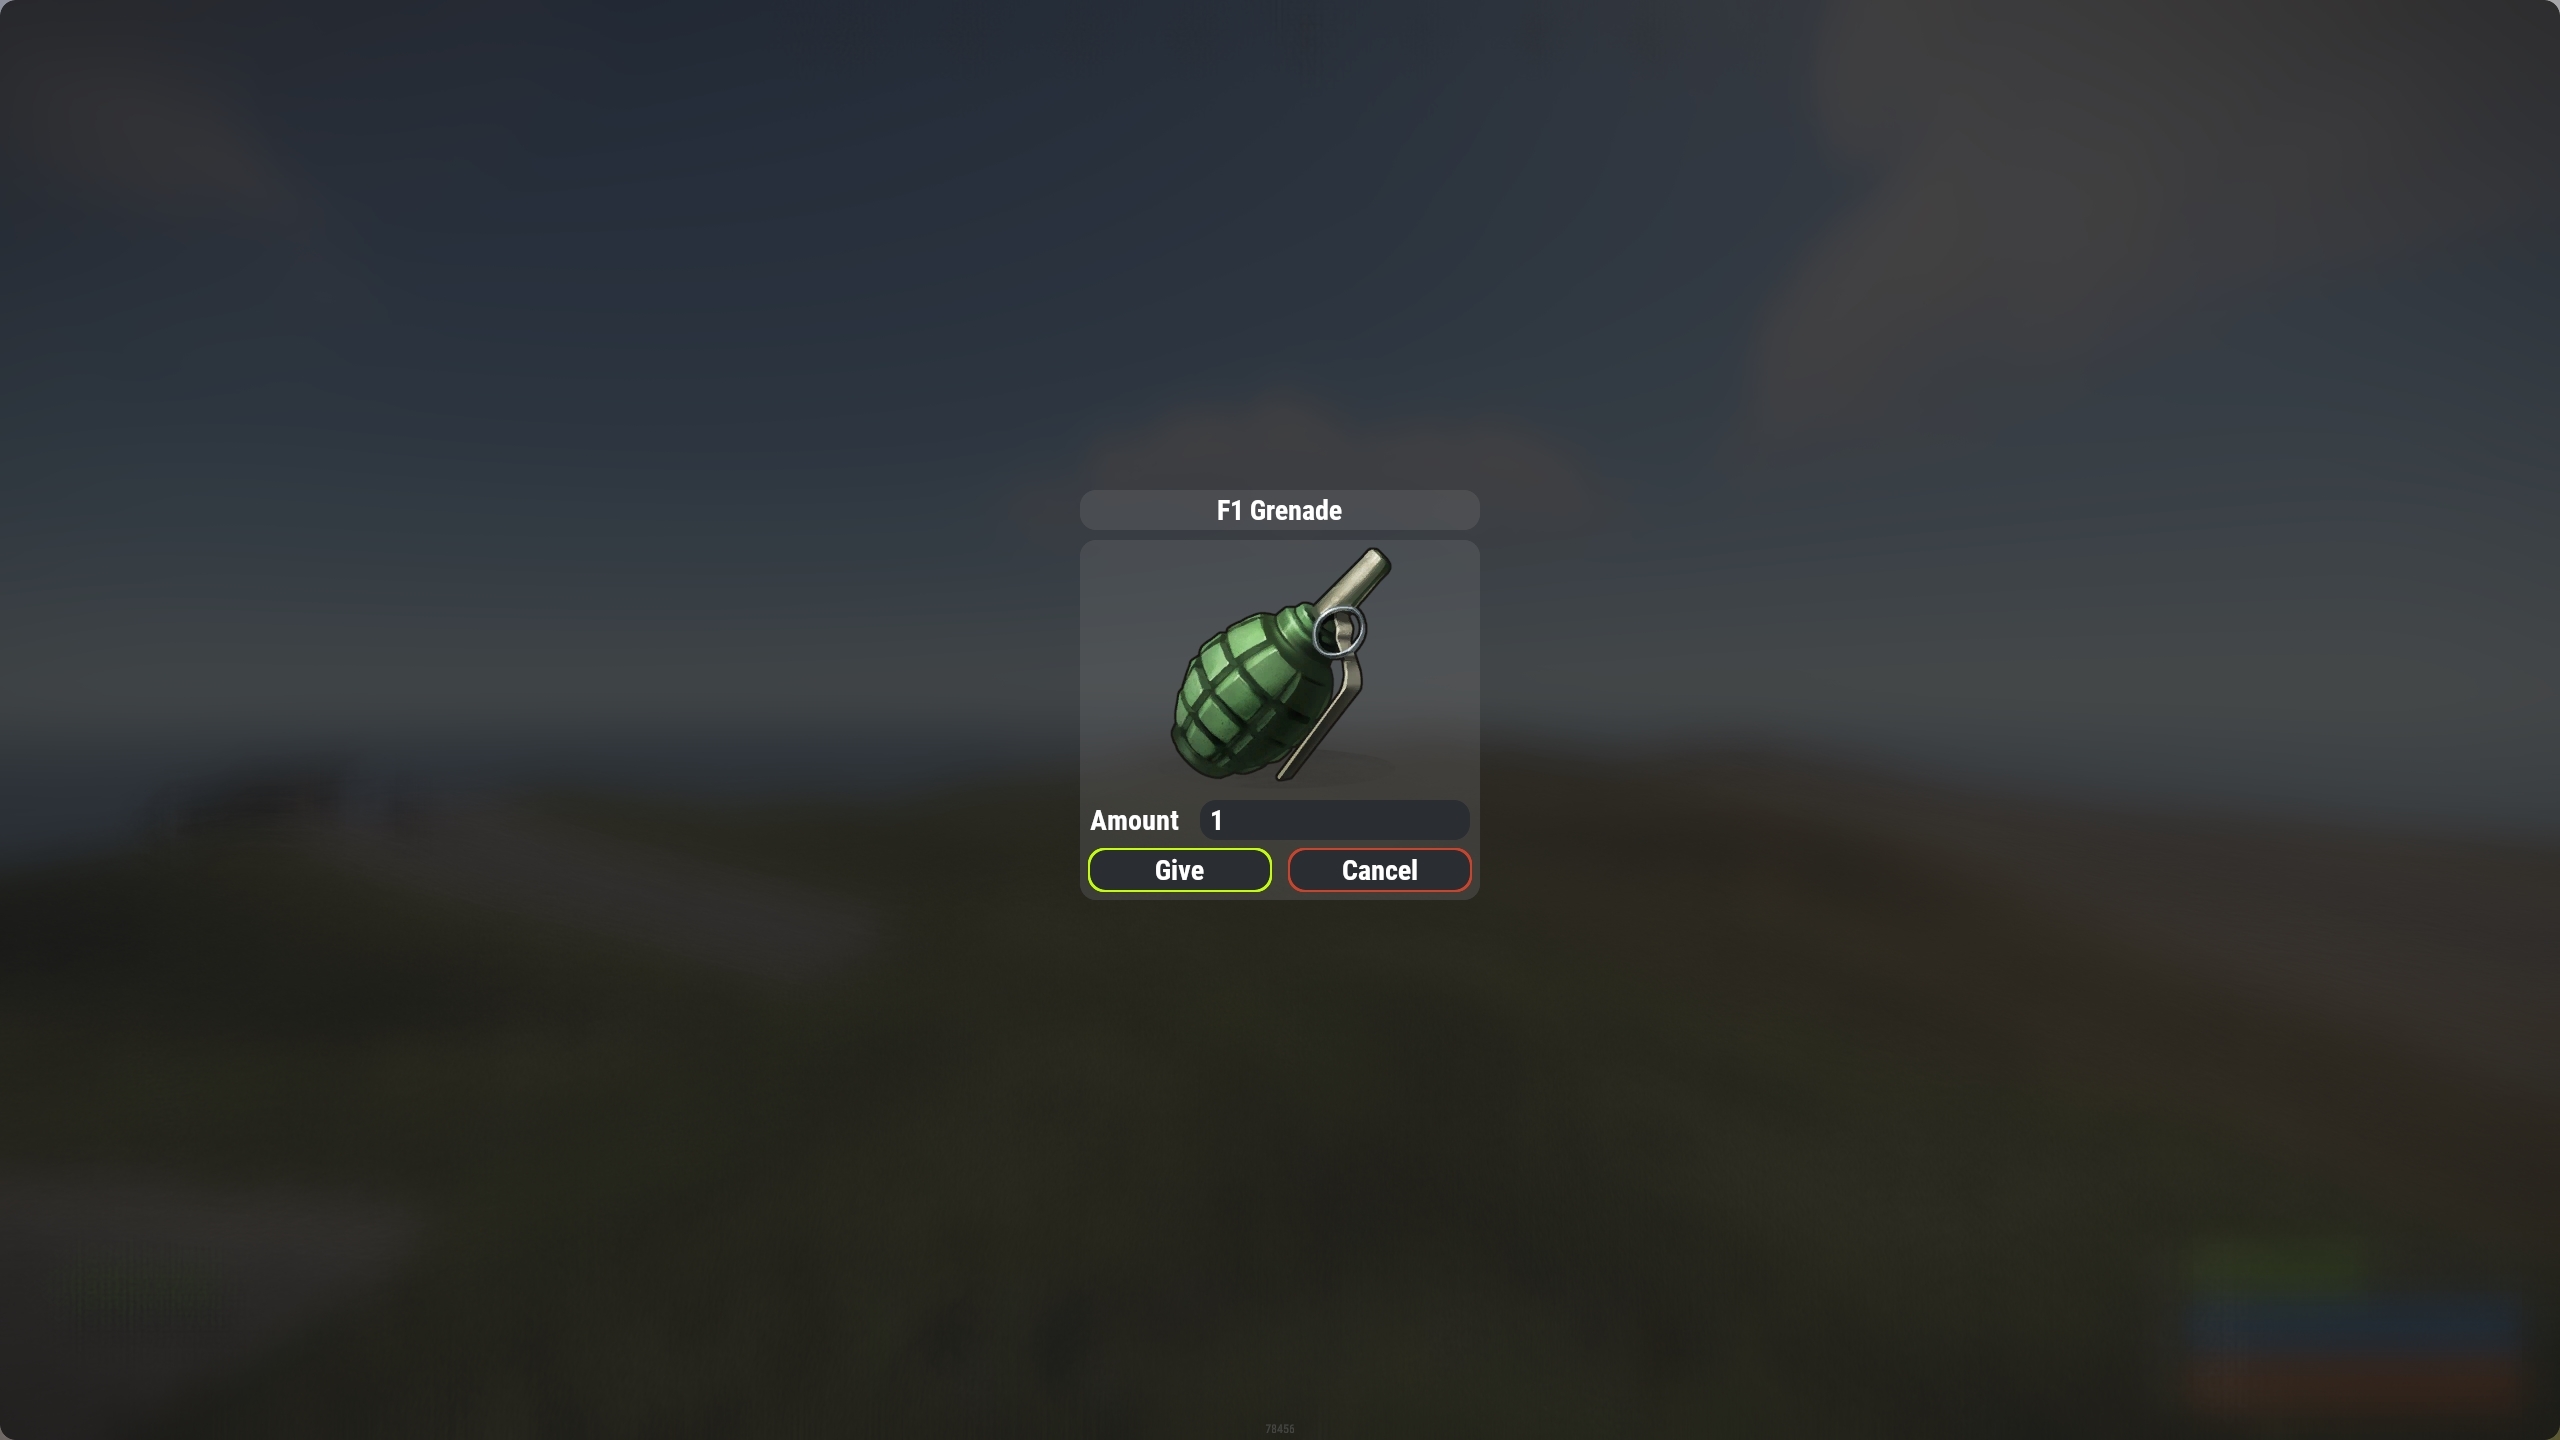
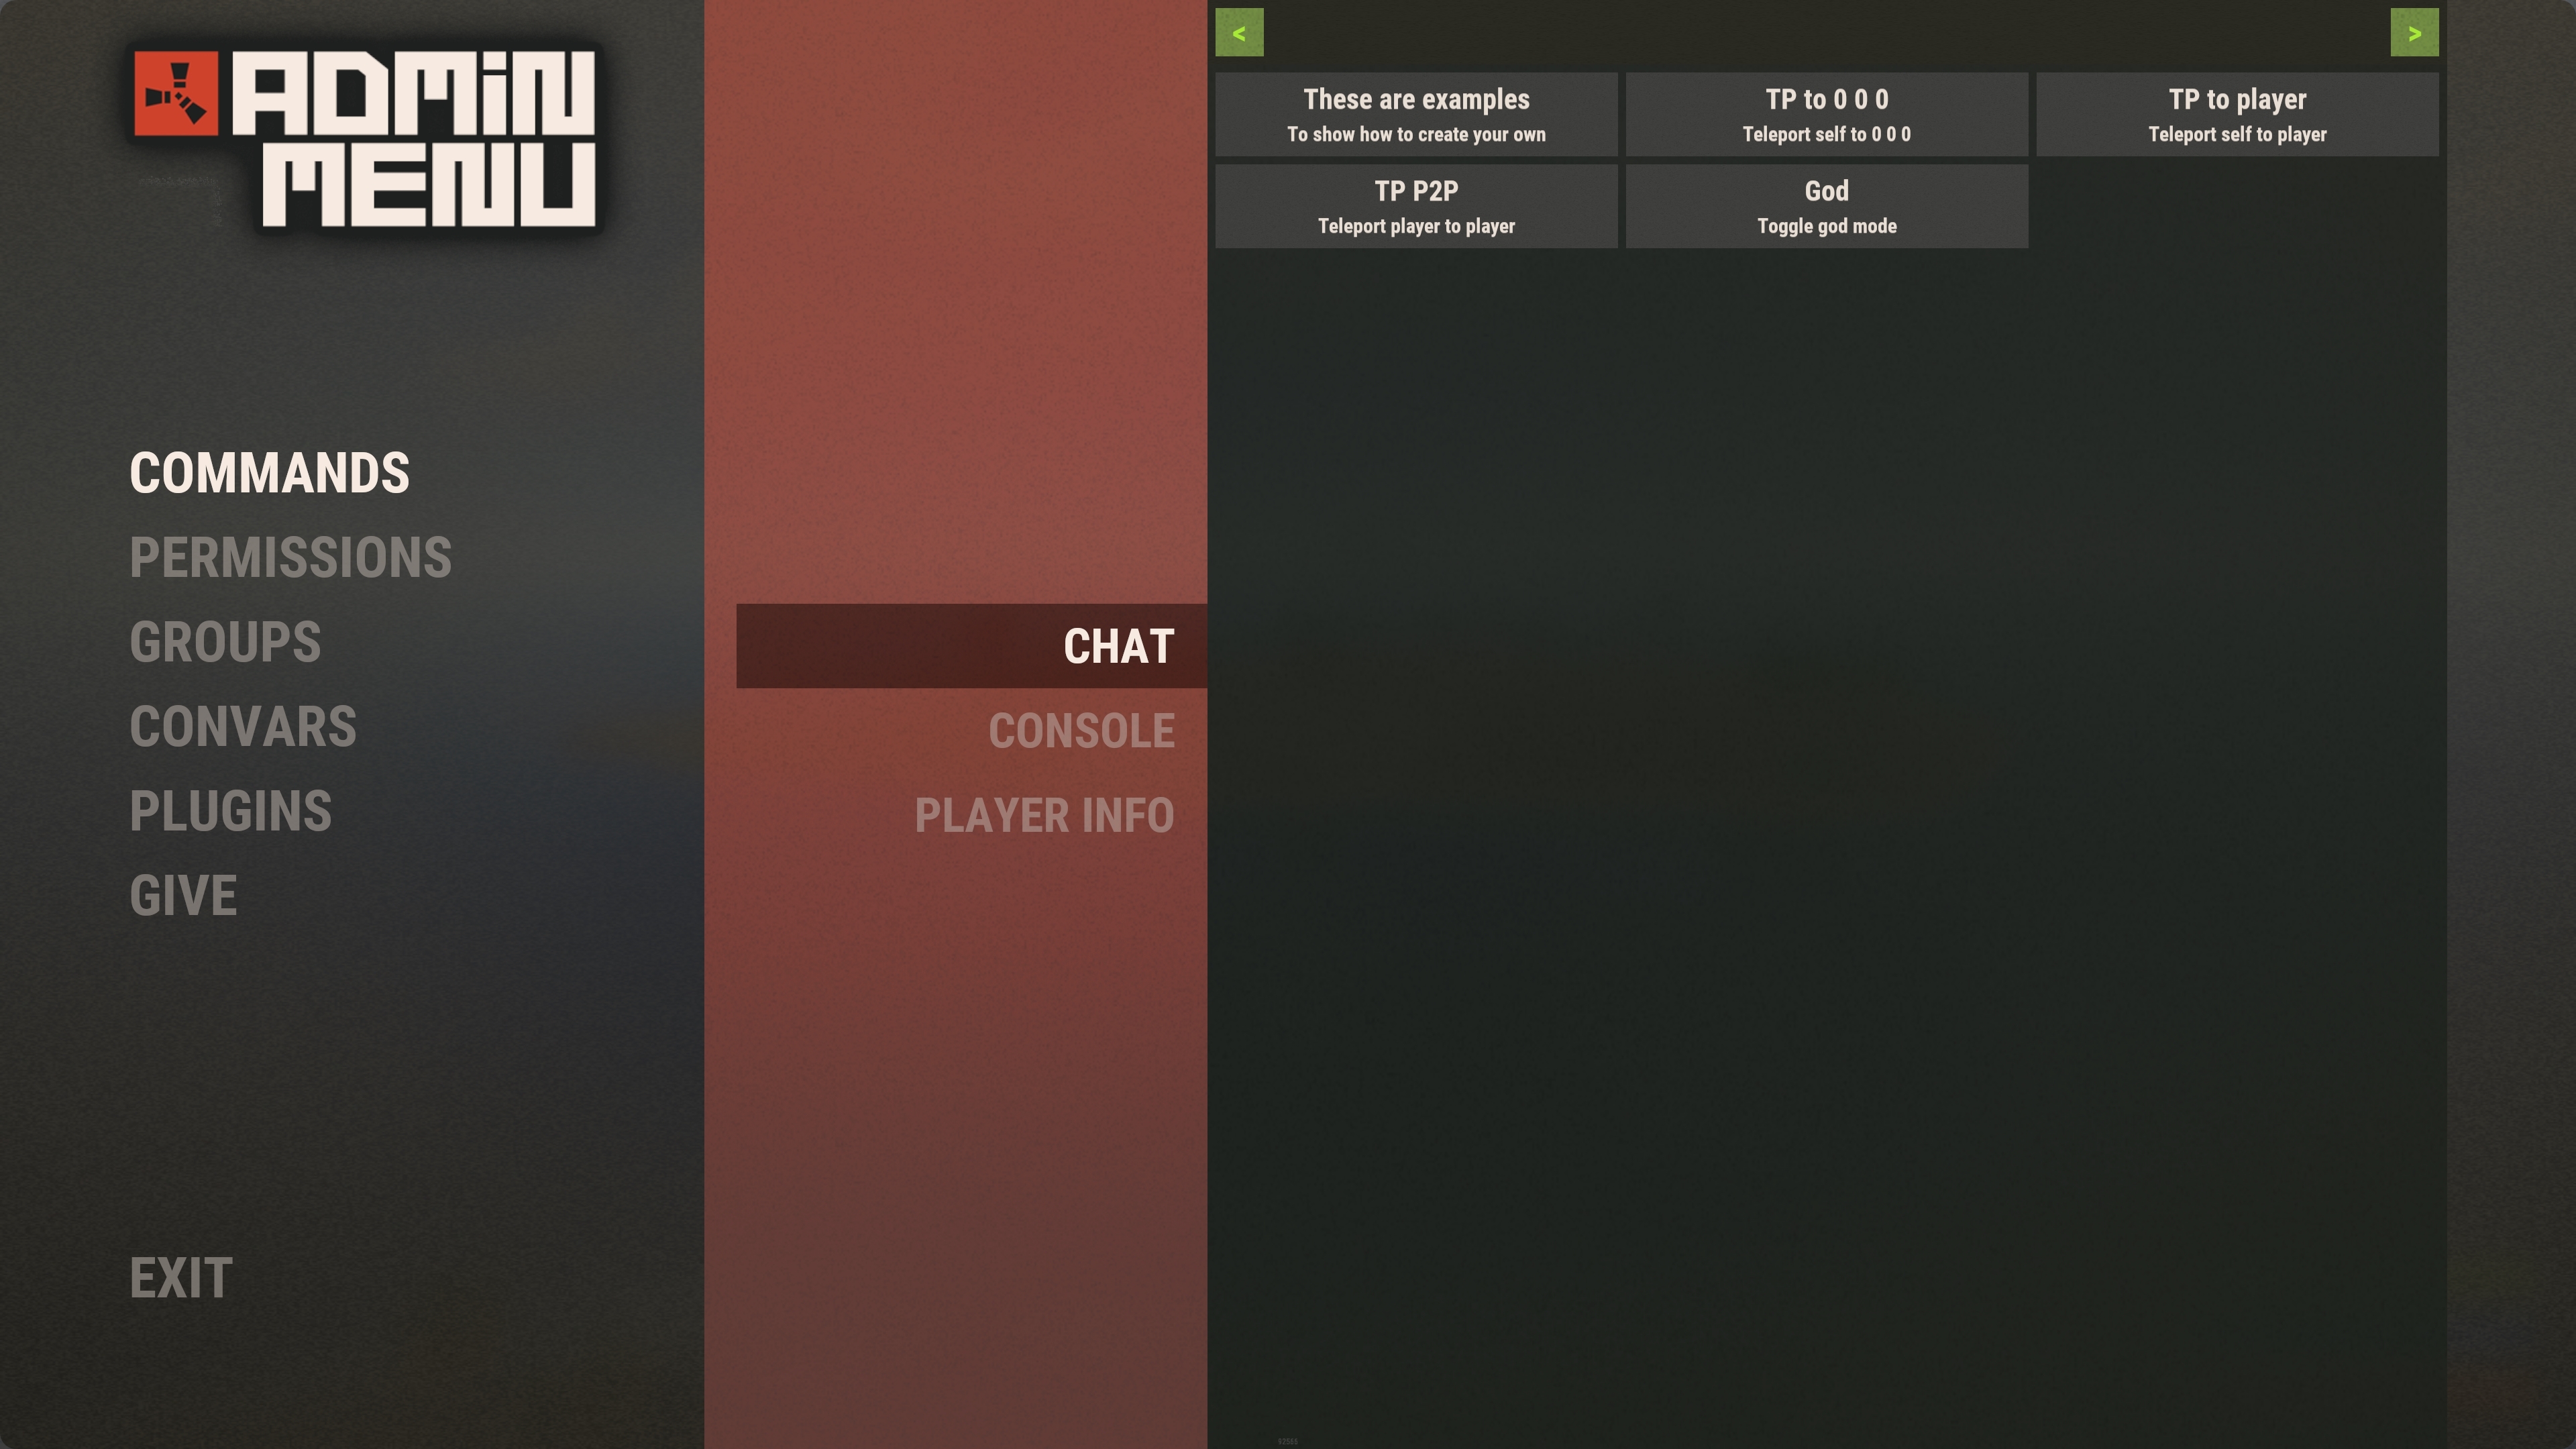
Rust styled UI (can be enabled in the config with the "Use alternate UI style" option)
Features
Admin menu is a ingame UI based menu that can be used for;
Chat Command
/admin - Opens the menu. (Requires permission adminmenu.use)
Permissions
adminmenu.use - Required to open the menu and access the commands section
adminmenu.permissions - Required to access the permission section
adminmenu.groups - Required to access the groups section
adminmenu.give - Required to access the Give menu
adminmenu.convars - Required to access the Convar menu
adminmenu.players - Required to access the Player Info menu
adminmenu.give.selfonly - Used to restrict the give menu to only allow users to give items to themselves
Commands Menu

(Requires permission adminmenu.use)
The commands menu is used to easily run plugin or server commands.
You can set up chat and console commands that can be run via the menu.
These commands are run as if the user is typing it themselves so any commands will need the relevant permission/authlevel to be run.
** NOTE ** The commands provided in the default config are only an example of how to set them up. It is up to you to customize this to suit your own needs
There are currently 4 variables you can put into the commands to make them target specific. They are;
Code:
{target1_name}
{target2_name}
{target1_id}
{target2_id}
By using the variable "{target1_name}" or "{target1_id}" in a command will trigger the player selection menu allowing you to select a target player for the command.
By using the variable {target2_name}" or "{target2_id}" in a command will trigger a second player selection menu allowing you to select a additional target player for the command.
The name variables will be replaced with the targets display name, and in-turn the ID variables will be replaced with the targets user ID.
An example of usage for 2 target players:
Teleporting Player1 to Player2 using the /tp command.
Code:
"/tp {target1_name} {target2_name}"
An example of usage for 1 player:
Teleporting to the target player using the /tp command.
Code:
"/tp {target1_name}"
An example of a command that does not require any targets:
Toggling god mode on yourself.
Code:
"/god"
I am happy to expand upon this with additional variables if you can think of any alternative use-cases
Permissions Menu


(Requires permission adminmenu.permissions)
The are 3 categories in the permissions menu.
View - This is just a list of all currently registered permissions
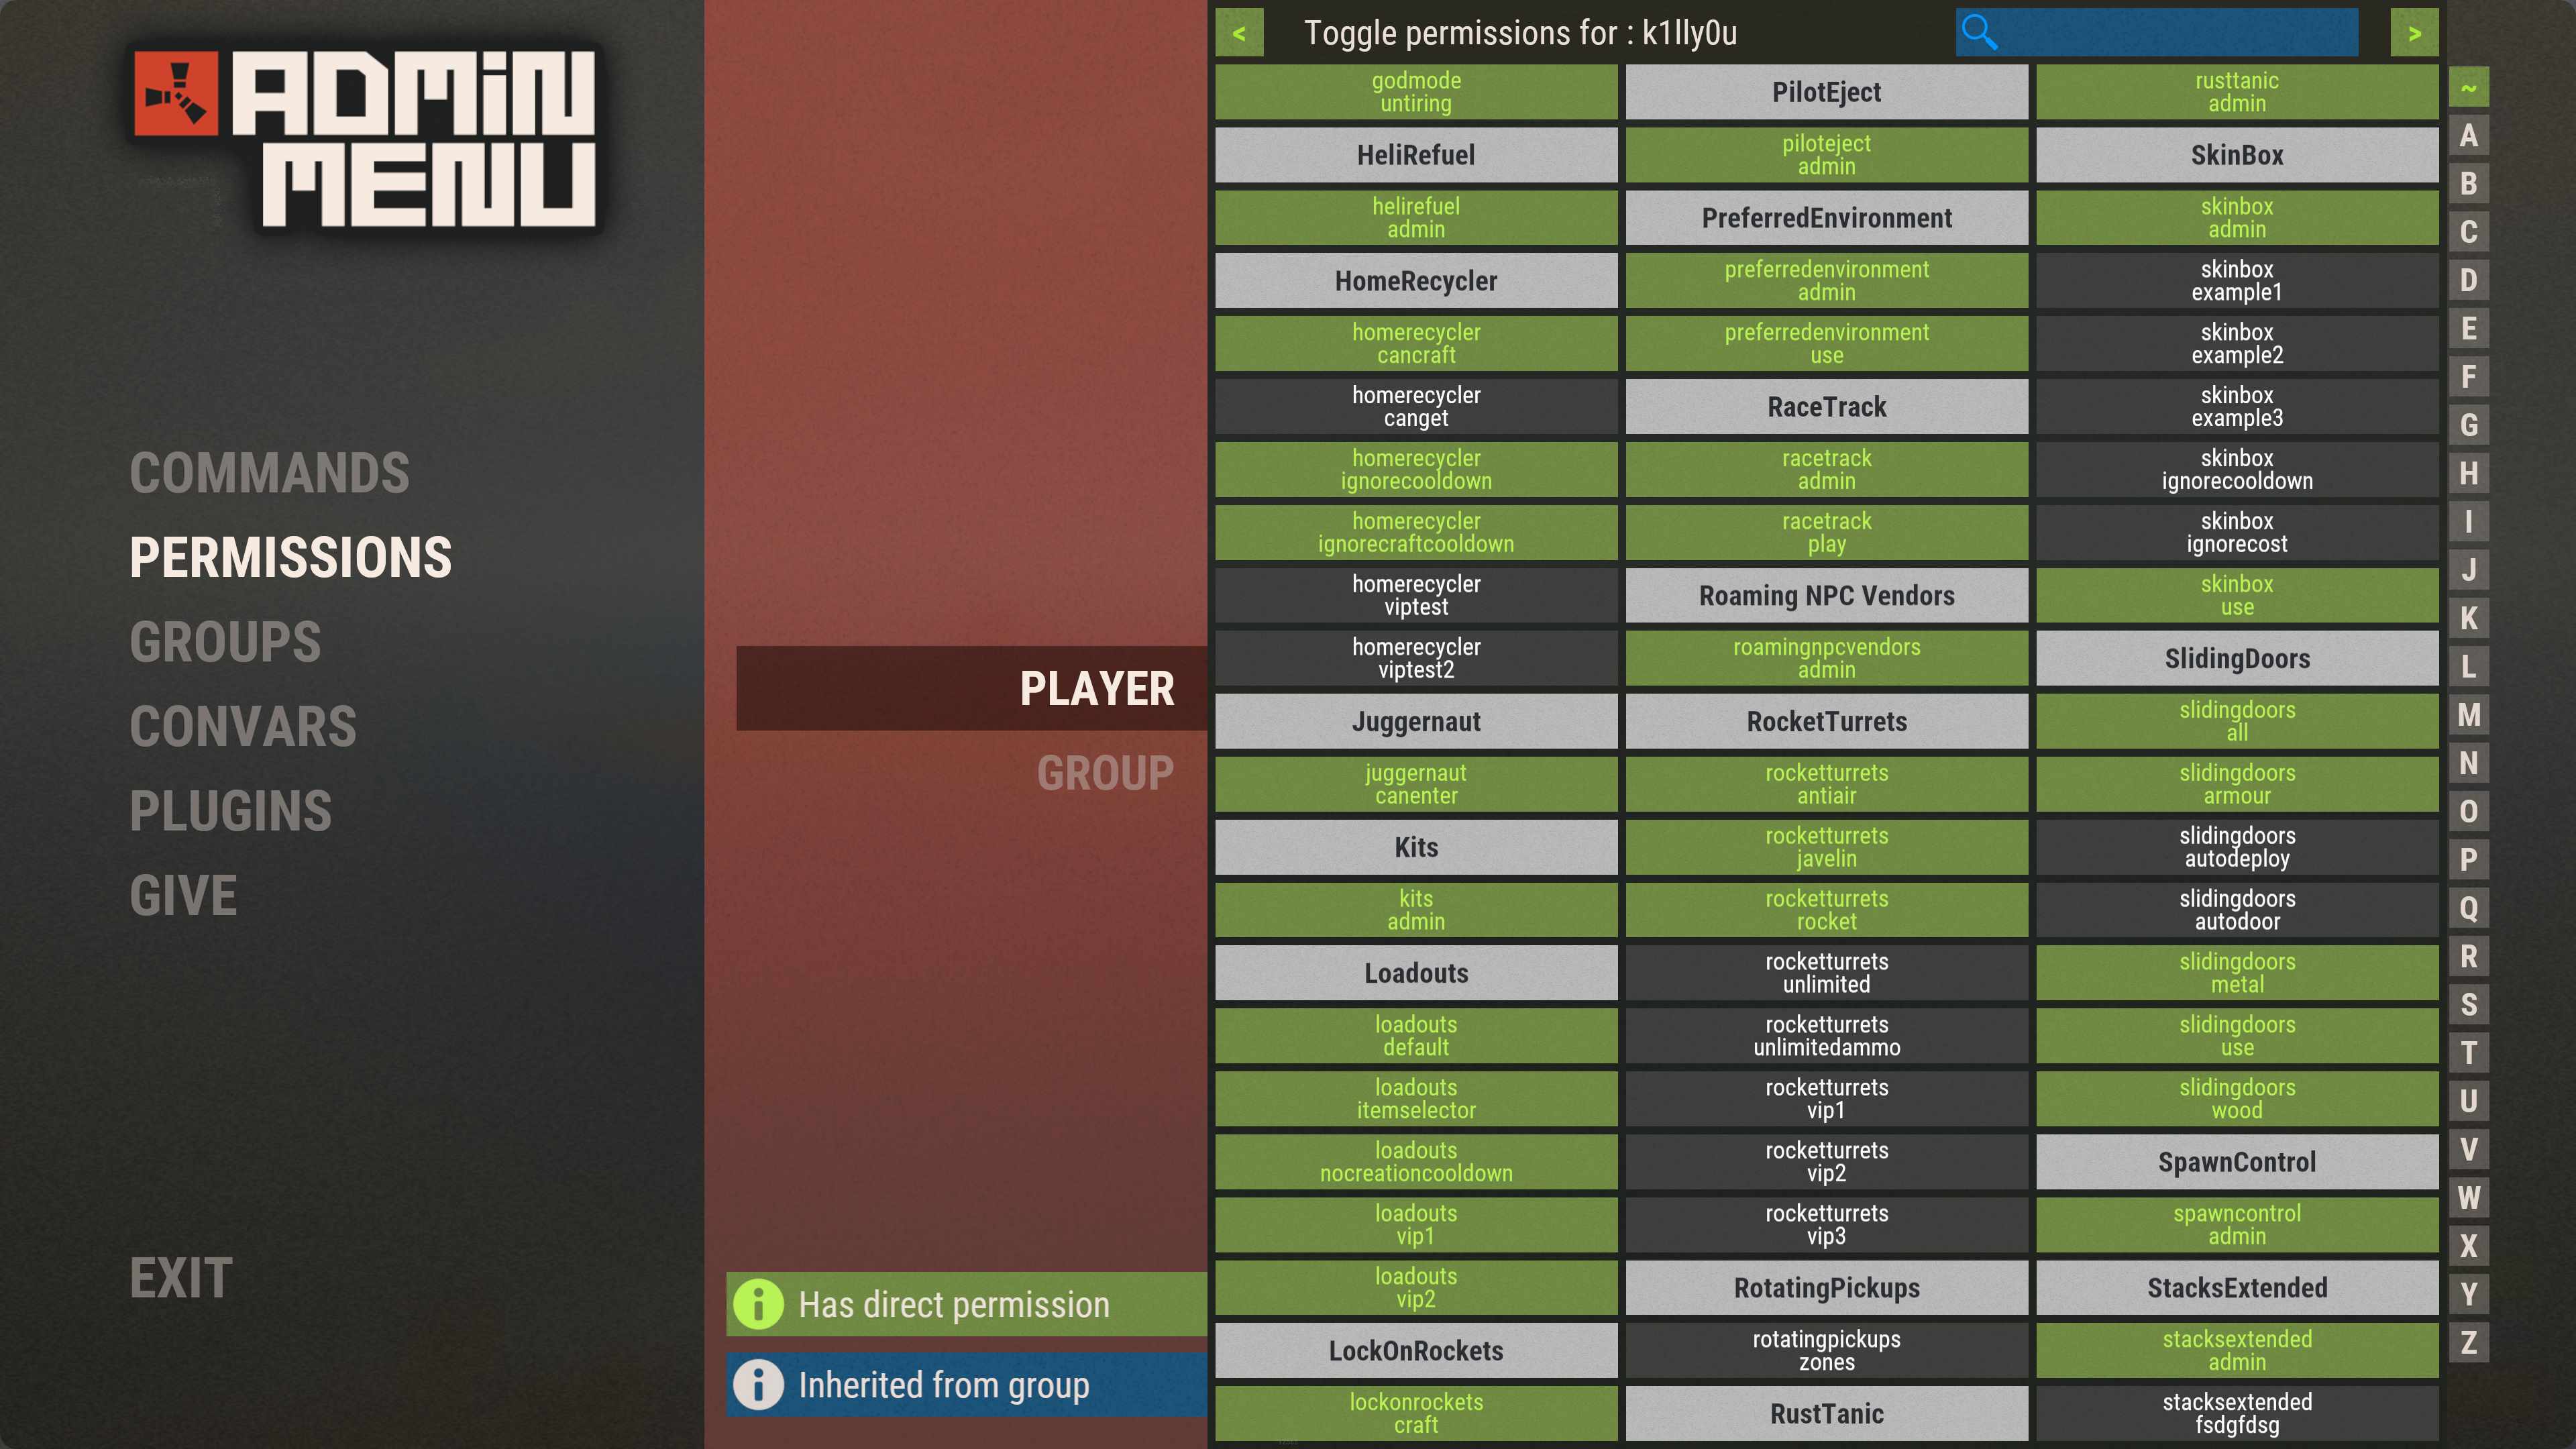
Player Permissions - This will open a player selection menu, once you have selected a player it will display all currently available permissions, with permissions that the player has being highlighted in green. You can then toggle permissions for the selected player by clicking the permission button.
Group Permissions - This will open a group selection menu, once you have selected a group it will display all currently available permissions, with permissions that the group has being highlighted in green. You can then toggle permissions for the selected group by clicking the permission button.
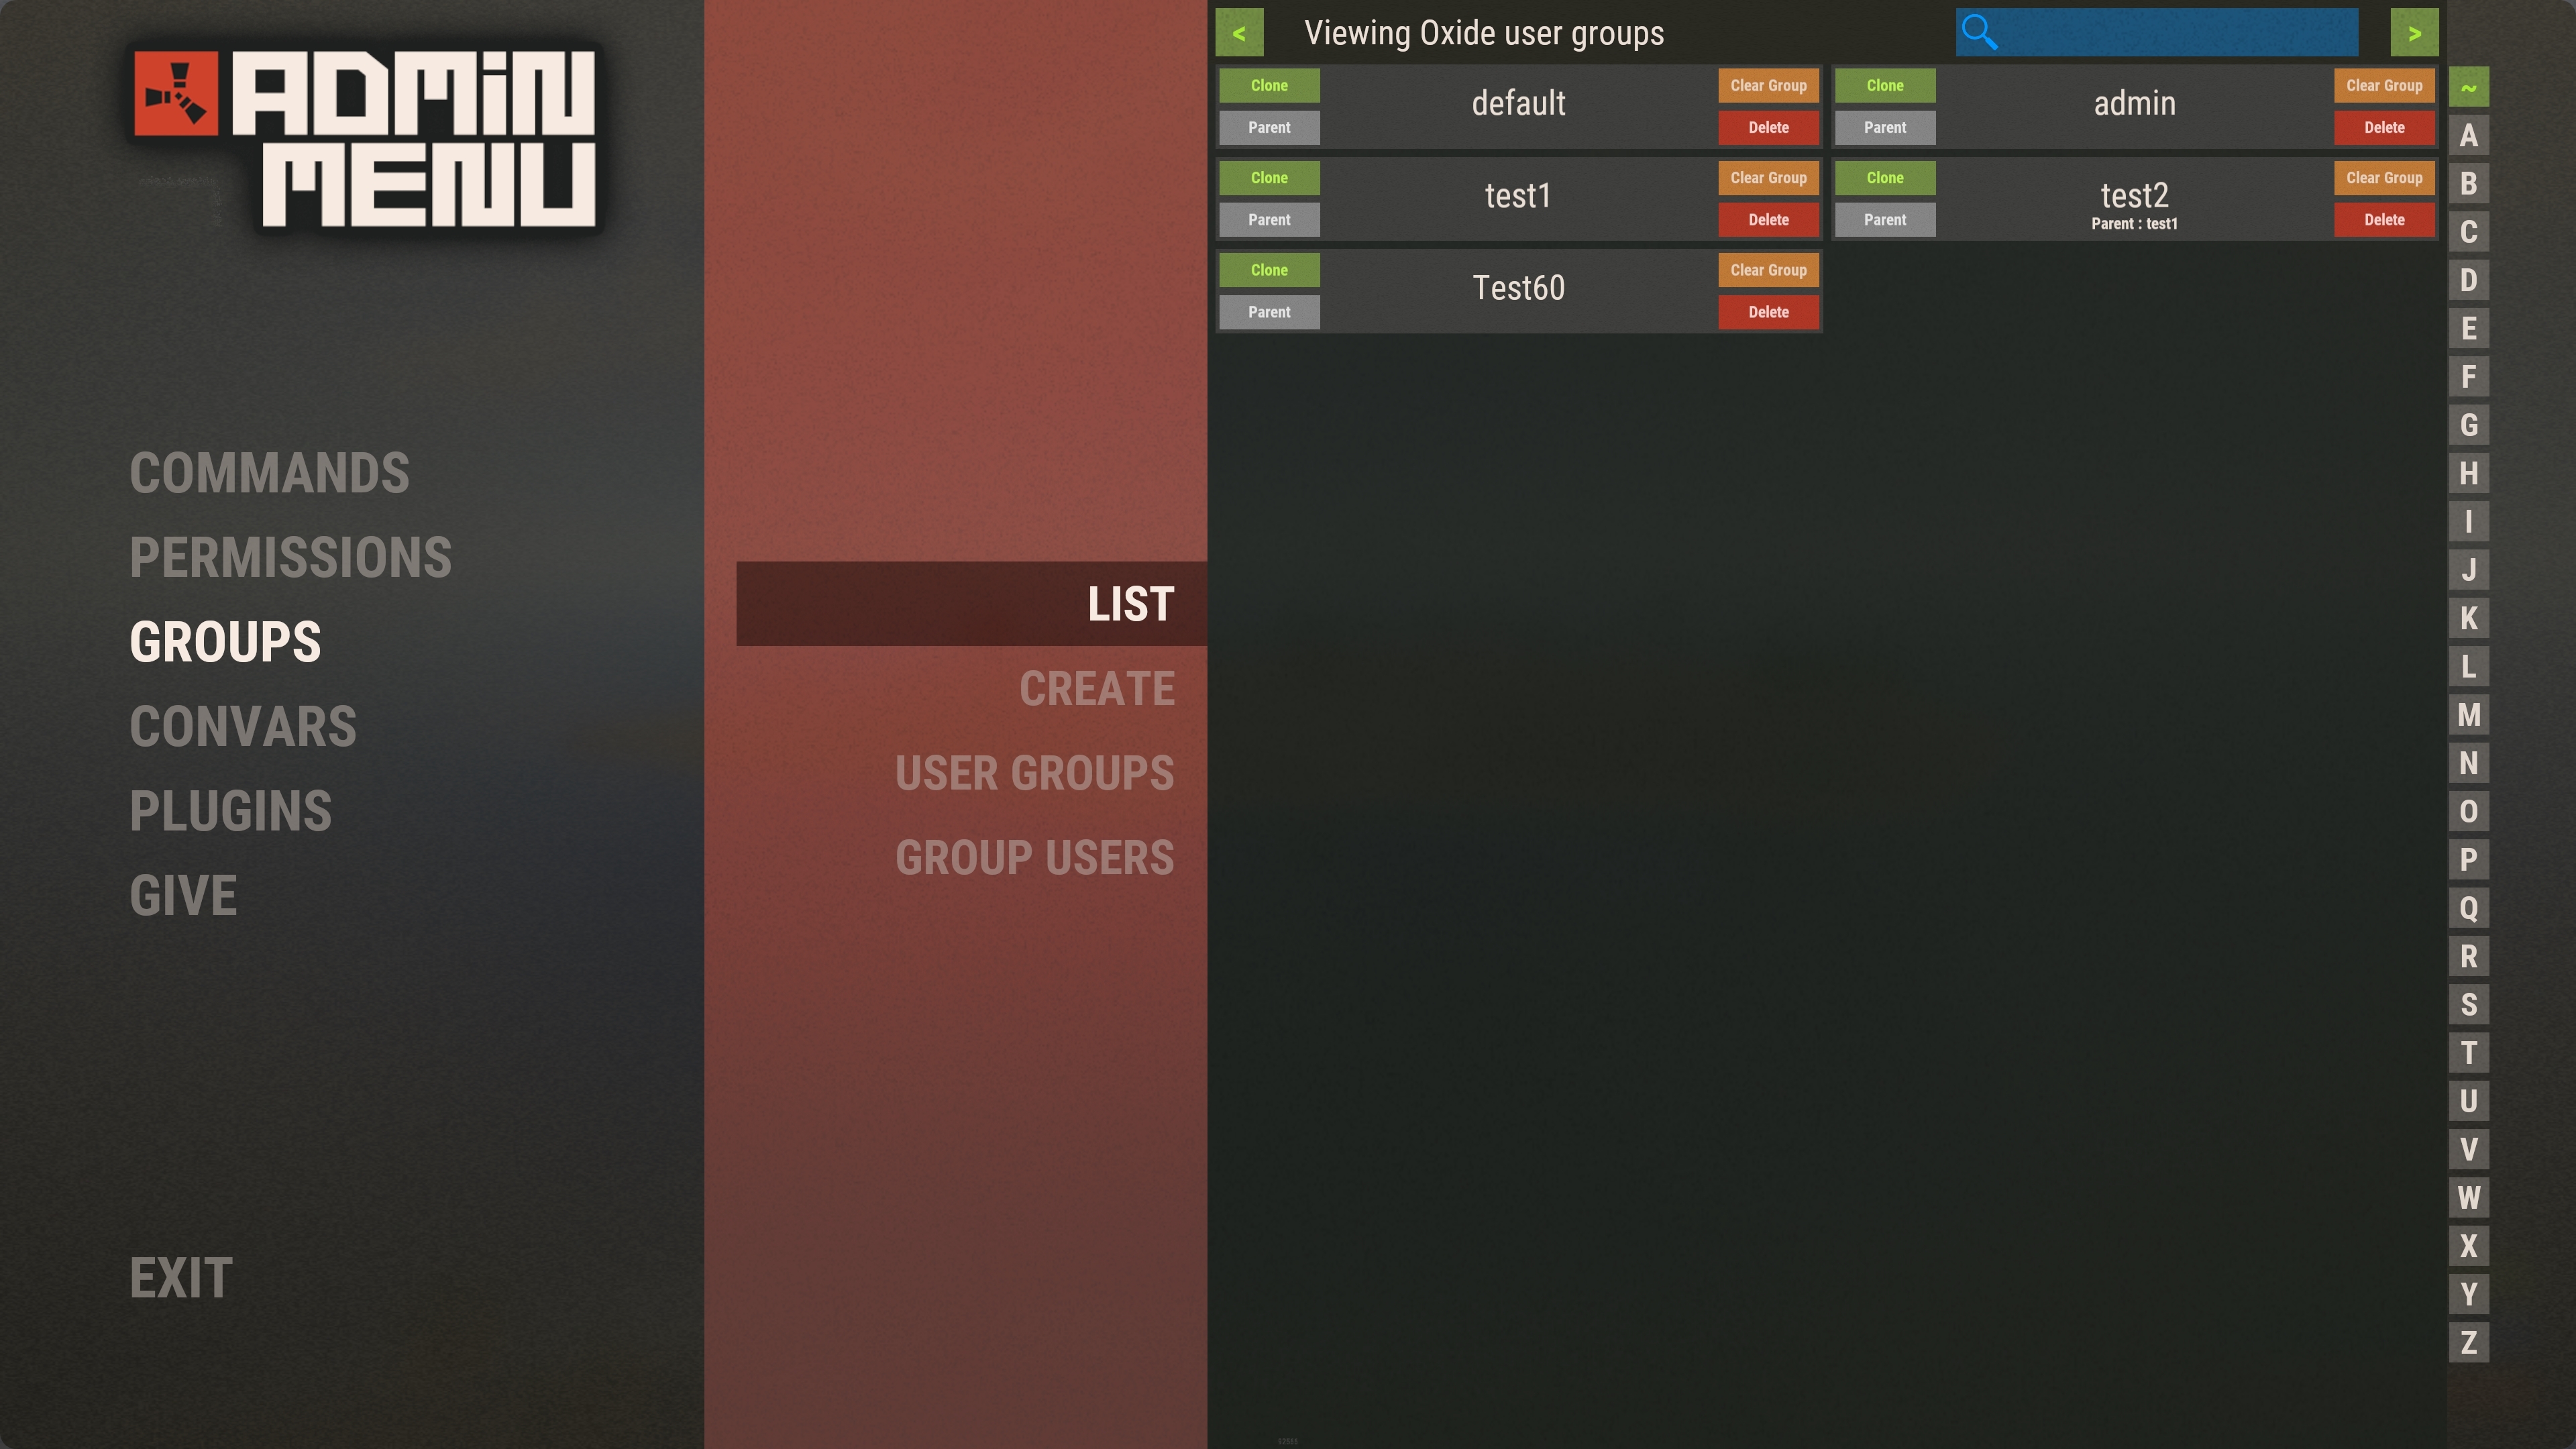
Groups Menu


(Requires permission adminmenu.groups)
There are 4 categories in the groups menu.
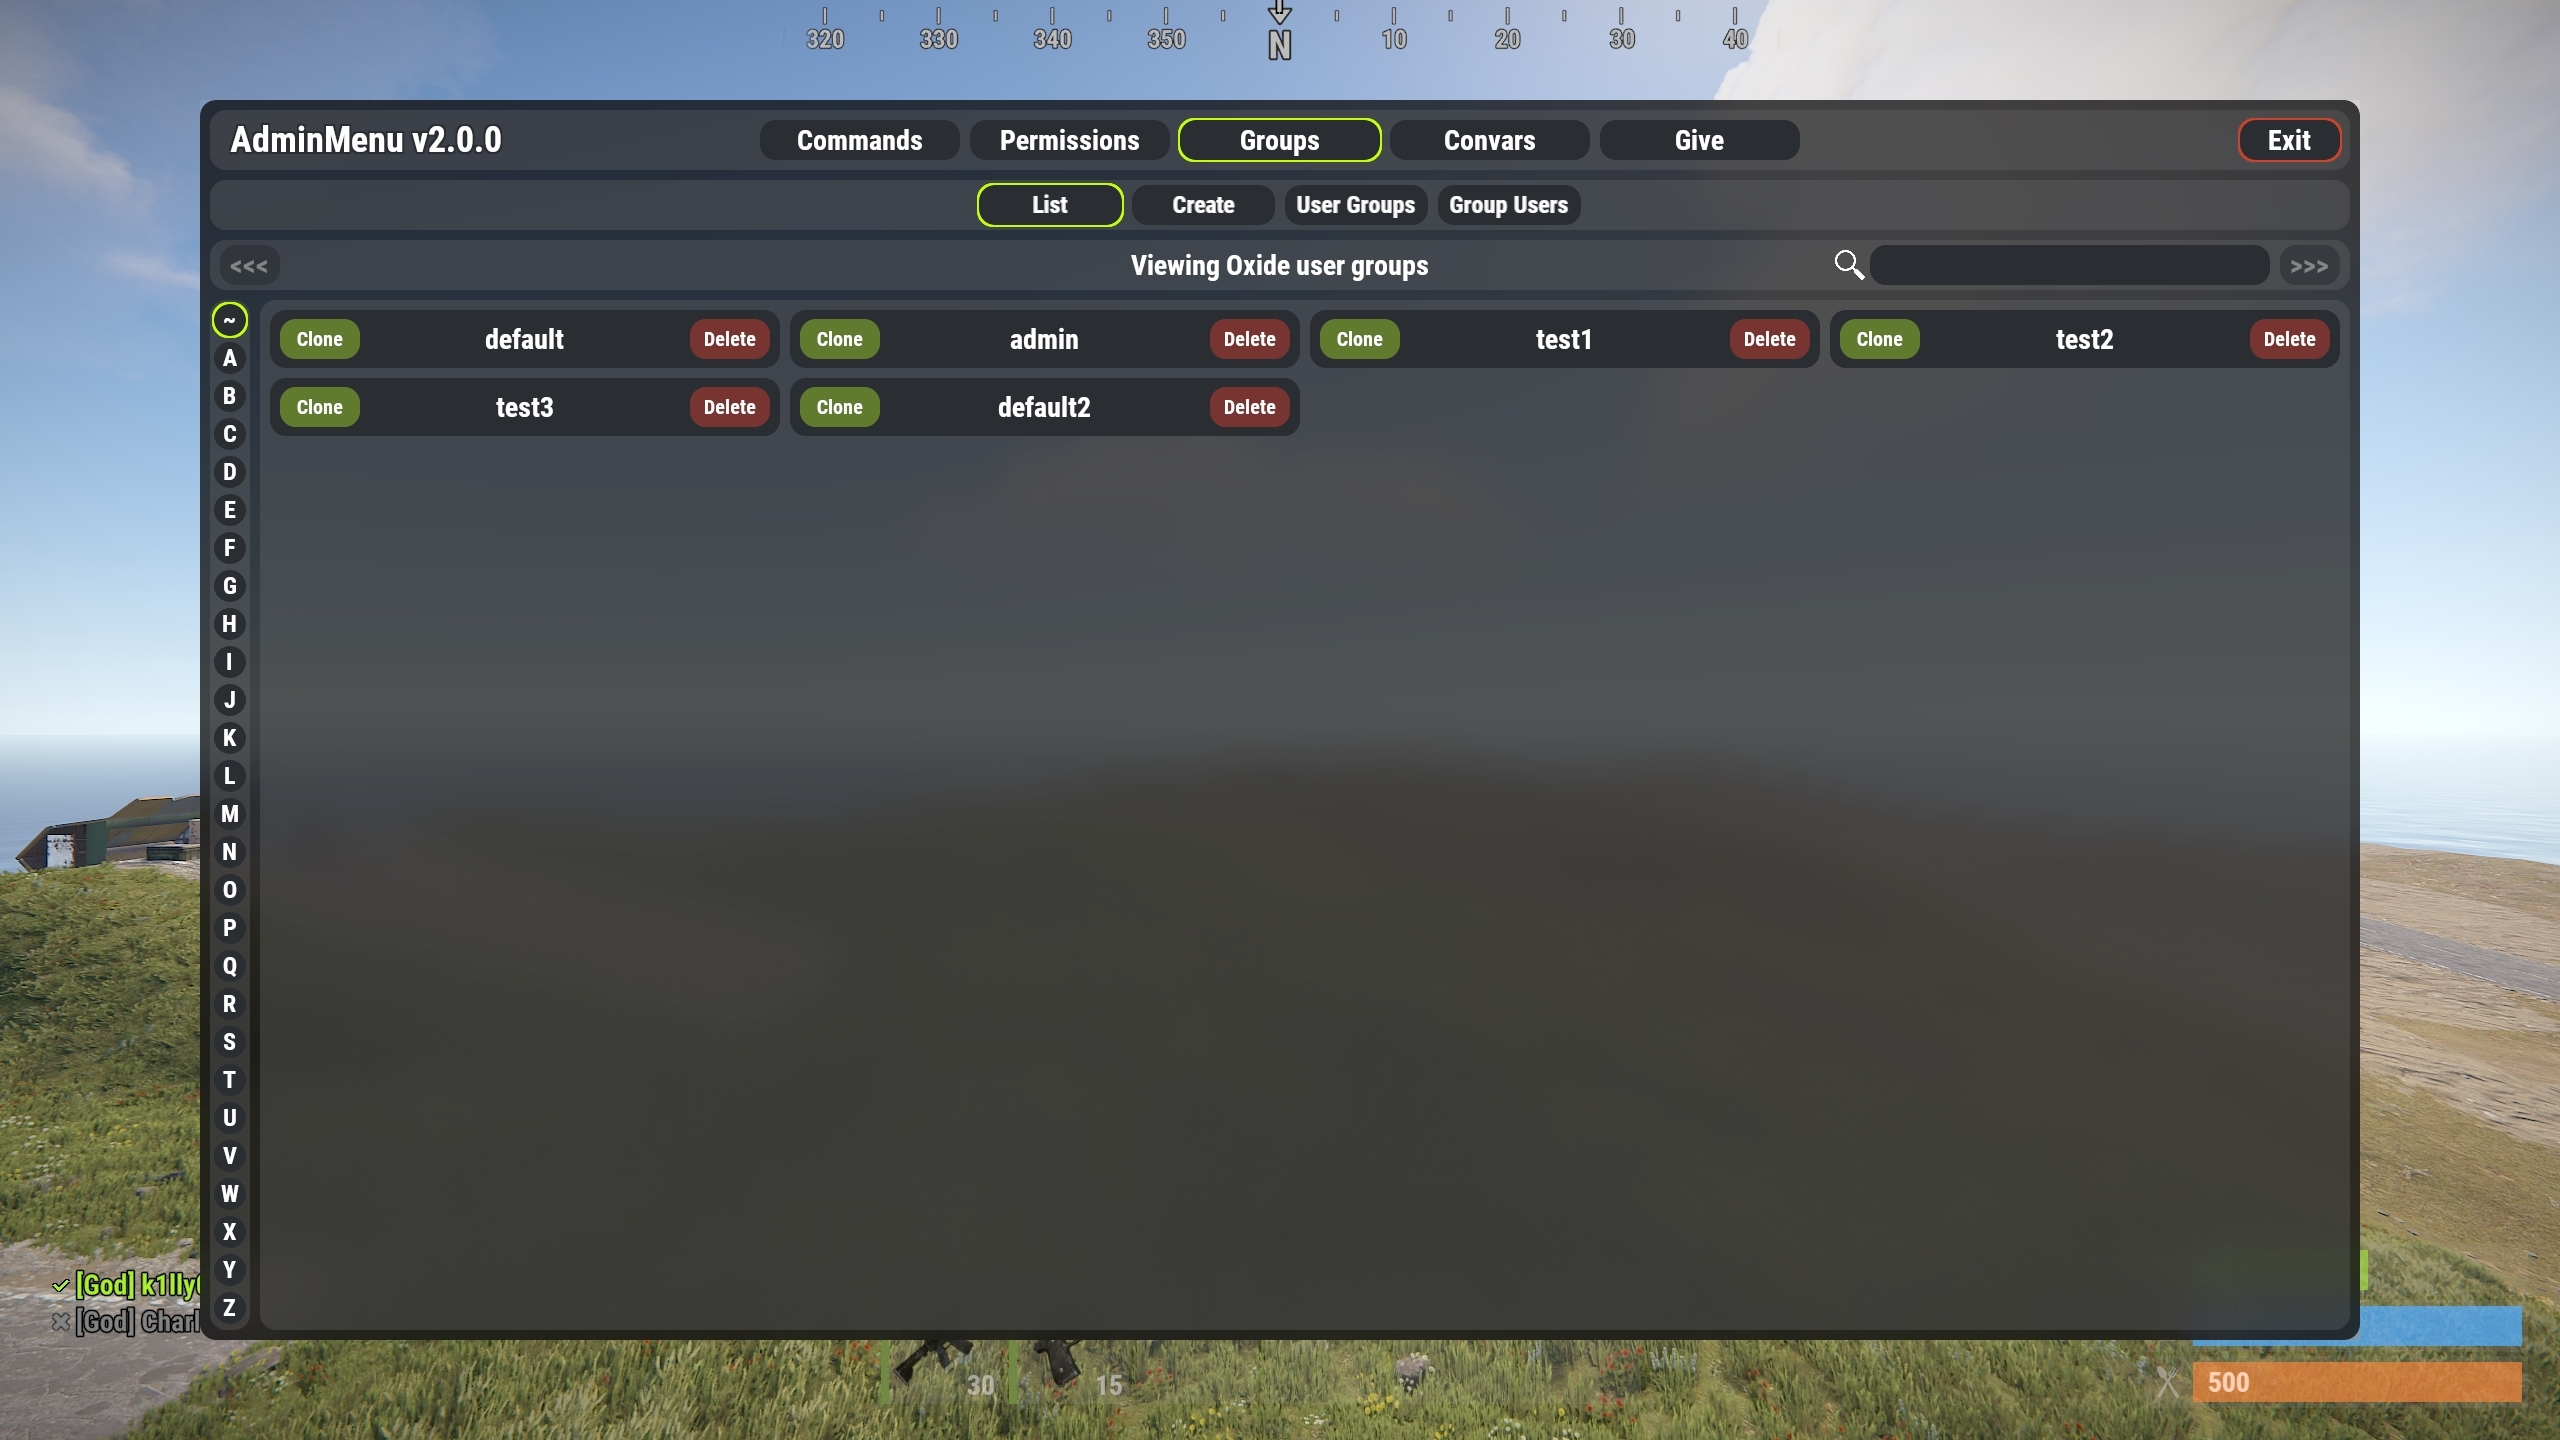
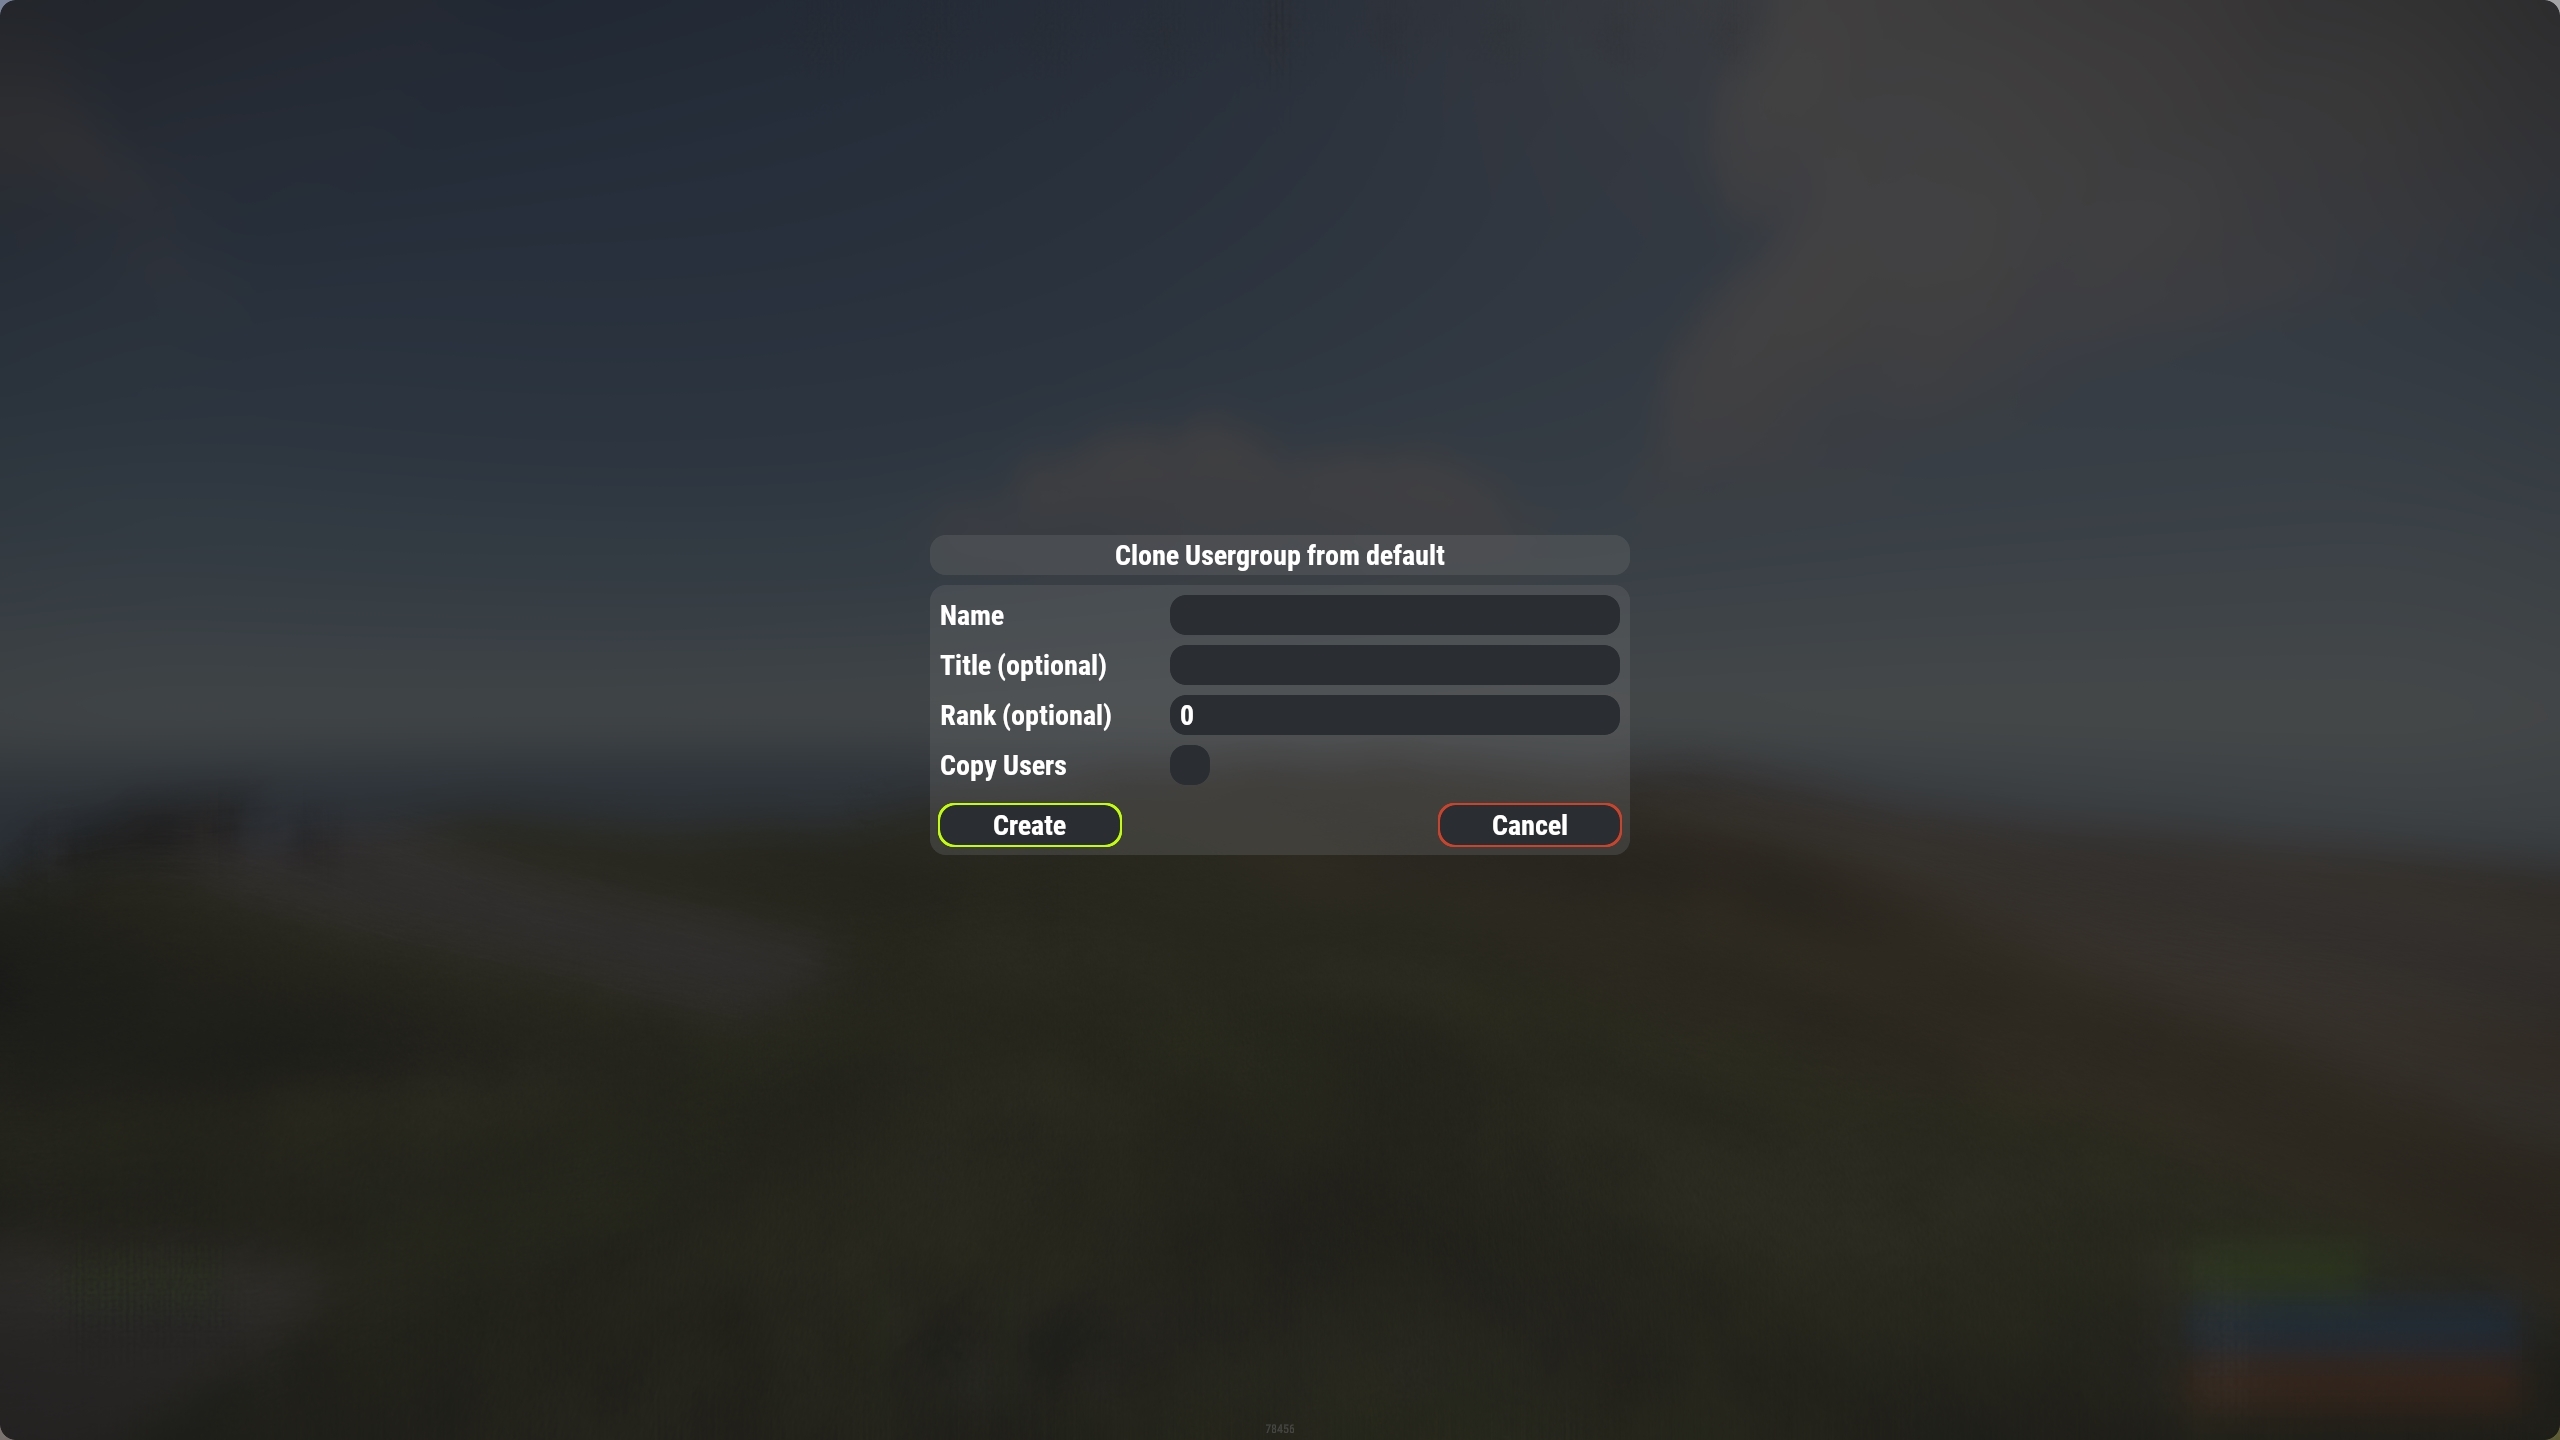
List - This is a list of all groups, from here you can clone and delete usergroups
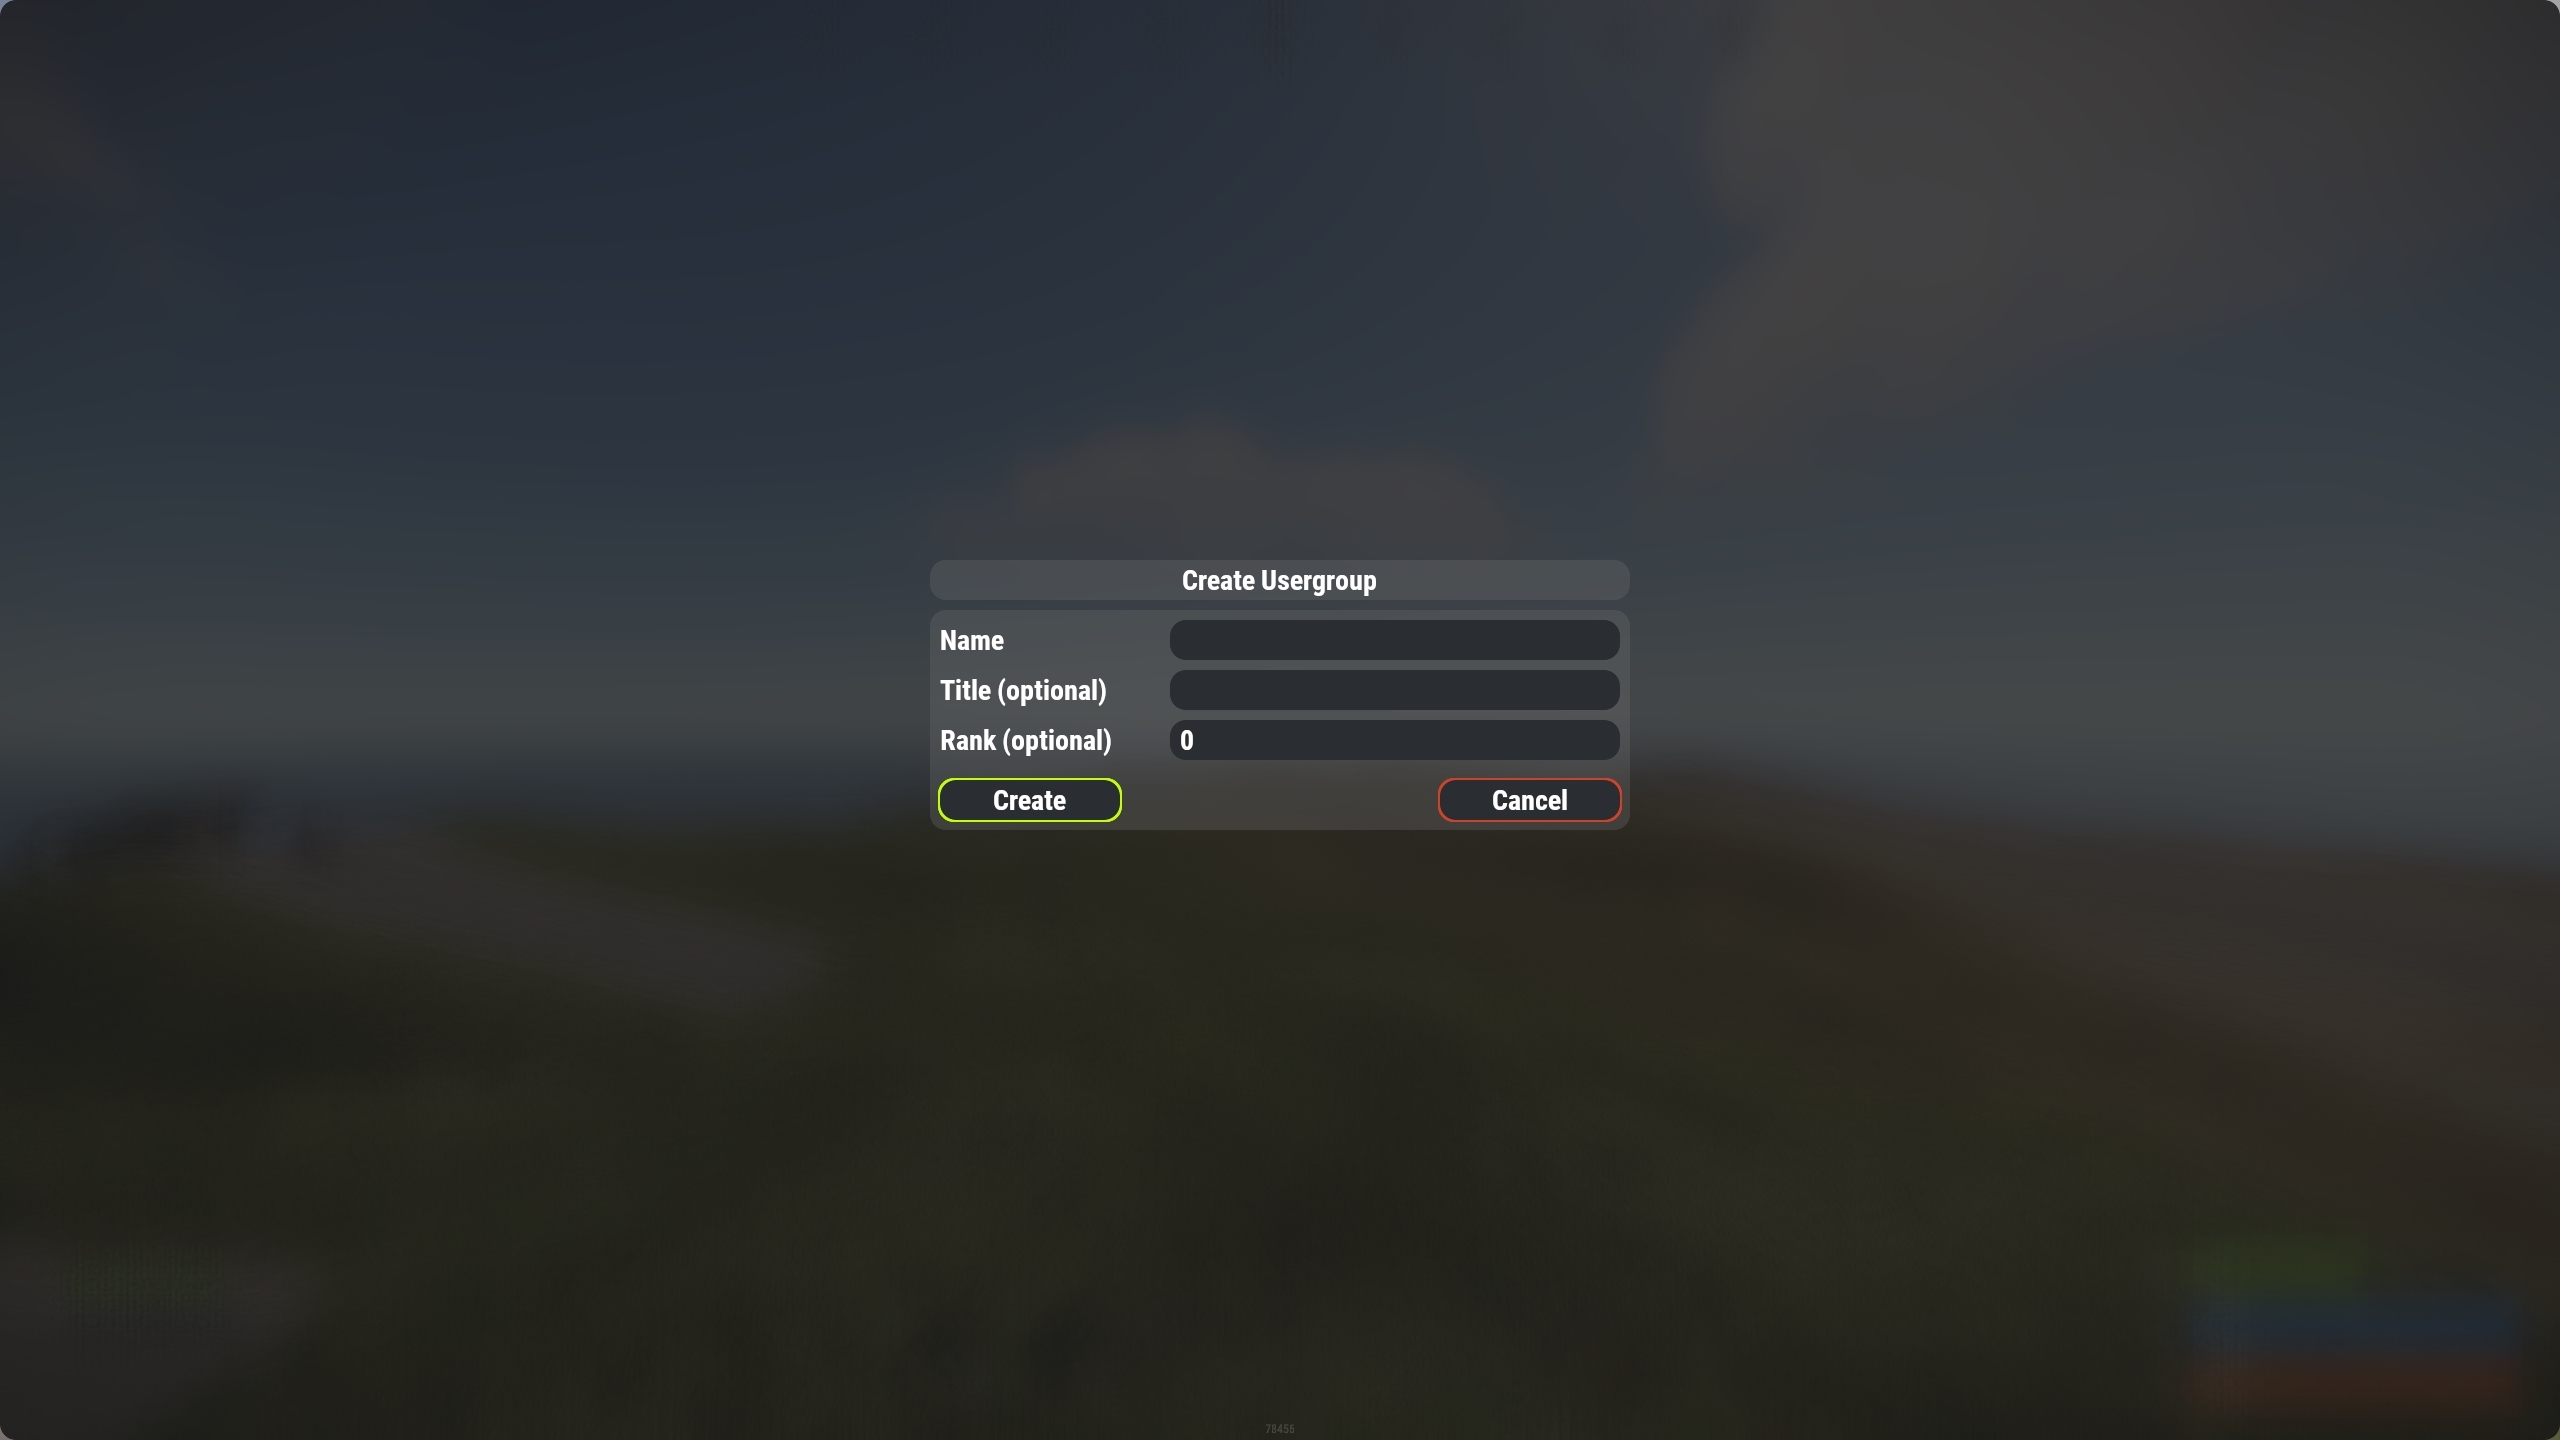
Create Group - This menu is used to create new groups. It has 3 input boxes (Name, Title and Rank). Upon filling in a box you must hit "ENTER" to register your input.
At the very least you need to specify a group name to create a new group.
Once you have filled in the details you can press the "Create" button to create the new group.
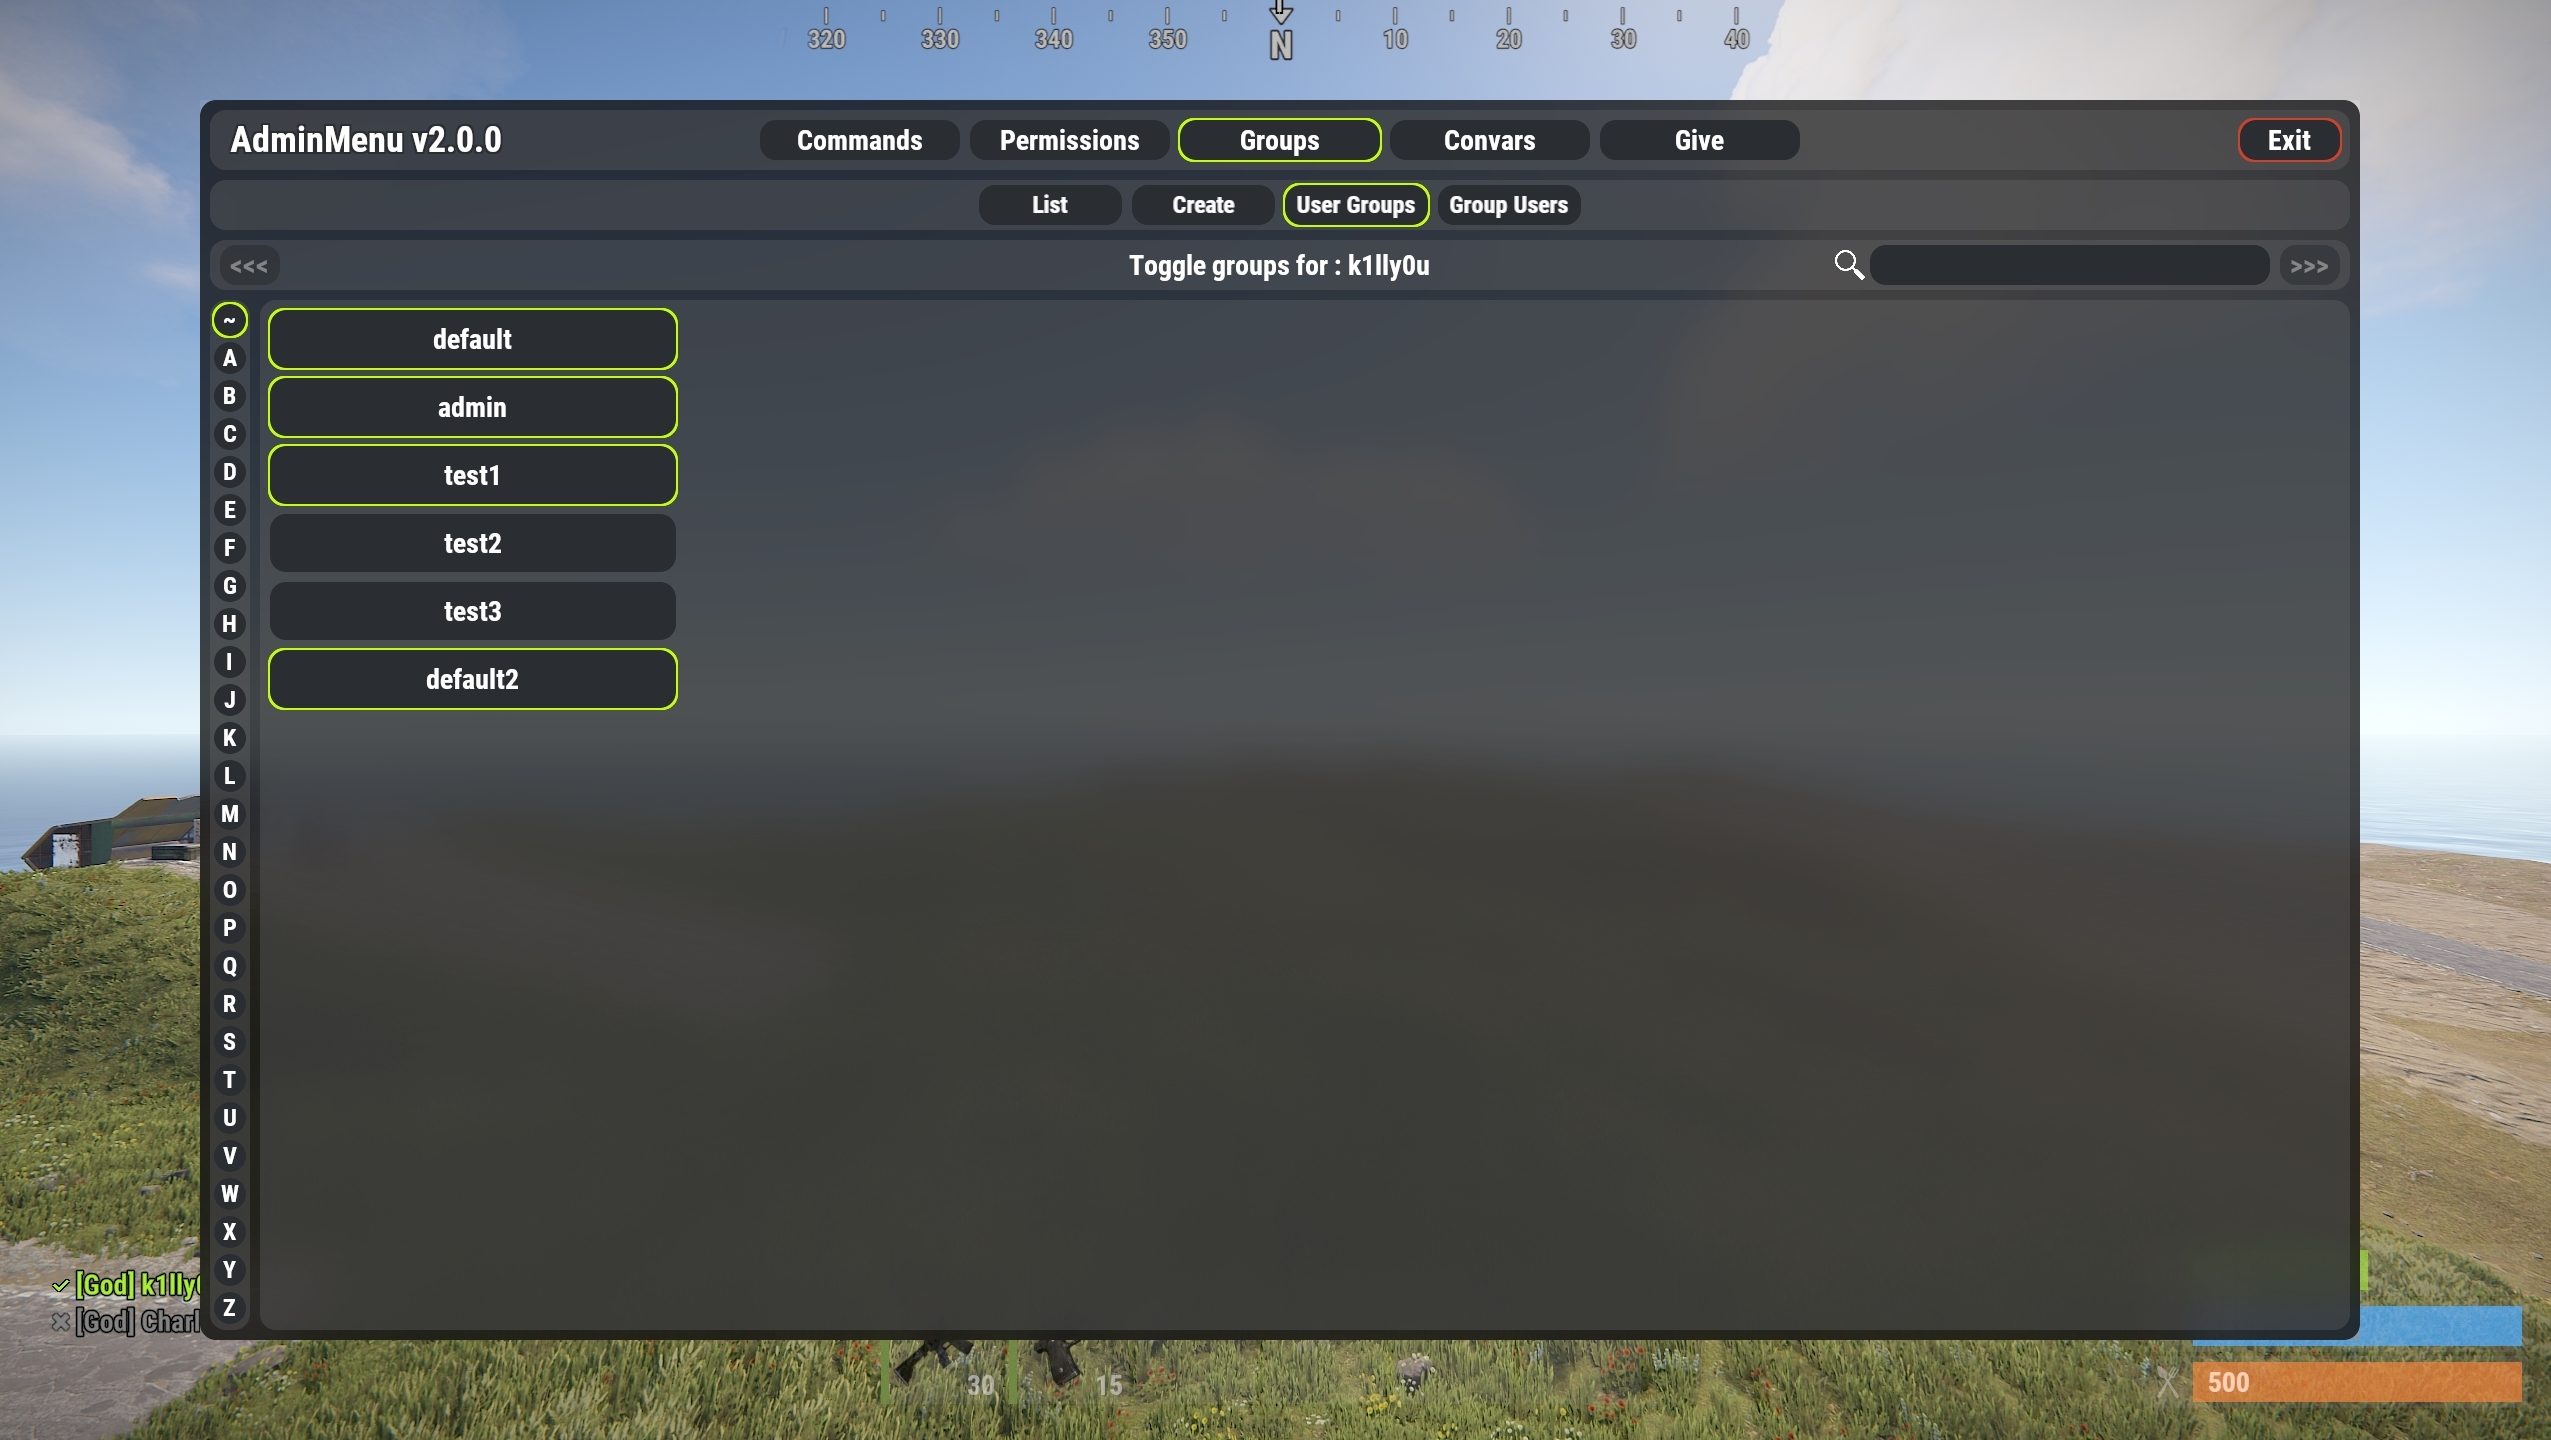
User Groups - This menu allows you to select a player and view all the usergroups they are in. You can also toggle the users groups
Group Users - This menu allows you to select a user group and view all the players in it. You can also remove users from the selected group
User Groups - This will open a player selection menu, once you have selected a player it will display all available groups, with groups that the player is in being highlighted in green. You can then toggle groups for the selected player by clicking the group button
Player Info Menu

(Requires permission adminmenu.players)
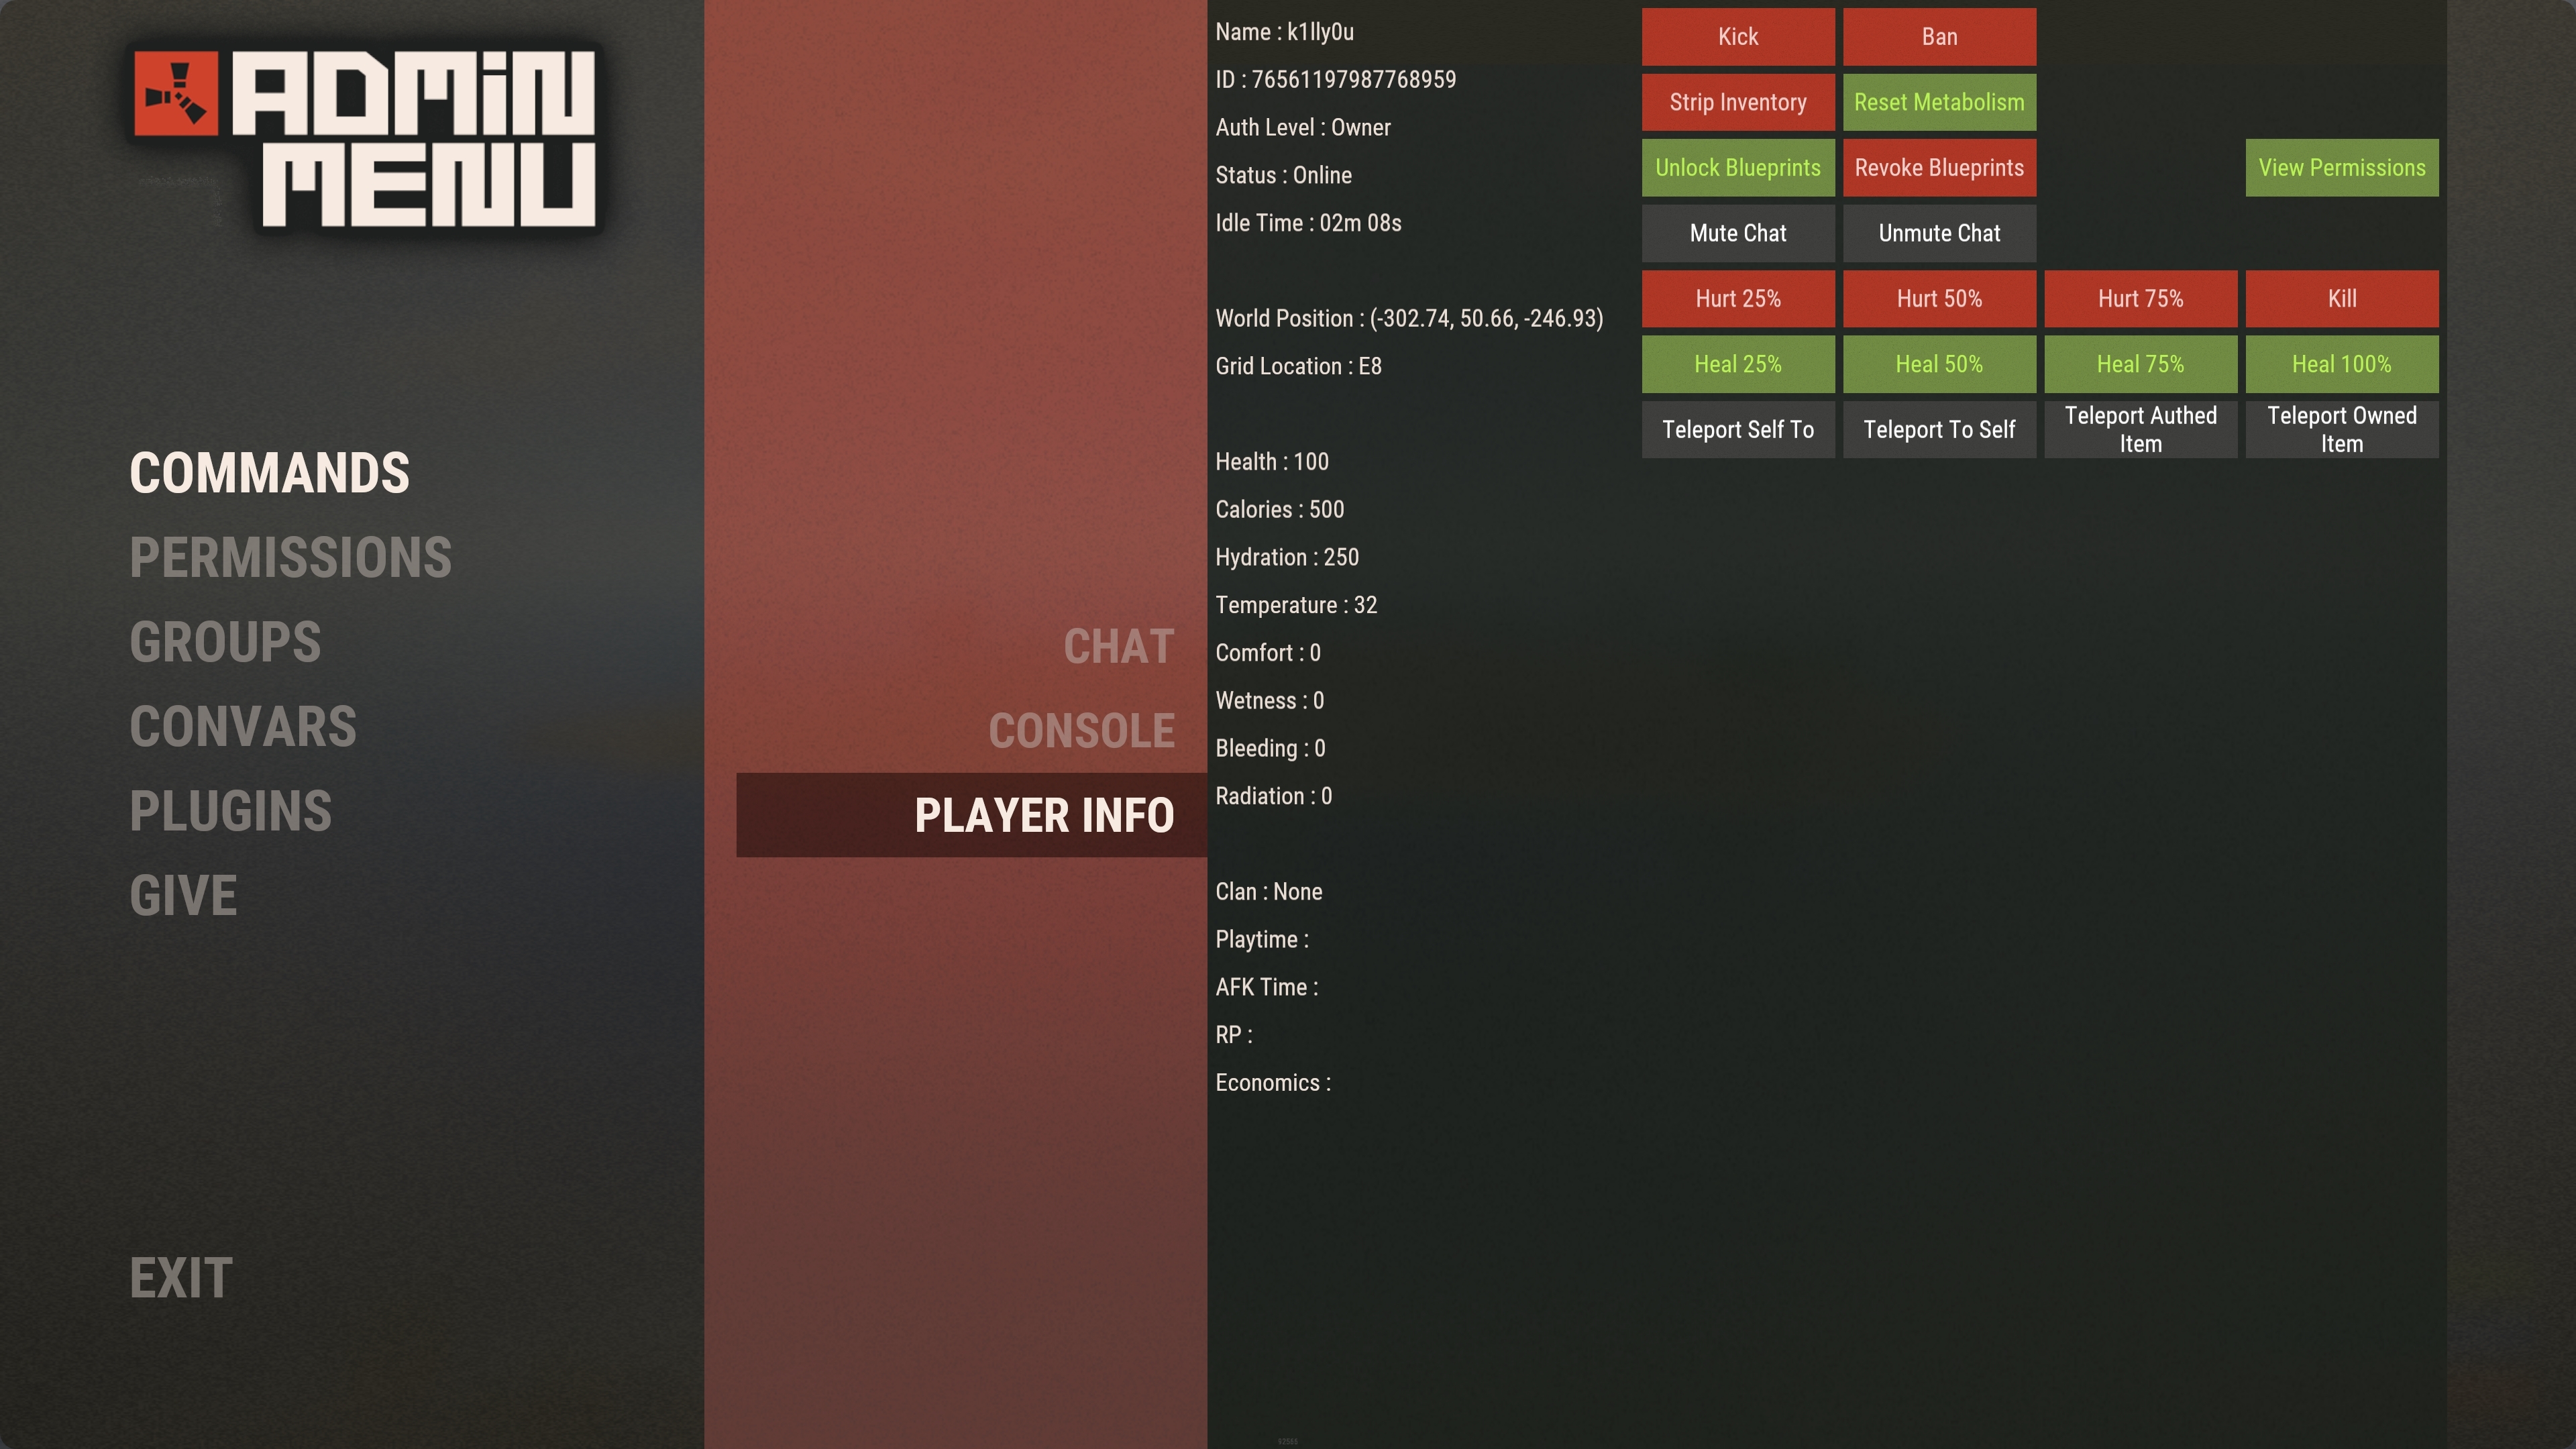
The player info menu allows you to view current information about any player, and perform a number of predefined commands/actions on them.
This menu's permission system can optionally be broken down further to restrict user access to the functionality provided
To enable this feature set "Use different permissions for each section of the player administration tab" to true in the config.
The permissions for each element in the player info menu are;
adminmenu.players.kickban
adminmenu.players.mute
adminmenu.players.blueprints
adminmenu.players.hurt
adminmenu.players.heal
adminmenu.players.kill
adminmenu.players.strip
adminmenu.players.teleport
You can also customize this menu with additional commands that you set up in the config.
Each entry in this config is applied to a new row of buttons, and each command in those entries places that button on the next column.
This section of the config specifies a new row of buttons;
Each command consists of a few options;
Example of this in the config. This is 1 row with 2 buttons
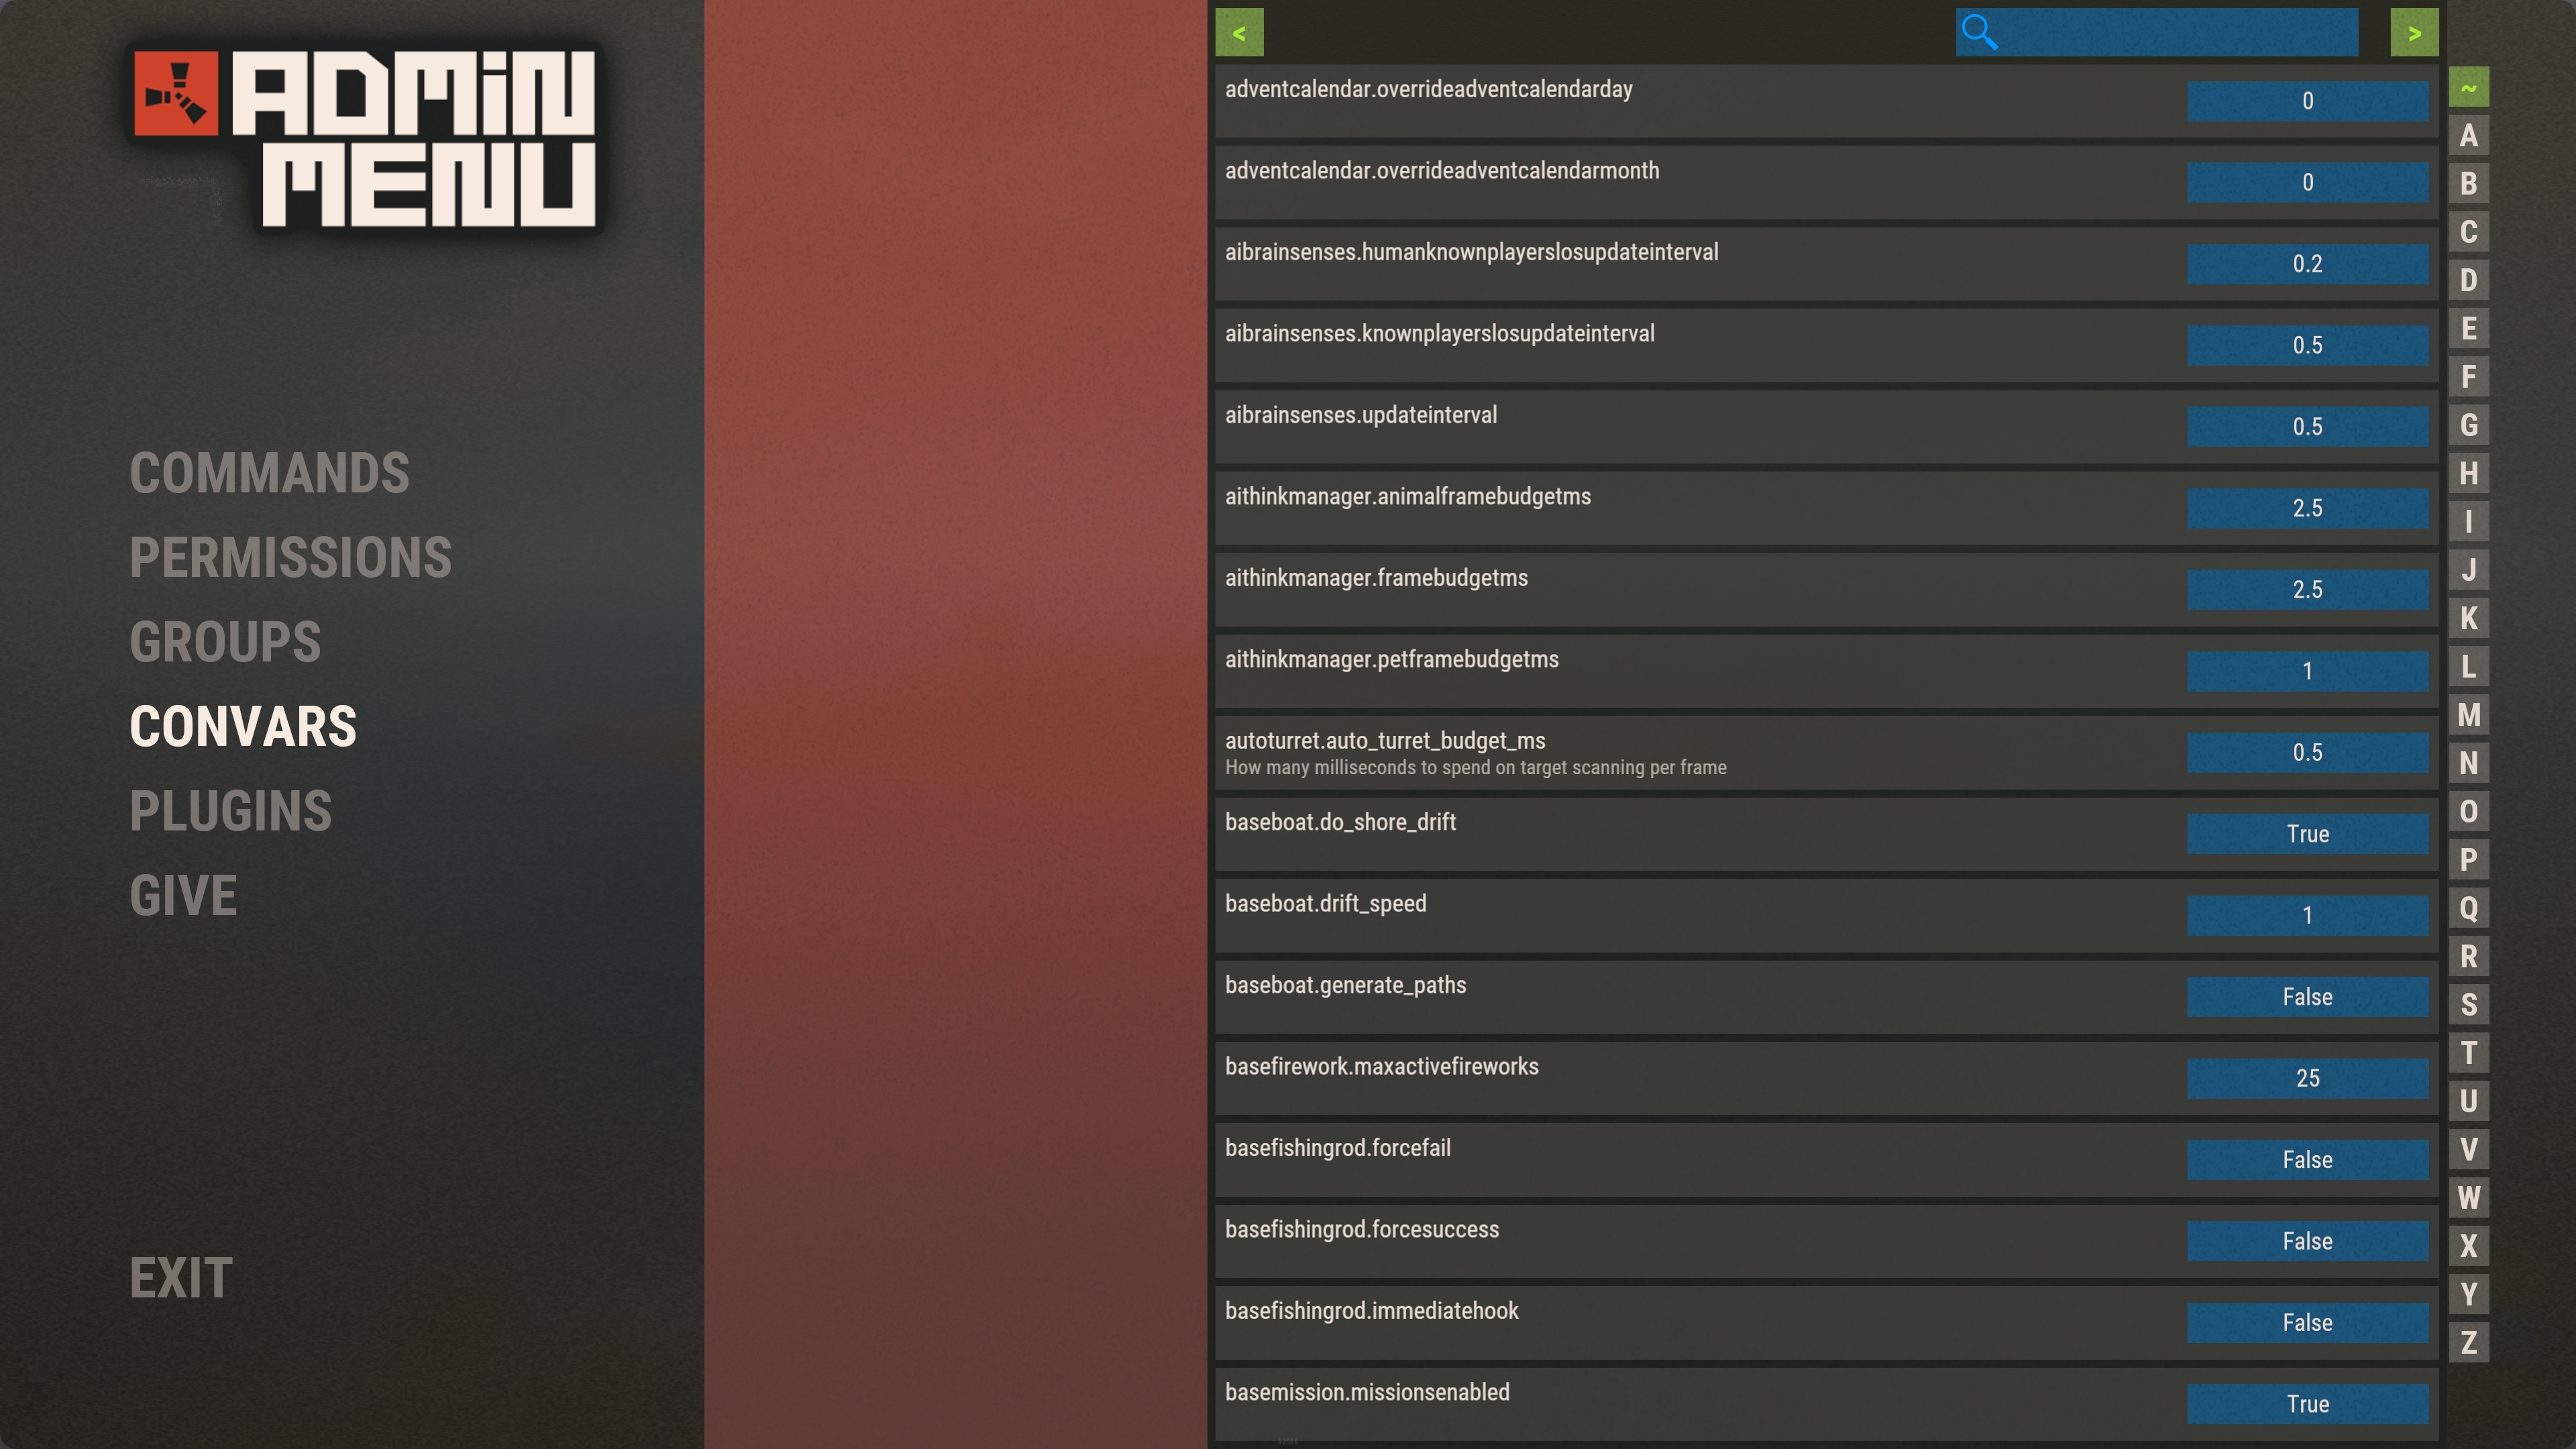
ConVars Menu

(requires permission adminmenu.convars)
The convars menu is a list of all the server variables available. From here you can view, search and edit their current value


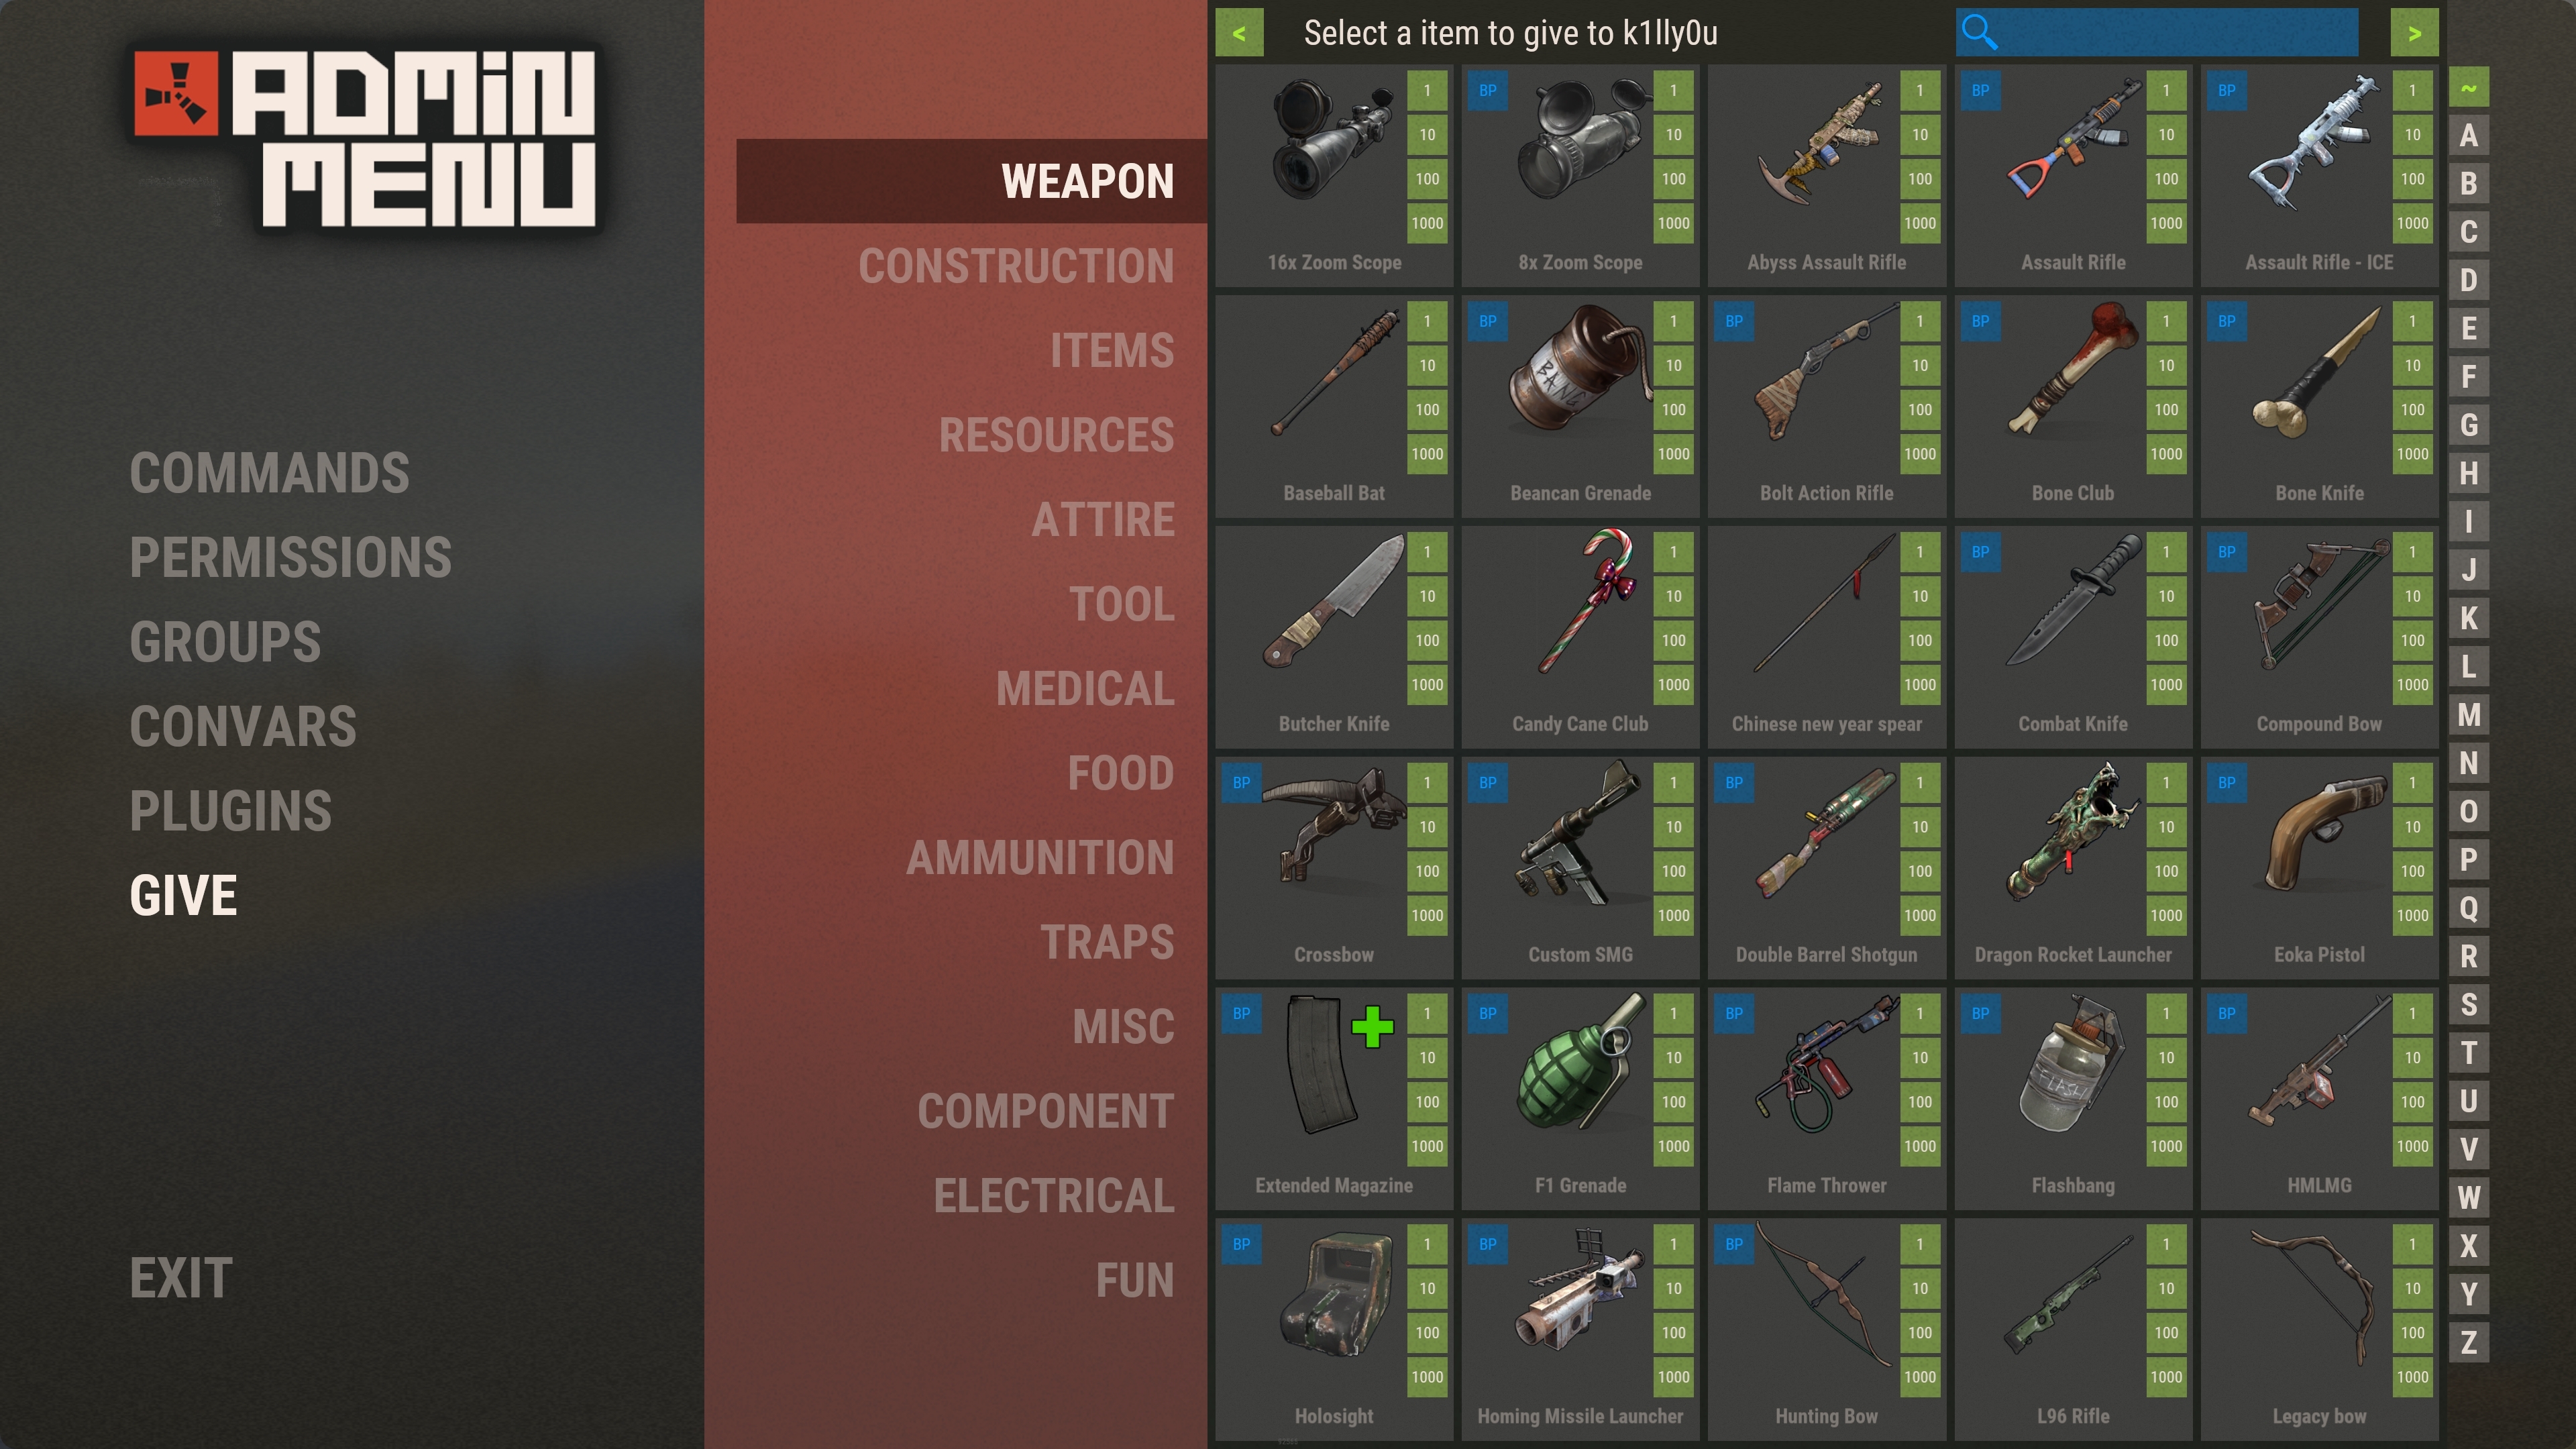
Give Menu (requires permission adminmenu.give)
The give menu allows you to give items to any player
You can restrict this menu to only allow giving items to the user that is using the menu by granting them the permission adminmenu.give.selfonly


Rust styled UI (can be enabled in the config with the "Use alternate UI style" option)


Features
Admin menu is a ingame UI based menu that can be used for;
- Managing permissions for both groups and individual players
- Creating and removing Oxide usergroups
- Clone Oxide usergroups while maintaining its permissions, and optionally clone group members
- View users in usergroups
- Add/remove users from usergroups
- Edit server ConVars
- Easily run chat or console command by the click of a button
- Giving items to players
- All permission based so you can give limited power to your admins
- Search bars and character filters are provided on almost every page for quick access
- Option to log all actions performed to a Discord webhook
Chat Command
/admin - Opens the menu. (Requires permission adminmenu.use)
Permissions
Code:
AdminMenu uses Oxides permission system
To assign a user permission use oxide.grant user "username|steam id" "permission" in console.
To assign a group permission use oxide.grant group "groupname" "permission" in console.
You can read more about how to use the permission system here : uMod - Permissionsadminmenu.permissions - Required to access the permission section
adminmenu.groups - Required to access the groups section
adminmenu.give - Required to access the Give menu
adminmenu.convars - Required to access the Convar menu
adminmenu.players - Required to access the Player Info menu
adminmenu.give.selfonly - Used to restrict the give menu to only allow users to give items to themselves
Commands Menu

(Requires permission adminmenu.use)
The commands menu is used to easily run plugin or server commands.
You can set up chat and console commands that can be run via the menu.
These commands are run as if the user is typing it themselves so any commands will need the relevant permission/authlevel to be run.
** NOTE ** The commands provided in the default config are only an example of how to set them up. It is up to you to customize this to suit your own needs
There are currently 4 variables you can put into the commands to make them target specific. They are;
Code:
{target1_name}
{target2_name}
{target1_id}
{target2_id}
By using the variable "{target1_name}" or "{target1_id}" in a command will trigger the player selection menu allowing you to select a target player for the command.
By using the variable {target2_name}" or "{target2_id}" in a command will trigger a second player selection menu allowing you to select a additional target player for the command.
The name variables will be replaced with the targets display name, and in-turn the ID variables will be replaced with the targets user ID.
An example of usage for 2 target players:
Teleporting Player1 to Player2 using the /tp command.
Code:
"/tp {target1_name} {target2_name}"
An example of usage for 1 player:
Teleporting to the target player using the /tp command.
Code:
"/tp {target1_name}"
An example of a command that does not require any targets:
Toggling god mode on yourself.
Code:
"/god"
I am happy to expand upon this with additional variables if you can think of any alternative use-cases
Permissions Menu


(Requires permission adminmenu.permissions)
The are 3 categories in the permissions menu.
View - This is just a list of all currently registered permissions
Player Permissions - This will open a player selection menu, once you have selected a player it will display all currently available permissions, with permissions that the player has being highlighted in green. You can then toggle permissions for the selected player by clicking the permission button.
Group Permissions - This will open a group selection menu, once you have selected a group it will display all currently available permissions, with permissions that the group has being highlighted in green. You can then toggle permissions for the selected group by clicking the permission button.
Groups Menu


(Requires permission adminmenu.groups)
There are 4 categories in the groups menu.
List - This is a list of all groups, from here you can clone and delete usergroups
Create Group - This menu is used to create new groups. It has 3 input boxes (Name, Title and Rank). Upon filling in a box you must hit "ENTER" to register your input.
At the very least you need to specify a group name to create a new group.
Once you have filled in the details you can press the "Create" button to create the new group.
User Groups - This menu allows you to select a player and view all the usergroups they are in. You can also toggle the users groups
Group Users - This menu allows you to select a user group and view all the players in it. You can also remove users from the selected group
User Groups - This will open a player selection menu, once you have selected a player it will display all available groups, with groups that the player is in being highlighted in green. You can then toggle groups for the selected player by clicking the group button
Player Info Menu

(Requires permission adminmenu.players)
The player info menu allows you to view current information about any player, and perform a number of predefined commands/actions on them.
This menu's permission system can optionally be broken down further to restrict user access to the functionality provided
To enable this feature set "Use different permissions for each section of the player administration tab" to true in the config.
The permissions for each element in the player info menu are;
adminmenu.players.kickban
adminmenu.players.mute
adminmenu.players.blueprints
adminmenu.players.hurt
adminmenu.players.heal
adminmenu.players.kill
adminmenu.players.strip
adminmenu.players.teleport
You can also customize this menu with additional commands that you set up in the config.
Each entry in this config is applied to a new row of buttons, and each command in those entries places that button on the next column.
This section of the config specifies a new row of buttons;
Code:
"Name": "Freeze", - This name is only for you benefit when editing the config. This name is not used in the plugin

"Commands" - This is the list of buttons to place on this row
Code:
"RequiredPlugin" - If this field has a value the button will only appear in the menu if this plugin is present. If this field is empty there will be no check for the plugin. This name should be the file name of the plugin, the same name used when typing "o.reload xxx"

"RequiredPermission" - This is the permission the user needs to be able to run this command. You can set it to the required permission of the plugin you are targeting, or you can create your own permission prefixed with "adminmenu." which will register that new permission.
ex. "adminmenu.usefreeze"

"Command Type ( Chat, Console )" - Dictates whether this is a chat or console command

"Name" - This is what will be shown on the button

"Command" - This is the command that will be run. If it is a chat command make sure it starts with a slash. Commands here have the same arguments as the commands menu (see above)

"Description" - Is not used (only there due to class inheritance)

"CloseOnRun" - Closes the menu after running the command
JSON:
{
      "Name": "Freeze",
      "Commands": [
        {
          "RequiredPlugin": "Freeze",
          "RequiredPermission": "freeze.use",
          "Command Type ( Chat, Console )": "Chat",
          "Name": "Freeze",
          "Command": "/freeze {target1_id}",
          "Description": null,
          "CloseOnRun": false
        },
        {
          "RequiredPlugin": "Freeze",
          "RequiredPermission": "freeze.use",
          "Command Type ( Chat, Console )": "Chat",
          "Name": "Unfreeze",
          "Command": "/unfreeze {target1_id}",
          "Description": null,
          "CloseOnRun": false
        }
      ]
    }
ConVars Menu

(requires permission adminmenu.convars)
The convars menu is a list of all the server variables available. From here you can view, search and edit their current value


Give Menu (requires permission adminmenu.give)
The give menu allows you to give items to any player
You can restrict this menu to only allow giving items to the user that is using the menu by granting them the permission adminmenu.give.selfonly
JSON:
{
  "Chat Command List": [
    {
      "Name": "These are examples",
      "Command": "/example",
      "Description": "To show how to create your own",
      "CloseOnRun": false,
      "RequiredPermission": "adminmenu.example"
    },
    {
      "Name": "TP to 0 0 0",
      "Command": "/tp 0 0 0",
      "Description": "Teleport self to 0 0 0",
      "CloseOnRun": false,
      "RequiredPermission": "adminmenu.tp000"
    },
    {
      "Name": "TP to player",
      "Command": "/tp {target1_name}",
      "Description": "Teleport self to player",
      "CloseOnRun": false,
      "RequiredPermission": ""
    },
    {
      "Name": "TP P2P",
      "Command": "/tp {target1_name} {target2_name}",
      "Description": "Teleport player to player",
      "CloseOnRun": false,
      "RequiredPermission": ""
    },
    {
      "Name": "God",
      "Command": "/god",
      "Description": "Toggle god mode",
      "CloseOnRun": false,
      "RequiredPermission": ""
    }
  ],
  "Console Command List": [
    {
      "Name": "These are examples",
      "Command": "example",
      "Description": "To show how to create your own",
      "CloseOnRun": false,
      "RequiredPermission": ""
    },
    {
      "Name": "Set time to 9",
      "Command": "env.time 9",
      "Description": "Set the time to 9am",
      "CloseOnRun": false,
      "RequiredPermission": ""
    },
    {
      "Name": "Set to to 22",
      "Command": "env.time 22",
      "Description": "Set the time to 10pm",
      "CloseOnRun": false,
      "RequiredPermission": ""
    },
    {
      "Name": "TP P2P",
      "Command": "teleport.topos {target1_name} {target2_name}",
      "Description": "Teleport player to player",
      "CloseOnRun": false,
      "RequiredPermission": ""
    },
    {
      "Name": "Call random strike",
      "Command": "airstrike strike random",
      "Description": "Call a random Airstrike",
      "CloseOnRun": false,
      "RequiredPermission": ""
    }
  ],
  "Player Info Custom Commands": [
    {
      "Name": "Backpacks",
      "Commands": [
        {
          "RequiredPlugin": "Backpacks",
          "Command Type ( Chat, Console )": "Chat",
          "Name": "View Backpack",
          "Command": "/viewbackpack {target1_id}",
          "Description": null,
          "CloseOnRun": true,
          "RequiredPermission": "backpacks.admin"
        }
      ]
    },
    {
      "Name": "InventoryViewer",
      "Commands": [
        {
          "RequiredPlugin": "InventoryViewer",
          "Command Type ( Chat, Console )": "Chat",
          "Name": "View Inventory",
          "Command": "/viewinv {target1_id}",
          "Description": null,
          "CloseOnRun": true,
          "RequiredPermission": "inventoryviewer.allowed"
        }
      ]
    },
    {
      "Name": "Freeze",
      "Commands": [
        {
          "RequiredPlugin": "Freeze",
          "Command Type ( Chat, Console )": "Chat",
          "Name": "Freeze",
          "Command": "/freeze {target1_id}",
          "Description": null,
          "CloseOnRun": false,
          "RequiredPermission": "freeze.use"
        },
        {
          "RequiredPlugin": "Freeze",
          "Command Type ( Chat, Console )": "Chat",
          "Name": "Unfreeze",
          "Command": "/unfreeze {target1_id}",
          "Description": null,
          "CloseOnRun": false,
          "RequiredPermission": "freeze.use"
        }
      ]
    }
  ],
  "Use different permissions for each section of the player administration tab": false,
  "Log menu actions to Discord webhook (webhook URL)": "",
  "Recent players purge time (days)": 7,
  "Version": {
    "Major": 2,
    "Minor": 0,
    "Patch": 19
  }
}
